Update SAML Configuration
In case SAML is configured as your IdP it needs to be reconfigured after updating TrendMiner. The following is a step-by-step guide for both Azure AD and OKTA.
Tip
This page only applies to customers who upgraded from 2021.R3.0 and already had a SAML IdP configured before the upgrade. To enable SAML for the first time, check our installation guide.
Important
Users will not be able to log in via SAML after the upgrade as long as this configuration update is not applied.
Azure AD
As a first step user and security claims need to be setup correctly. With this configuration Azure AD will return the correct Subject in the response for use in TrendMiner.
Configure user attributes & claims:
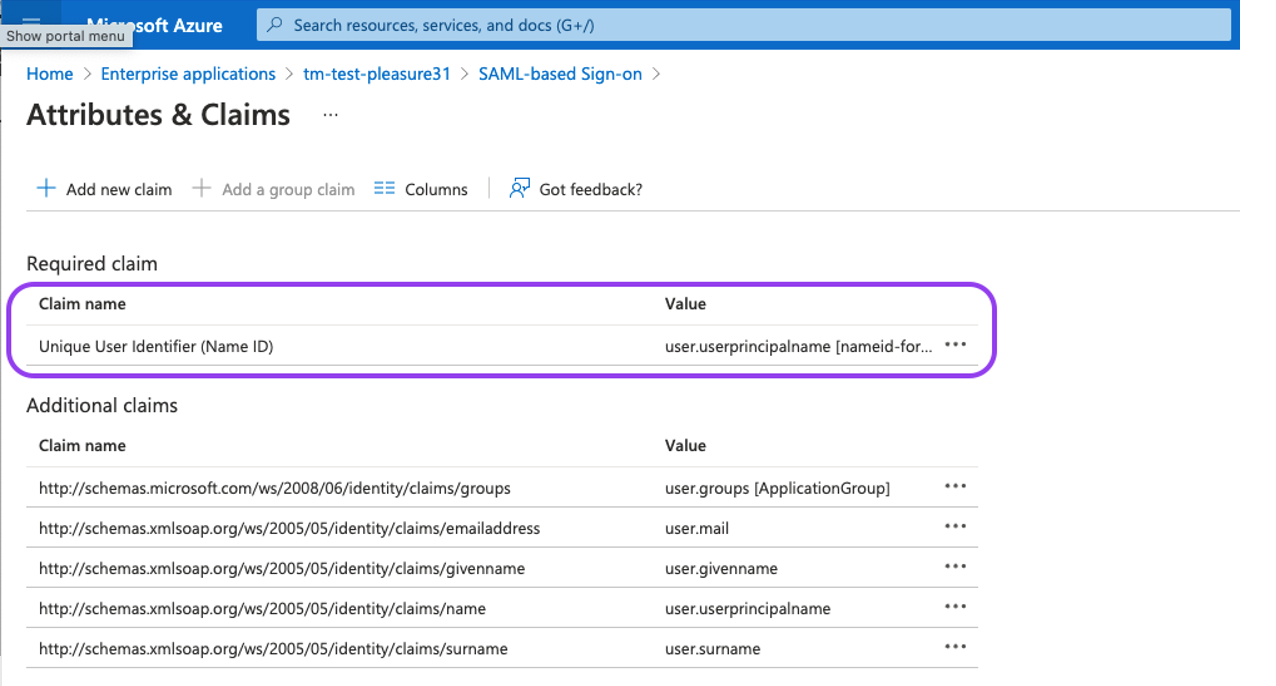
Click the "Edit"-button under "User Attributes & Claims"
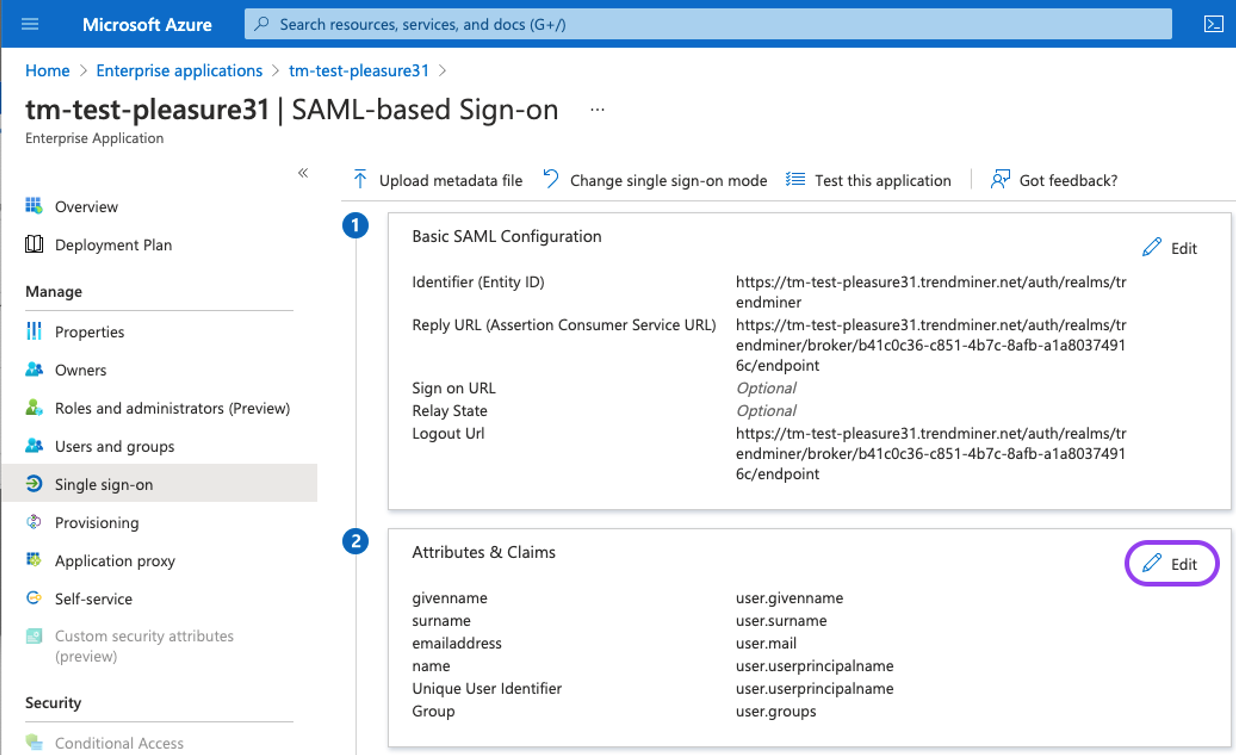
Click on the "Unique User Identifier (Name ID)" option.
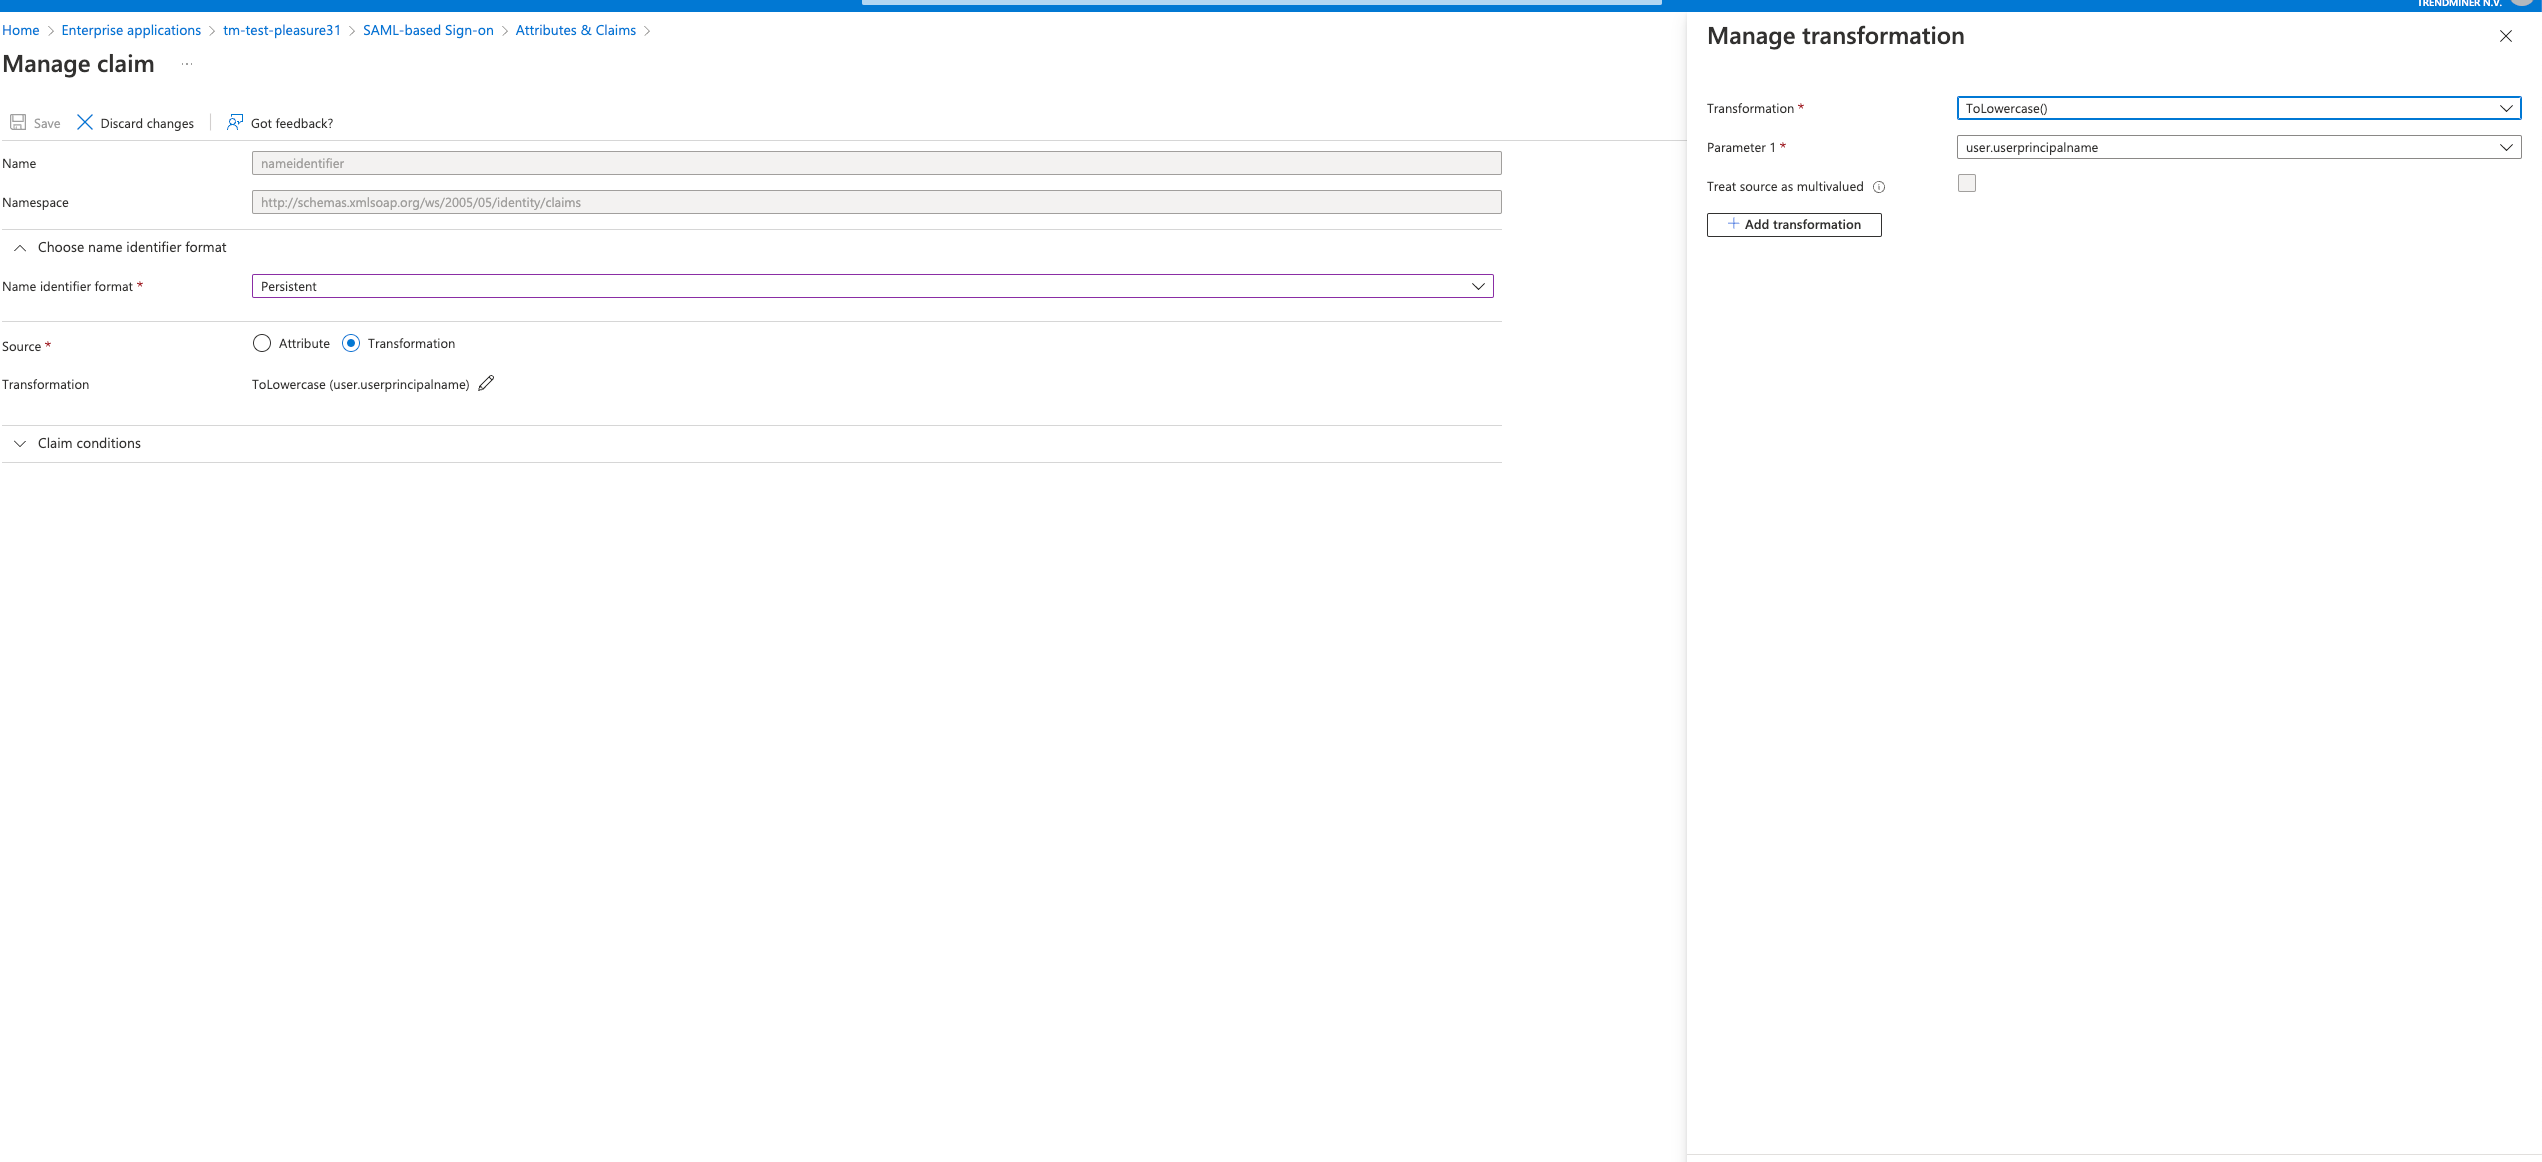
Migration logic will try to autodetect the correct nameIdPolicy format, that you specified in SAML. It defaults to the ‘PERSISTENT’ type in case it could not detect the format for some reason. Note that the source attribute "user.userprincipalname" refers to the email in Azure. Under "Source" select ''Transformation" and add the "ToLowercase()" transformation for the "user.userprincipalname" as shown in the screenshot below.
Note
If you are not using the email addresses as usernames in TrendMiner, select the source attribute which matches the username format in TrendMiner.
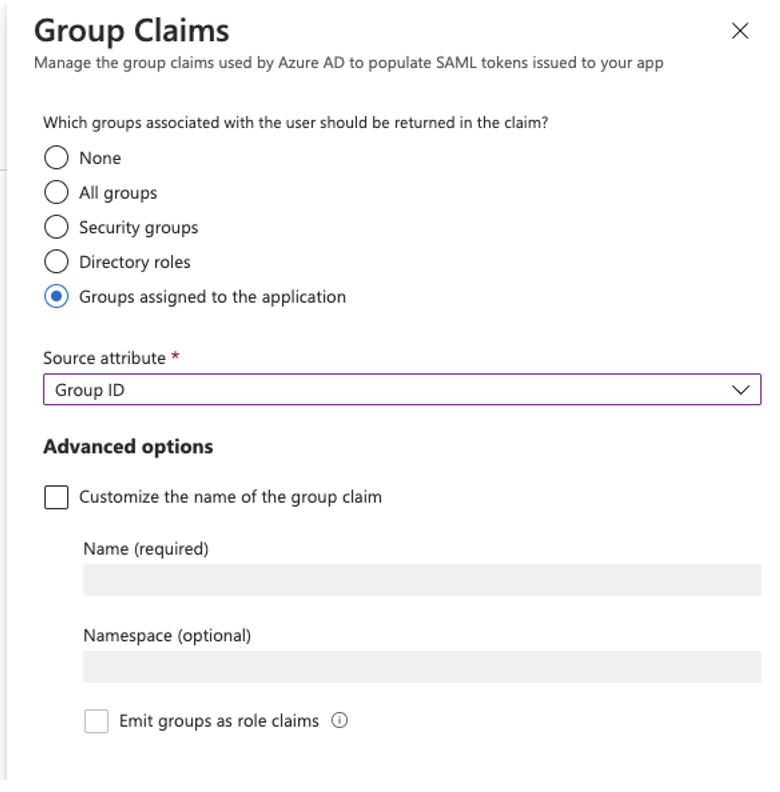
Configure groups:
Click the "Edit"-button under "User Attributes & Claims"
Click the "Add a group claim"-option.
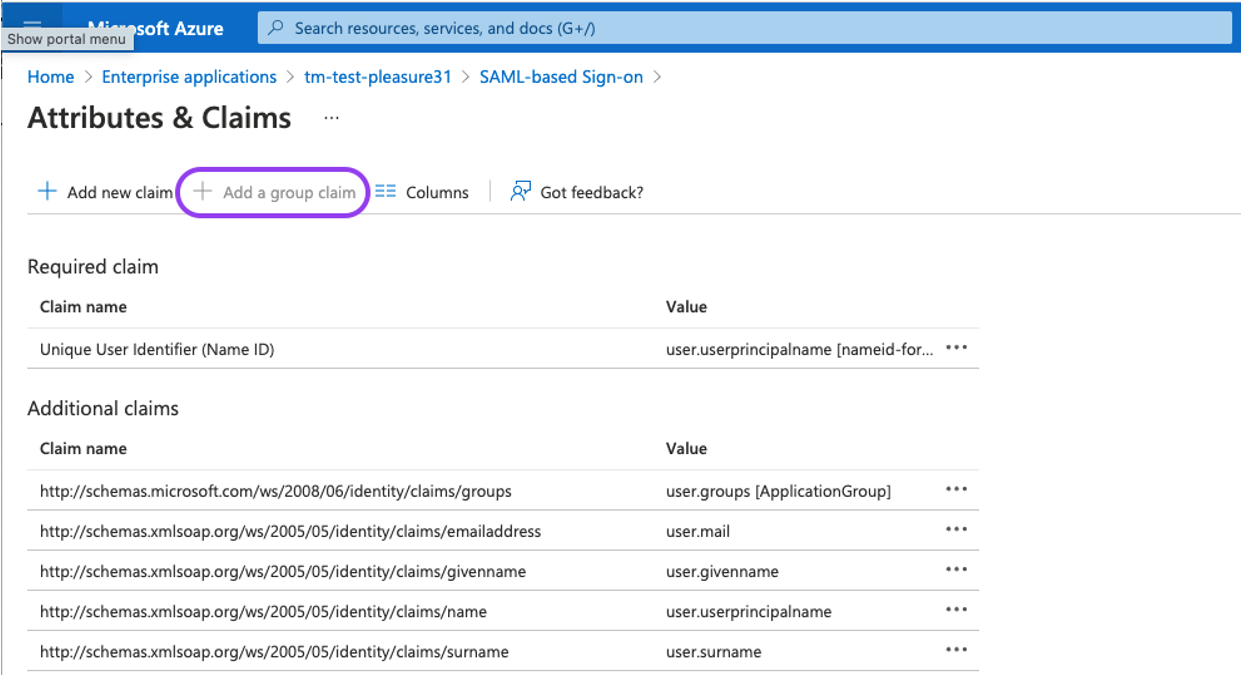
Set the Group Claims as shown on the screenshot below:
Associated: Groups assigned to the application.
Source attribute: Group ID
Note
In this release TrendMiner does not support syncing the group names yet so groups will be shown in ConfigHub by their ID.
After setting up the initial application in AZURE you can continue in TrendMiner's ConfigHub. Via ConfigHub you can see an overview of the existing Identity Providers.
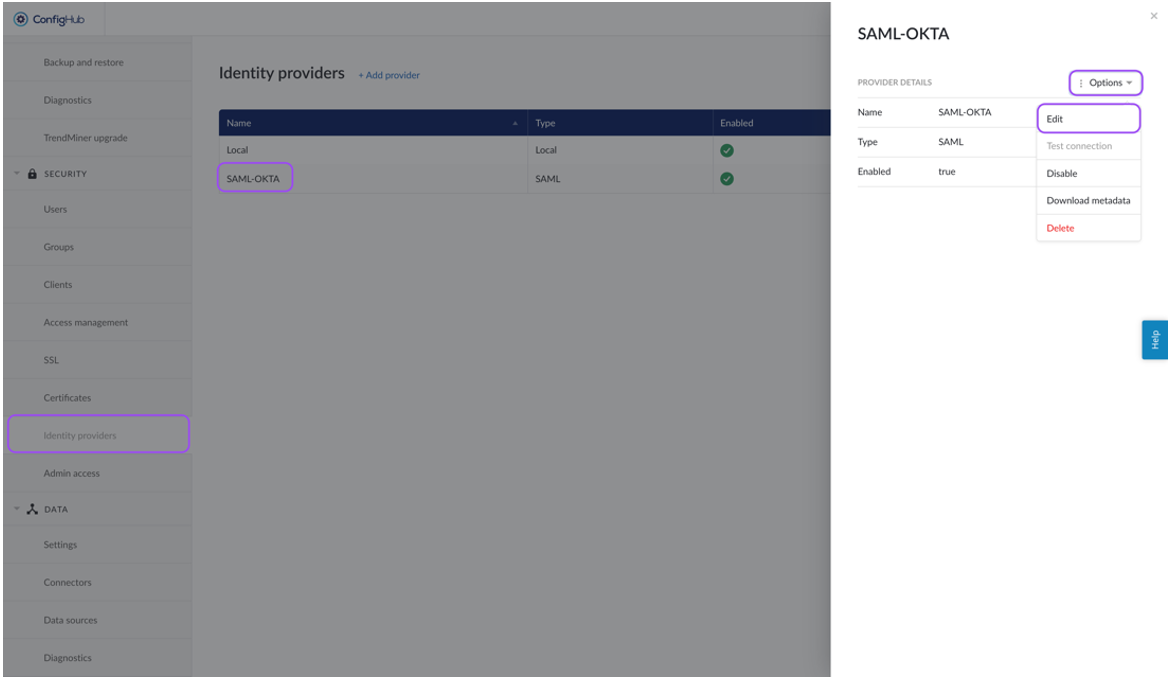
Configure TrendMiner ConfigHub:
Navigate to TrendMiner's ConfigHub and open the "Identity Providers" tab in the "Security" section.
Select your identity provider. A side-panel should open where you can edit your IdP settings (actions > edit).
Enable the Attributes mapping and fill out the fields. The values you need to fill in for the attribute mapping can be found in Azure under 'Attributes & Claims'.
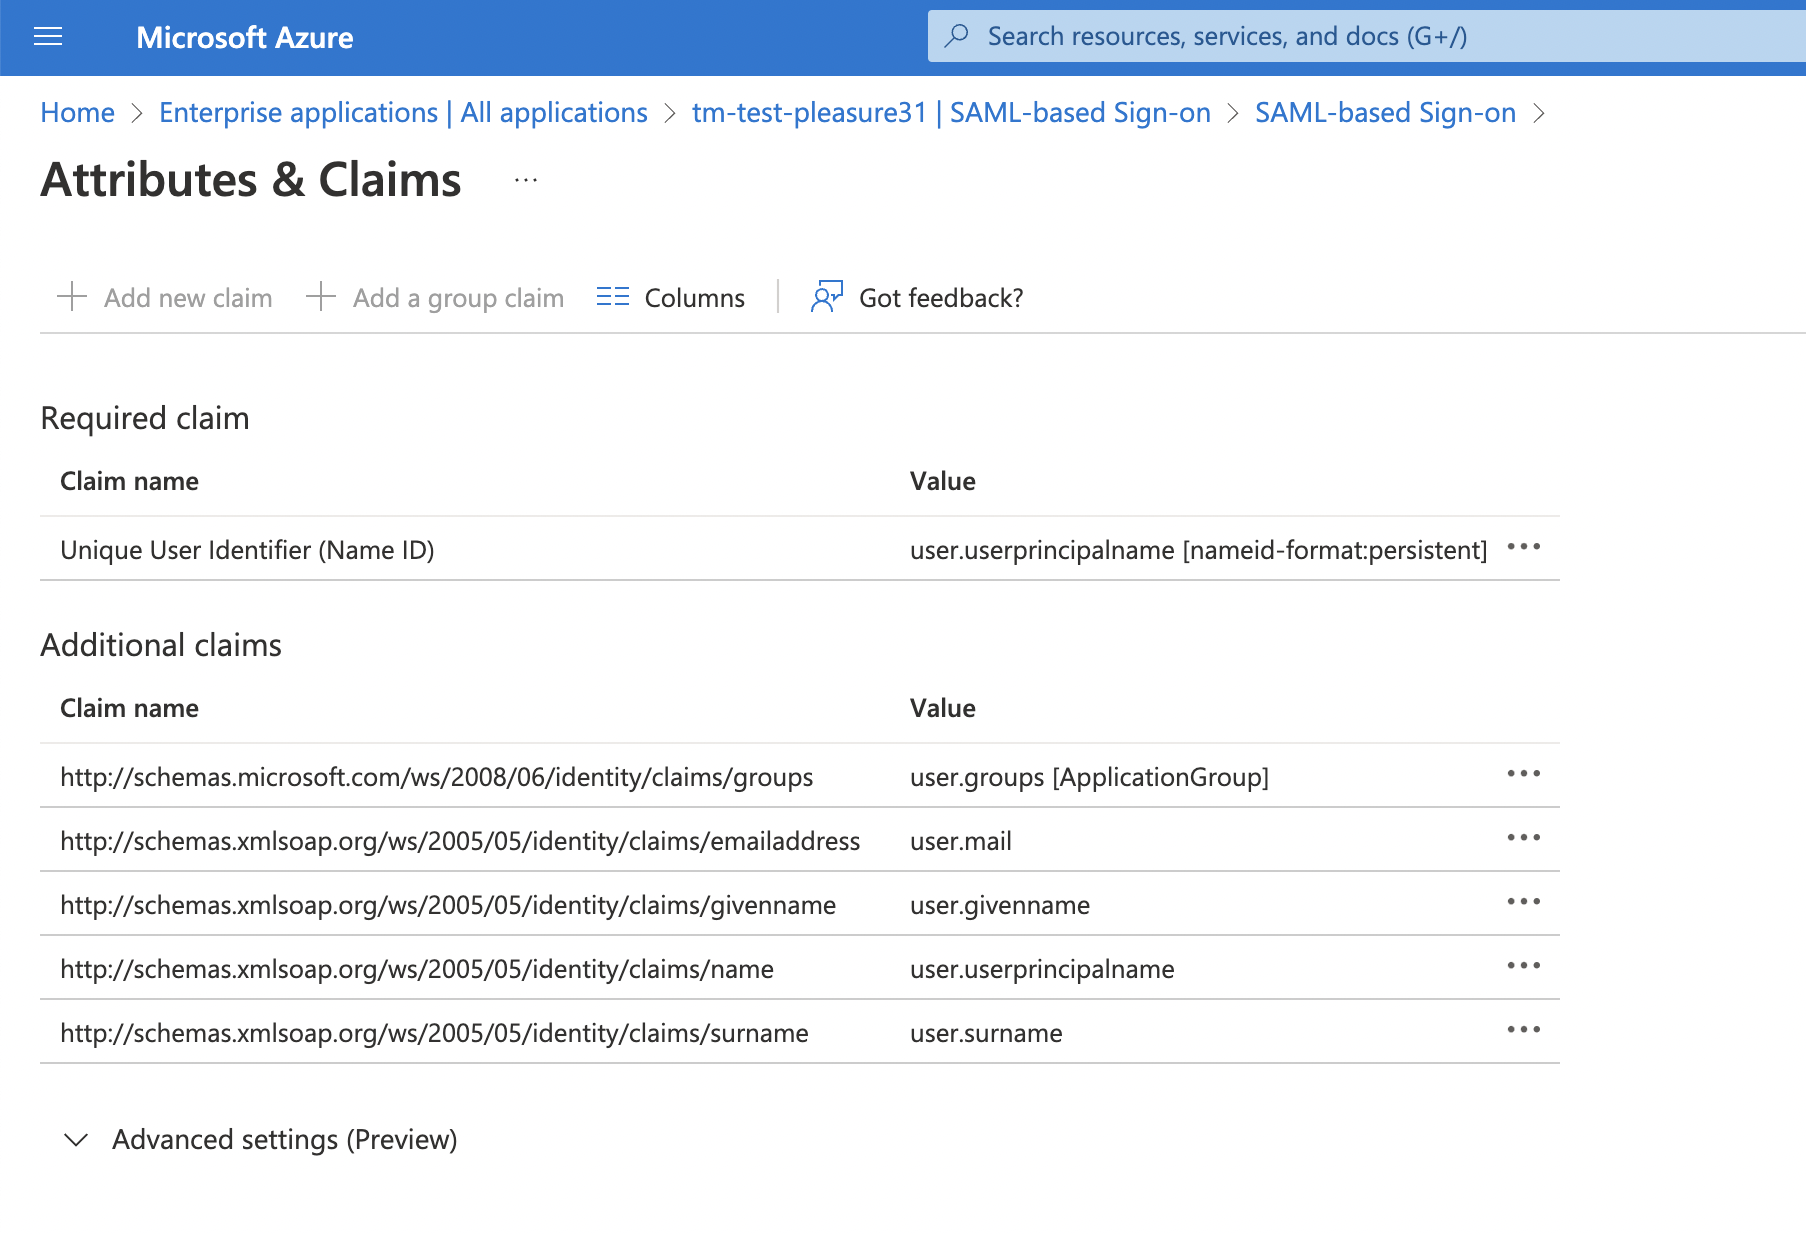
First name: extract first name out of assertions. e.g.:
'http://schemas.xmlsoap.org/ws/2005/05/identity/claims/givenname'
Last name: extract last name out of assertions. e.g.:
'http://schemas.xmlsoap.org/ws/2005/05/identity/claims/surname'
email: extract e-mail out of assertions. e.g.:
'http://schemas.xmlsoap.org/ws/2005/05/identity/claims/emailaddress'
Group: extract groups out of assertions. e.g.:
'http://schemas.microsoft.com/ws/2008/06/identity/claims/groups'
Separator: parse group value out of group assertion. Used when all groups are available in one Attribute Value tag. Default is 'none'

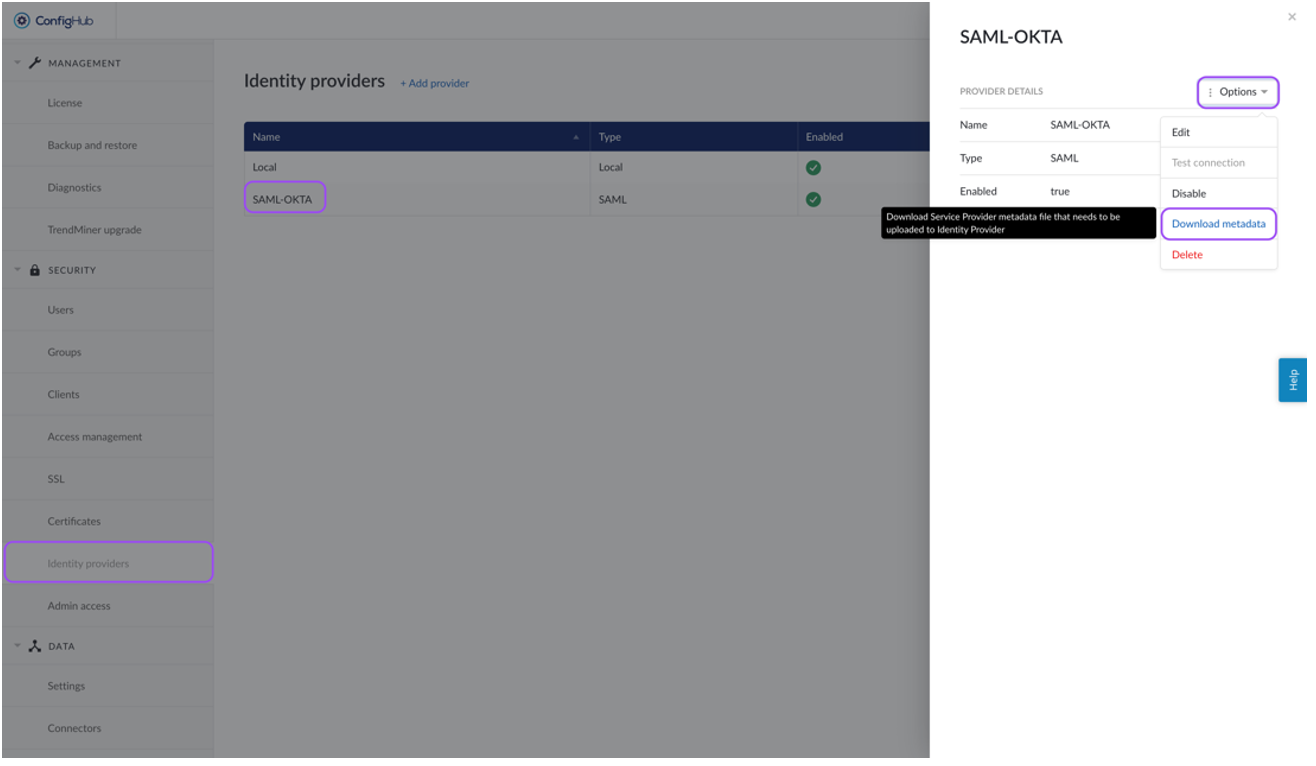
Download the metadata from TrendMiner:
Navigate to TrendMiner's ConfigHub and open the "Identity Providers" tab in the "Security" section.
Select your identity provider. A side-panel should open where you can download the metadata (actions > download metadata).
Update metadata of the identity Provider:
Navigate in Azure AD to your SAML application and open the "Single sign-on"-tab.
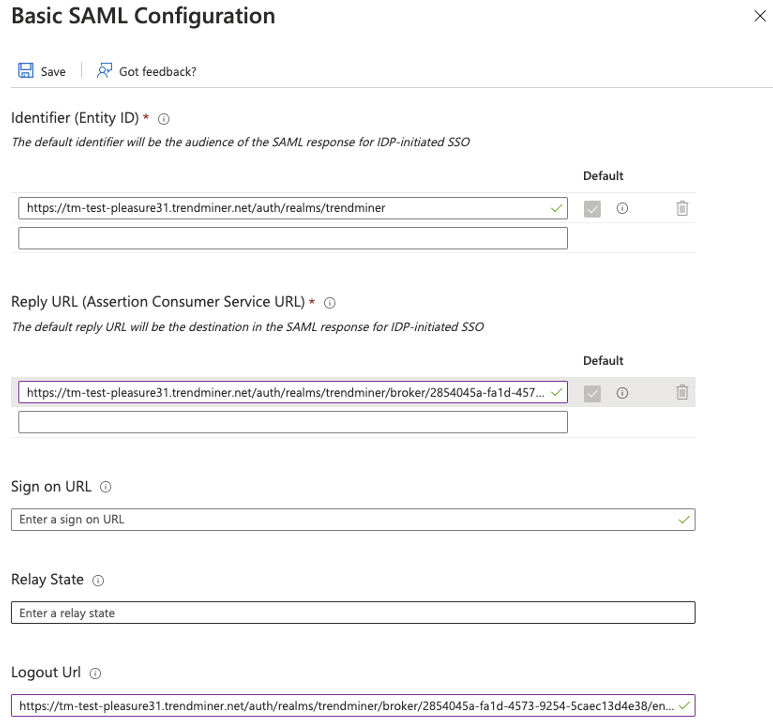
Click the "Upload metadata file" and upload the TrendMiner metadata file. The values in 'Identifier (Entity ID)' and 'Reply URL (Assertion Consumer Service URL)' will be updated with the values read from the metadata file.
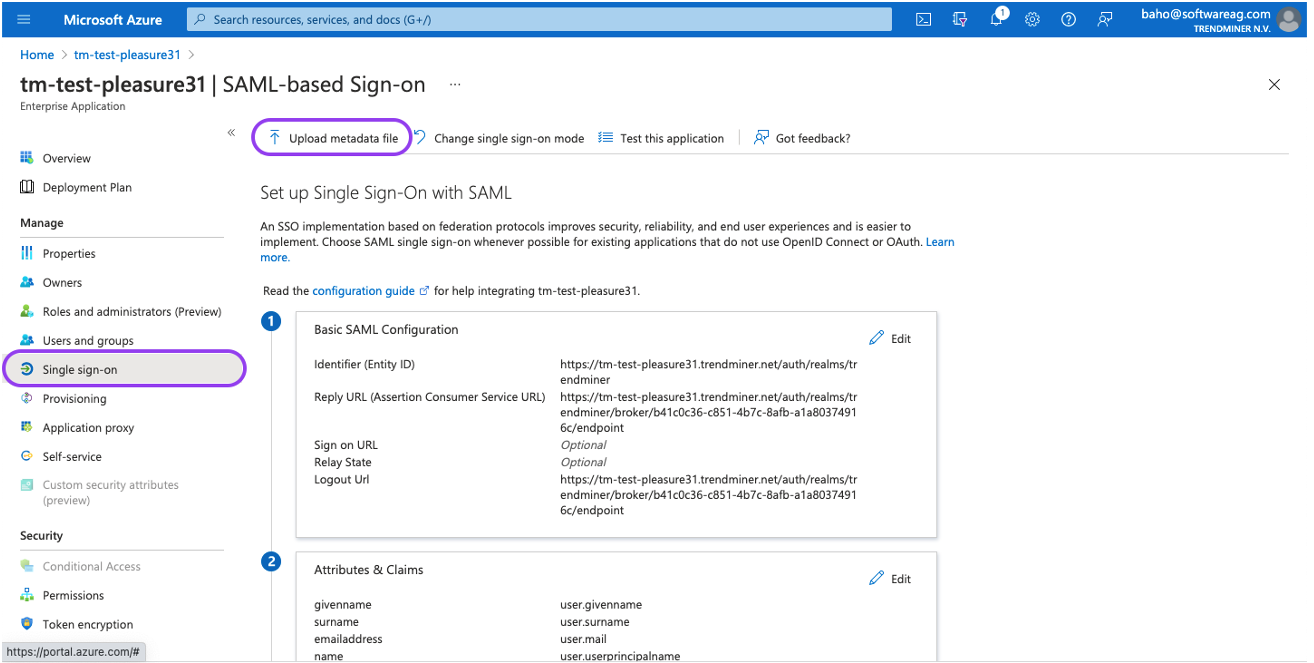
It can happen that the metadata file is not processed correctly. In case the 'Logout Url (Optional)' field is filled in and the 'Reply URL (Assertion Consumer Service URL)' field is empty, copy the logout url value to the reply url field and save your changes.
The SAML setup is complete and you should be able to login to TrendMiner. After logging in with a SAML user in TrendMiner the assigned groups should be synced and ACLs can be configured.
OKTA
As a first step the user and security claims need to be setup correctly. With this configuration OKTA will return the correct Subject in the response for use in TrendMiner.
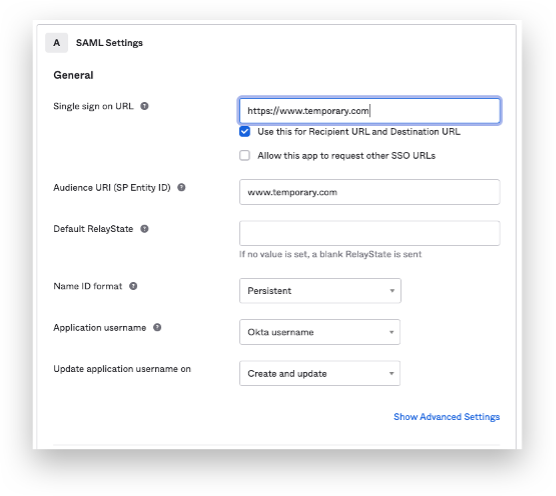
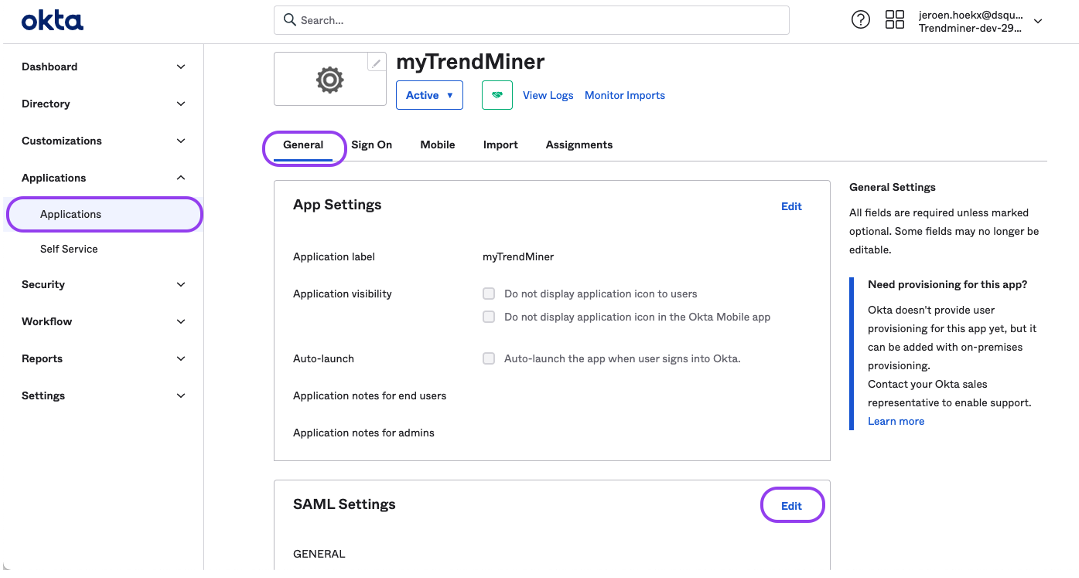
Navigate in OKTA to your application and open the "General"-tab.
Click "edit" for the SAML settings and proceed to step 2 "Configure SAML"
Fill out the details for the SAML settings and click on next when finished.
Application username: OKTA username
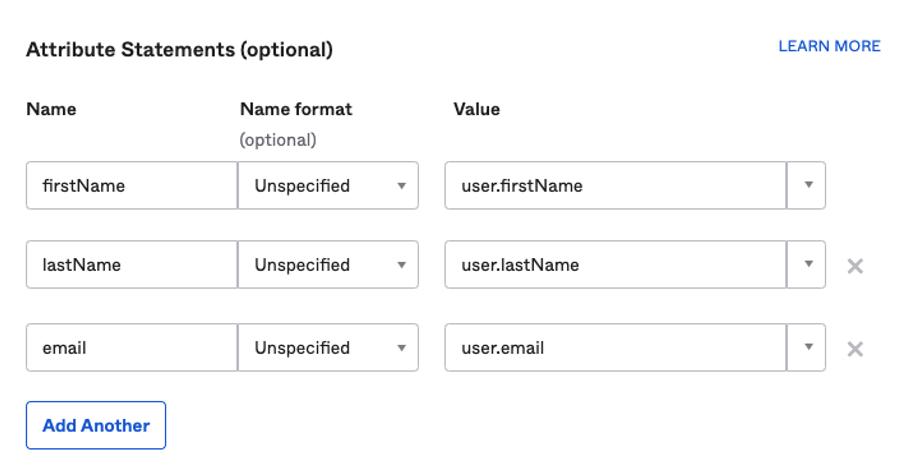
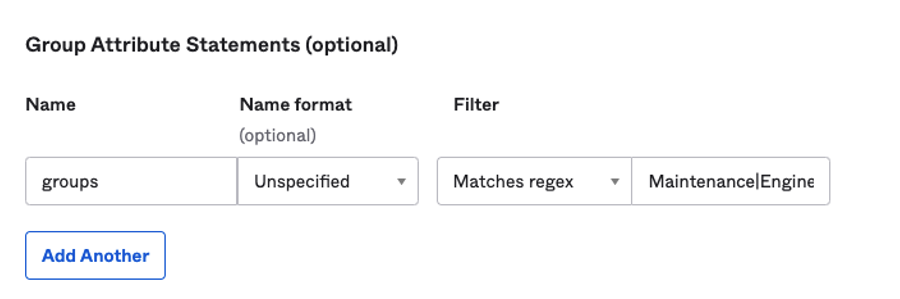
Make sure that the following Attribute statements are set:
firstName / unspecified / user.firstName
lastName / unspecified / user.lastName
email / unspecified / user.email
Make sure that a Group statements is present:
After setting up the initial application in OKTA you can continue in TrendMiner's ConfigHub. Via ConfigHub you can see an overview of the existing Identity Providers.
Configure TrendMiner ConfigHub:
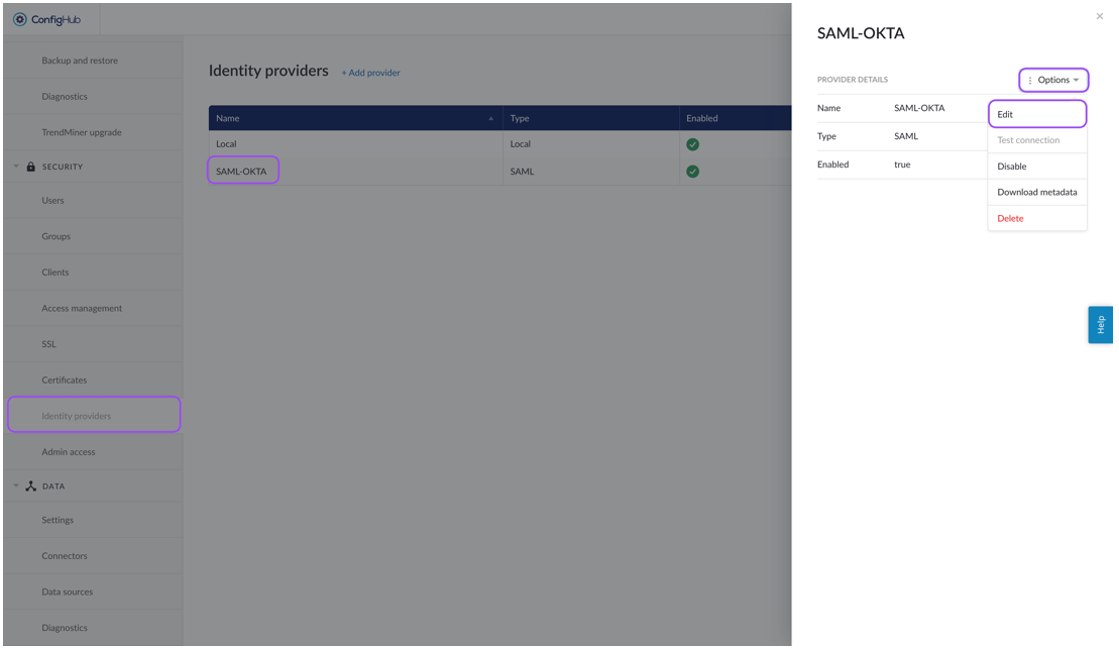
Navigate to TrendMiner's ConfigHub and open the "Identity Providers" tab in the "Security" section.
Select your identity provider. A side-panel should open where you can edit your IdP settings (actions > edit).
You can edit the main provider details:
Name: Display name in ConfigHub and used as root group. Does not relate to any technical SAML details.
Base Domain: Used in URLs of the SP metadata file. Eg: where the IDP has to redirect after identification.
NameID Policy Format: A dropdown to select the policy format as being used by the customer SAML provider (f.ex. Azure, Okta). Possible values are: Persistent, Transient, Email, Kerberos, X.509 Subject Name, Windows Domain Qualified Name, Unspecified
Principal Type: A dropdown to select the principal type as being used by the customer SAML provider (f.ex. Azure, Okta). Possible values are: Subject name ID, Attribute name, Attribute friendly name
Principal Attribute: In case attribute name or attribute friendly name was selected as an option from the Principal Type dropdown a extra input field will become visible to allow to enter the name of the specific attribute to be used
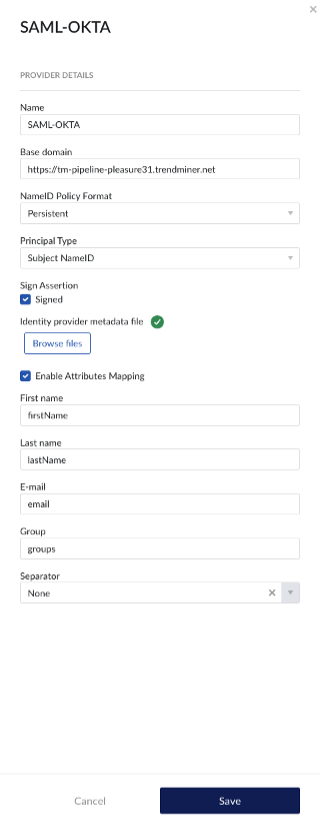
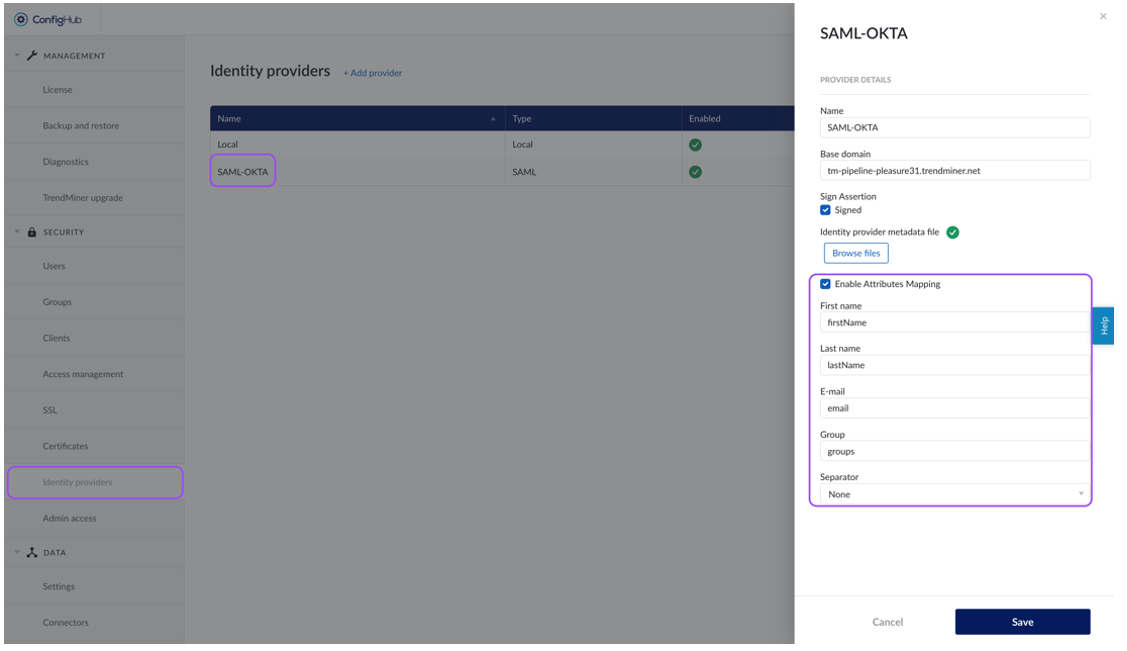
Enable the Attributes mapping and fill out the fields.
First name: extract first name out of assertions. e.g.: firstName
Last name: extract last name out of assertions. e.g.: lastName
E-mail: extract e-mail out of assertions. e.g.: email
Group: extract groups out of assertions. e.g.: groups
Separator: parse group value out of group assertion. Used when all groups are available in one AttributeValue tag. Default is 'none'
Download the metadata from TrendMiner:
Navigate to TrendMiner's ConfigHub and open the "Identity Providers" tab in the "Security" section.
Select your identity provider. A side-panel should open where you can download the metadata (actions > download metadata).

OKTA does not support uploading SP metadata files so some manual extraction is necessary:
Open the metadata file from TrendMiner in a text-editor. The metadata should like this:
<md:EntityDescriptor xmlns:md="urn:oasis:names:tc:SAML:2.0:metadata"
xmlns="urn:oasis:names:tc:SAML:2.0:metadata"
xmlns:ds="http://www.w3.org/2000/09/xmldsig#"

xmlns:saml="urn:oasis:names:tc:SAML:2.0:assertion" ID="ID_3f7843b9-664f-40e7-a536-2fa8893e87b6" entityID="https://trendminer.example.com/auth/realms/trendminer">

<md:SPSSODescriptor AuthnRequestsSigned="false" WantAssertionsSigned="true" protocolSupportEnumeration="urn:oasis:names:tc:SAML:2.0:protocol">

<md:SingleLogoutService Binding="urn:oasis:names:tc:SAML:2.0:bindings:HTTP-POST" Location="https://trendminer.example.com/auth/realms/trendminer/broker/7fc6524e-3d55-4ae2-9edf-3d678e376063/endpoint"/>

<md:NameIDFormat>urn:oasis:names:tc:SAML:1.1:nameid-format:unspecified</md:NameIDFormat>

<md:AssertionConsumerService Binding="urn:oasis:names:tc:SAML:2.0:bindings:HTTP-POST"
Location="https://trendminer.example.com/auth/realms/trendminer/broker/7fc6524e-3d55-4ae2-9edf-3d678e376063/endpoint" index="1" isDefault="true"/>

<md:AttributeConsumingService index="1" isDefault="true">

<md:RequestedAttribute FriendlyName="lastName" Name="lastName" NameFormat="urn:oasis:names:tc:SAML:2.0:attrname-format:basic"/>

<md:RequestedAttribute FriendlyName="email" Name="email" NameFormat="urn:oasis:names:tc:SAML:2.0:attrname-format:basic"/>

<md:RequestedAttribute FriendlyName="firstName" Name="firstName" NameFormat="urn:oasis:names:tc:SAML:2.0:attrname-format:basic"/>

</md:AttributeConsumingService>

</md:SPSSODescriptor>

</md:EntityDescriptor>
Copy the Location value from <md:SingleLogoutService>. In this example this corresponds to: https://trendminer.example.com/auth/realms/trendminer/broker/7fc6524e-3d55-4ae2-9edf-3d678e376063/endpoint
This URL needs to be added in OKTA.
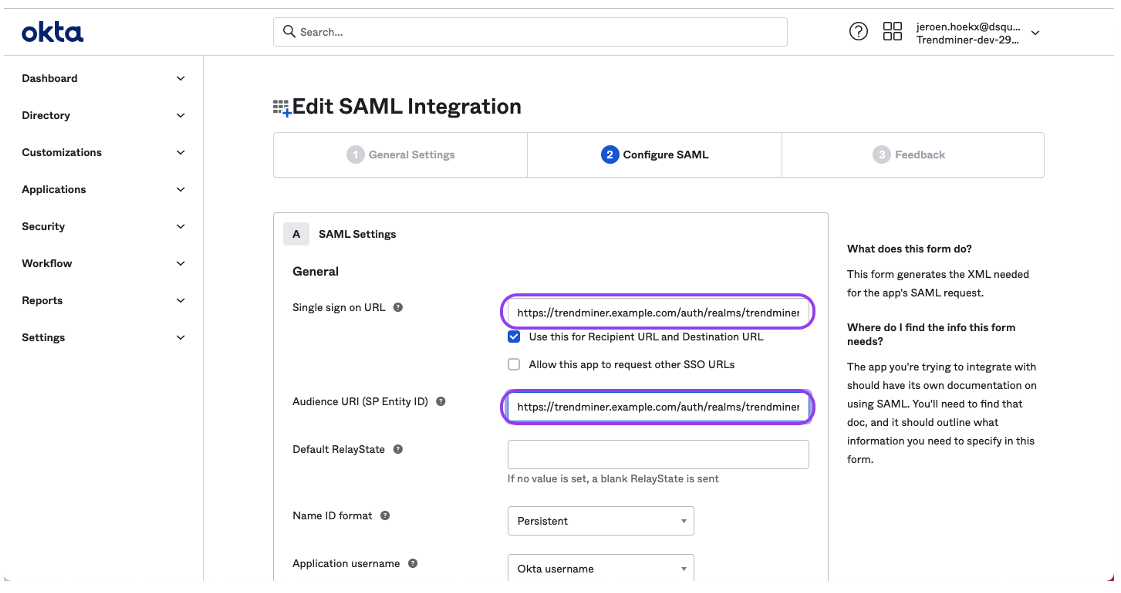
Navigate in OKTA to your application and open the "General"-tab.
Click "edit" for the SAML settings and proceed to step 2 "Configure SAML"
Make sure that the "Single sign on URL" and "Audience URI" are set to the copied URL.
The SAML setup is complete and you should be able to login in TrendMiner. After logging in with a SAML user in TrendMiner the assigned groups should be synced and ACLs can be configured.