ConfigHub
As a TrendMiner administrator or IT expert, the ConfigHub page will be your portal to configure any data connectivity, user management strategy, security settings and more.
Type ‘https://<trendminer_address>/confighub’ in the browser navigation bar to navigate to ConfigHub.
Each user with the 'system administrator' role can log in in ConfigHub. There is 1 hardcoded user with username 'admin' which always has ConfigHub access and which can be used in case all other users have lost their ConfigHub access.
The password of the 'admin' user can be reset in Edge Manager.
Dashboard
Services
System administrators can easily get an overview of all TrendMiner services, including their version and actual health-status. The restart of (unhealthy) services is also supported via the ConfigHub-interface.
| Healthy services are indicated by a green checkmark. | |
| When a service is unhealthy or is restarting a red exclamation mark is shown. | |
| A grey icon means the service is installed but it is not running because the necessary license is missing. This can be an indication that you have installed a full version of TrendMiner (including MLHub) but you have no valid MLHub license. |


Note
To update the health status of services a manual refresh of ConfigHub is necessary. In most browsers, press F5 to try and load the interface again.
Restarting a service will temporarily render it unusable until the restart has completed. This can take up to a few minutes. During this time users can notice errors and interruptions depending on which service is restarted and which functionality they are using.
Note
Restarting tm-config-hub will make ConfigHub unusable until the restart has completed. A manual refresh of the web page and manual log in after the restart is necessary. Please try refreshing the page until the login page is shown again.
Settings
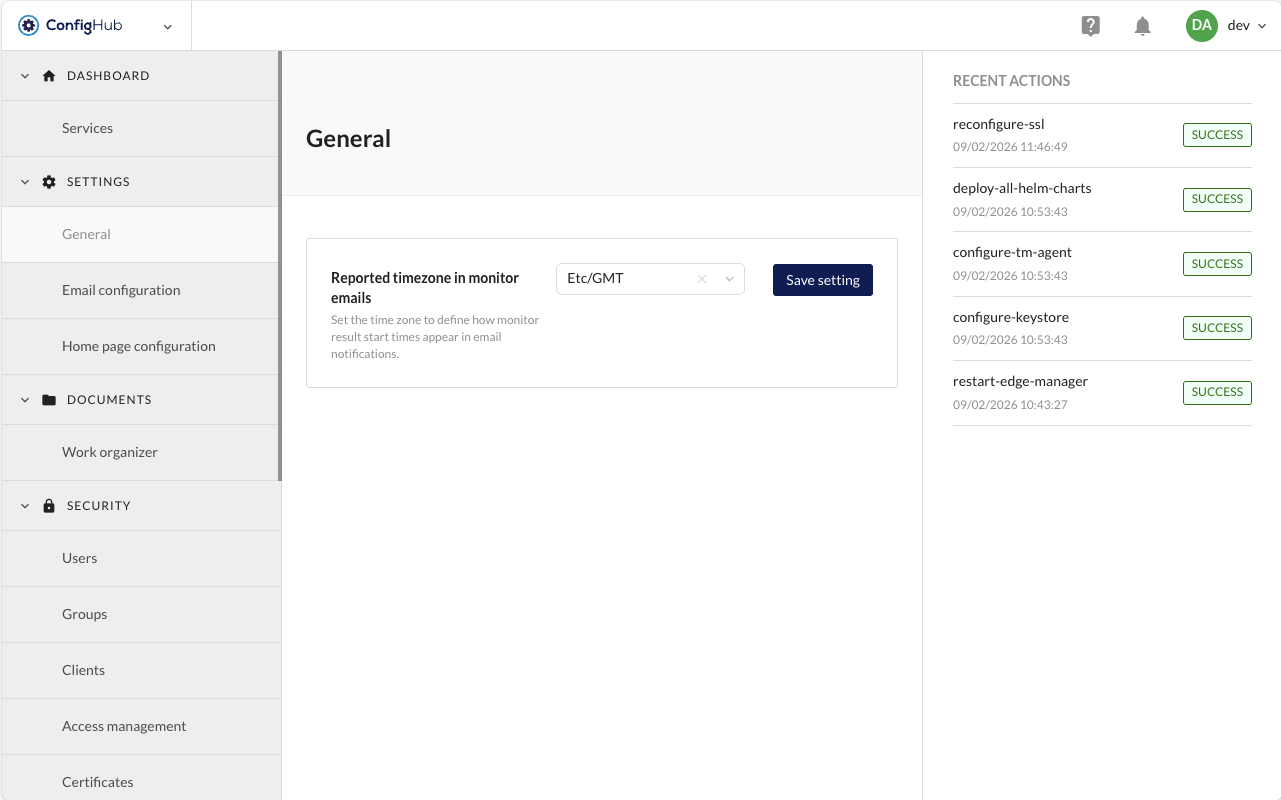
General
Configure the Reported timezone that is used in TrendMiner monitoring emails (monitor results). Only 1 timezone can be configured per TrendMiner installation.
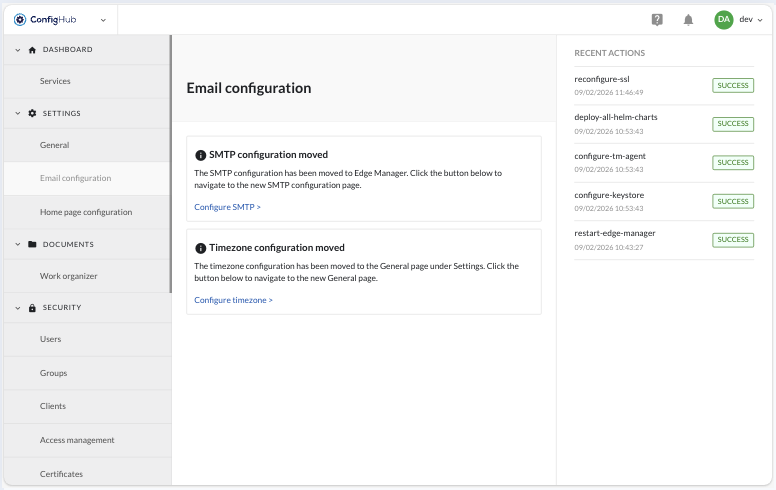
Email Configuration
Email configuration has moved to Edge Manager → Settings → SMTP Configuration
The timezone settings have been moved to ConfigHub → Settings → General.
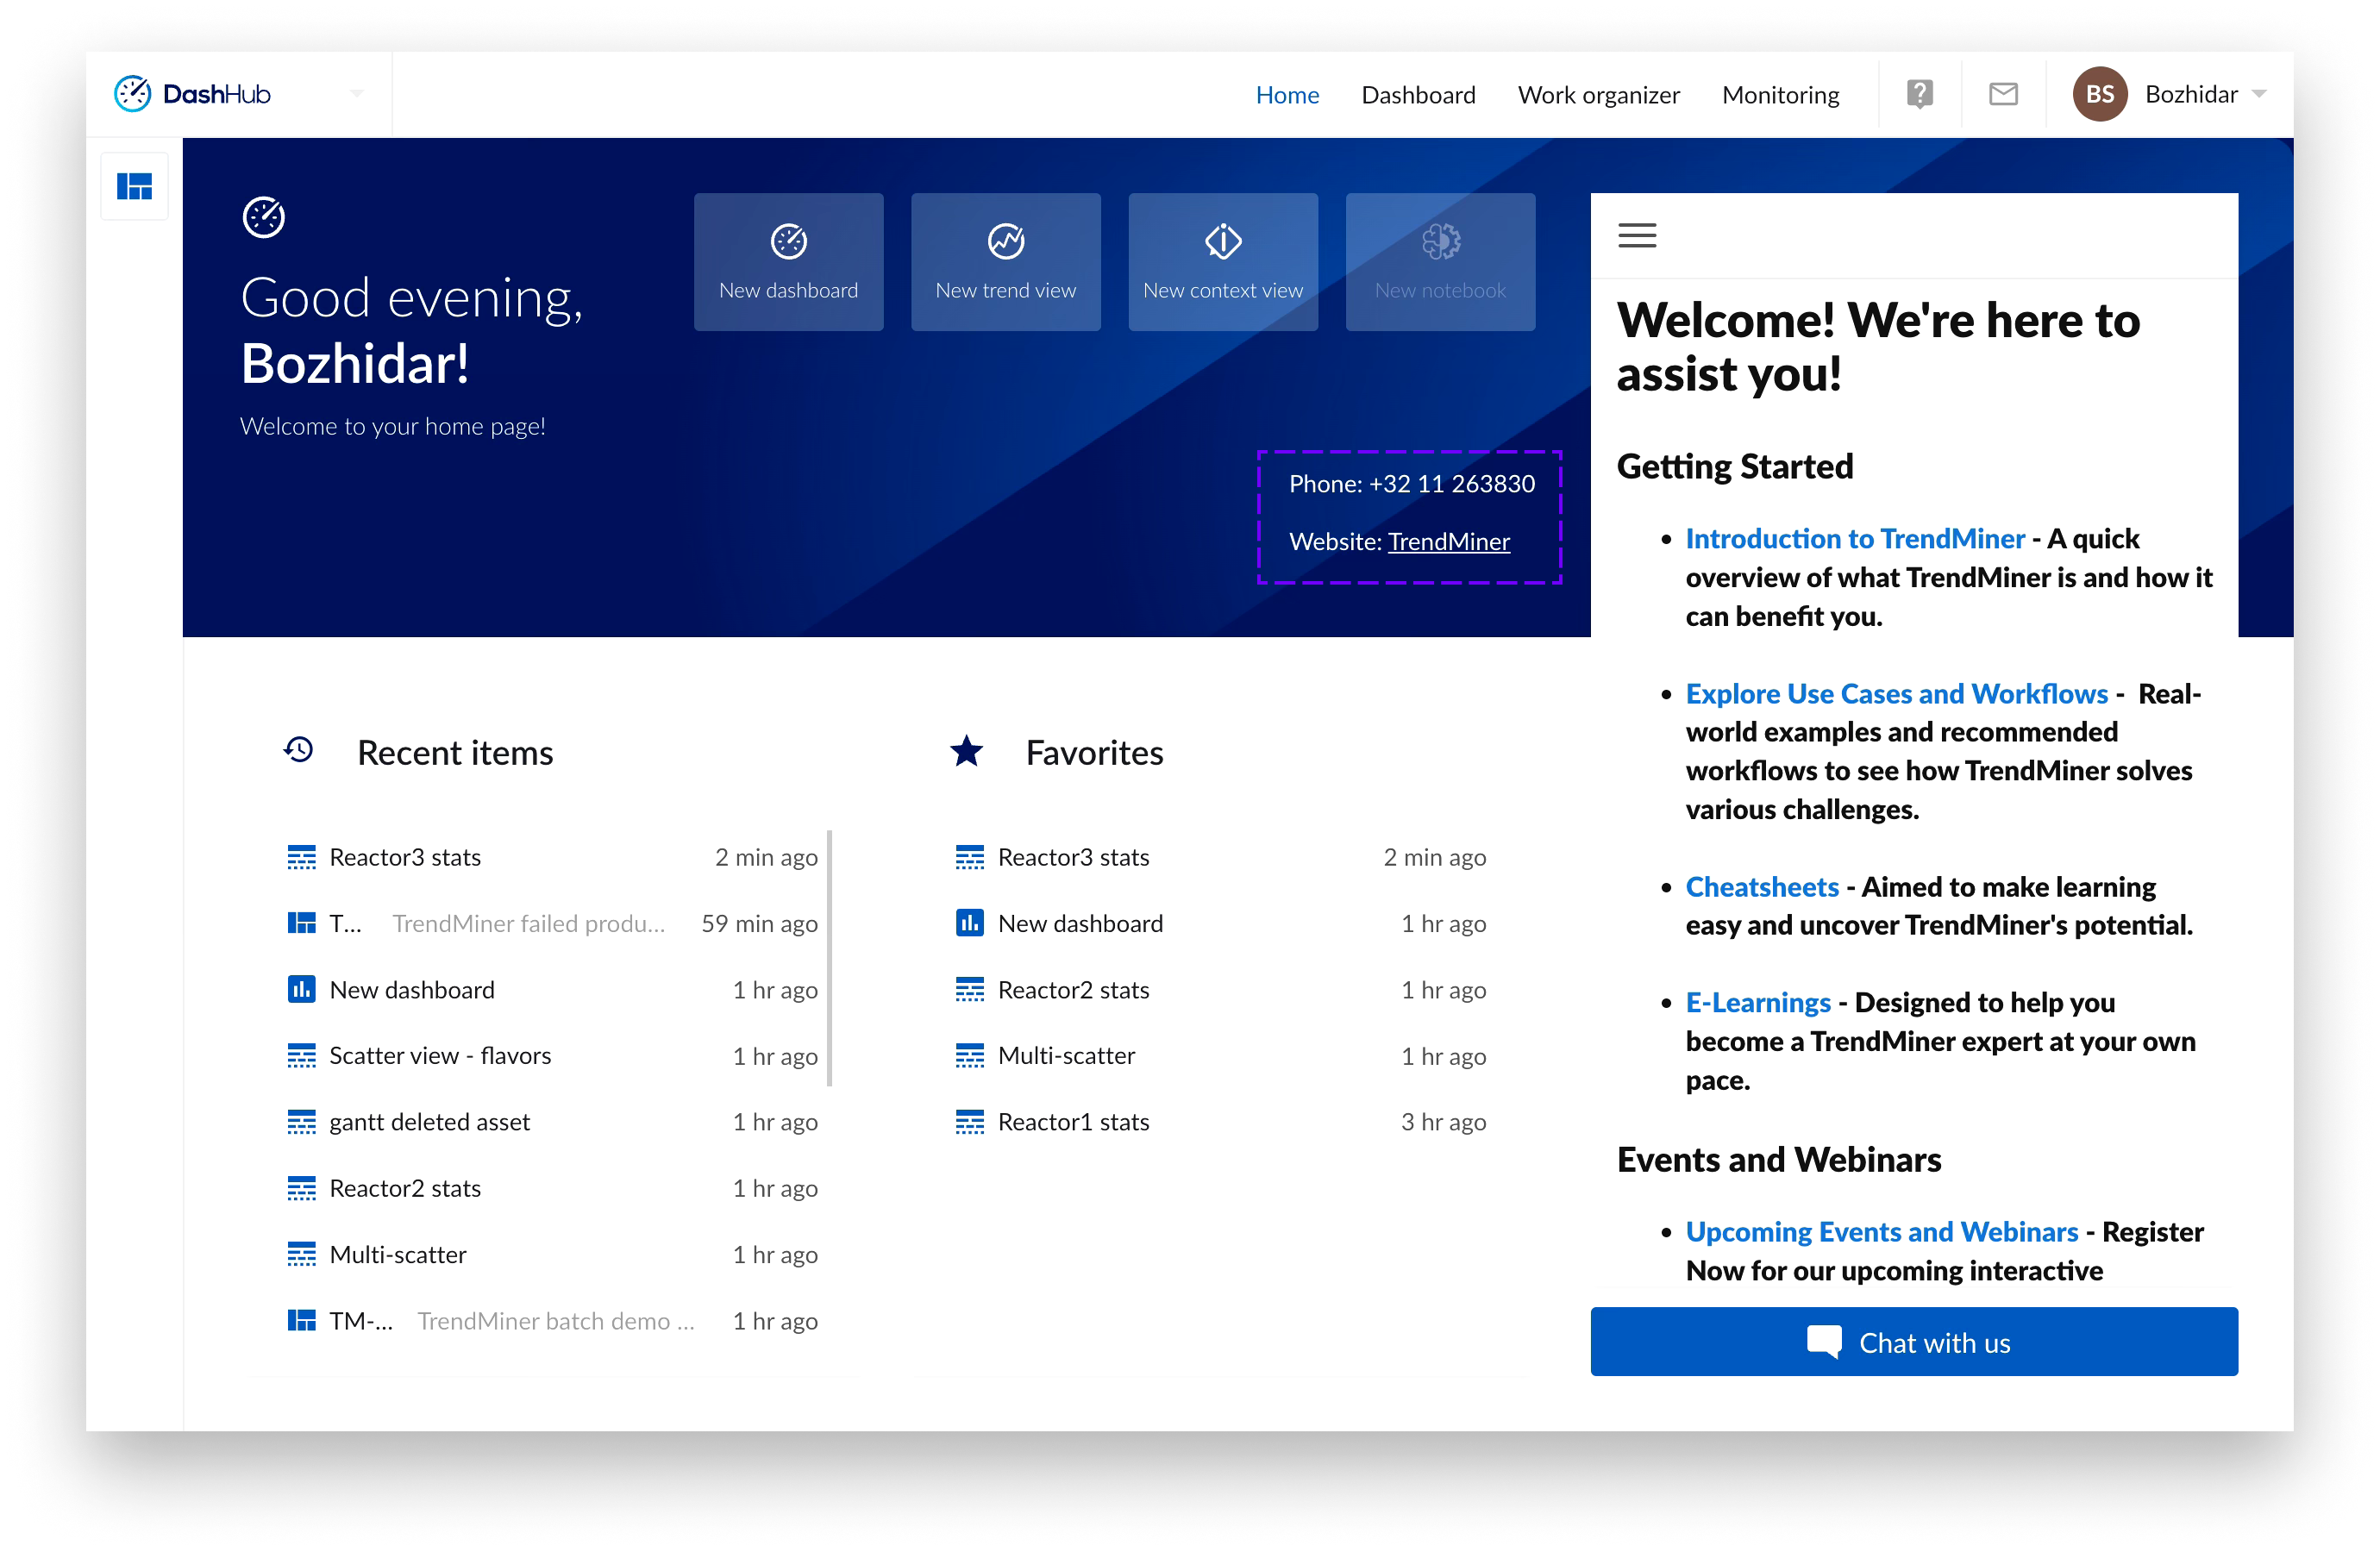
Homepage Configuration
Admin Message Tile Configuration

Administrators can configure the admin message tile through the Homepage Configuration page in ConfigHub. The configuration itself consist of three parts for configuring the title, message and contact information.
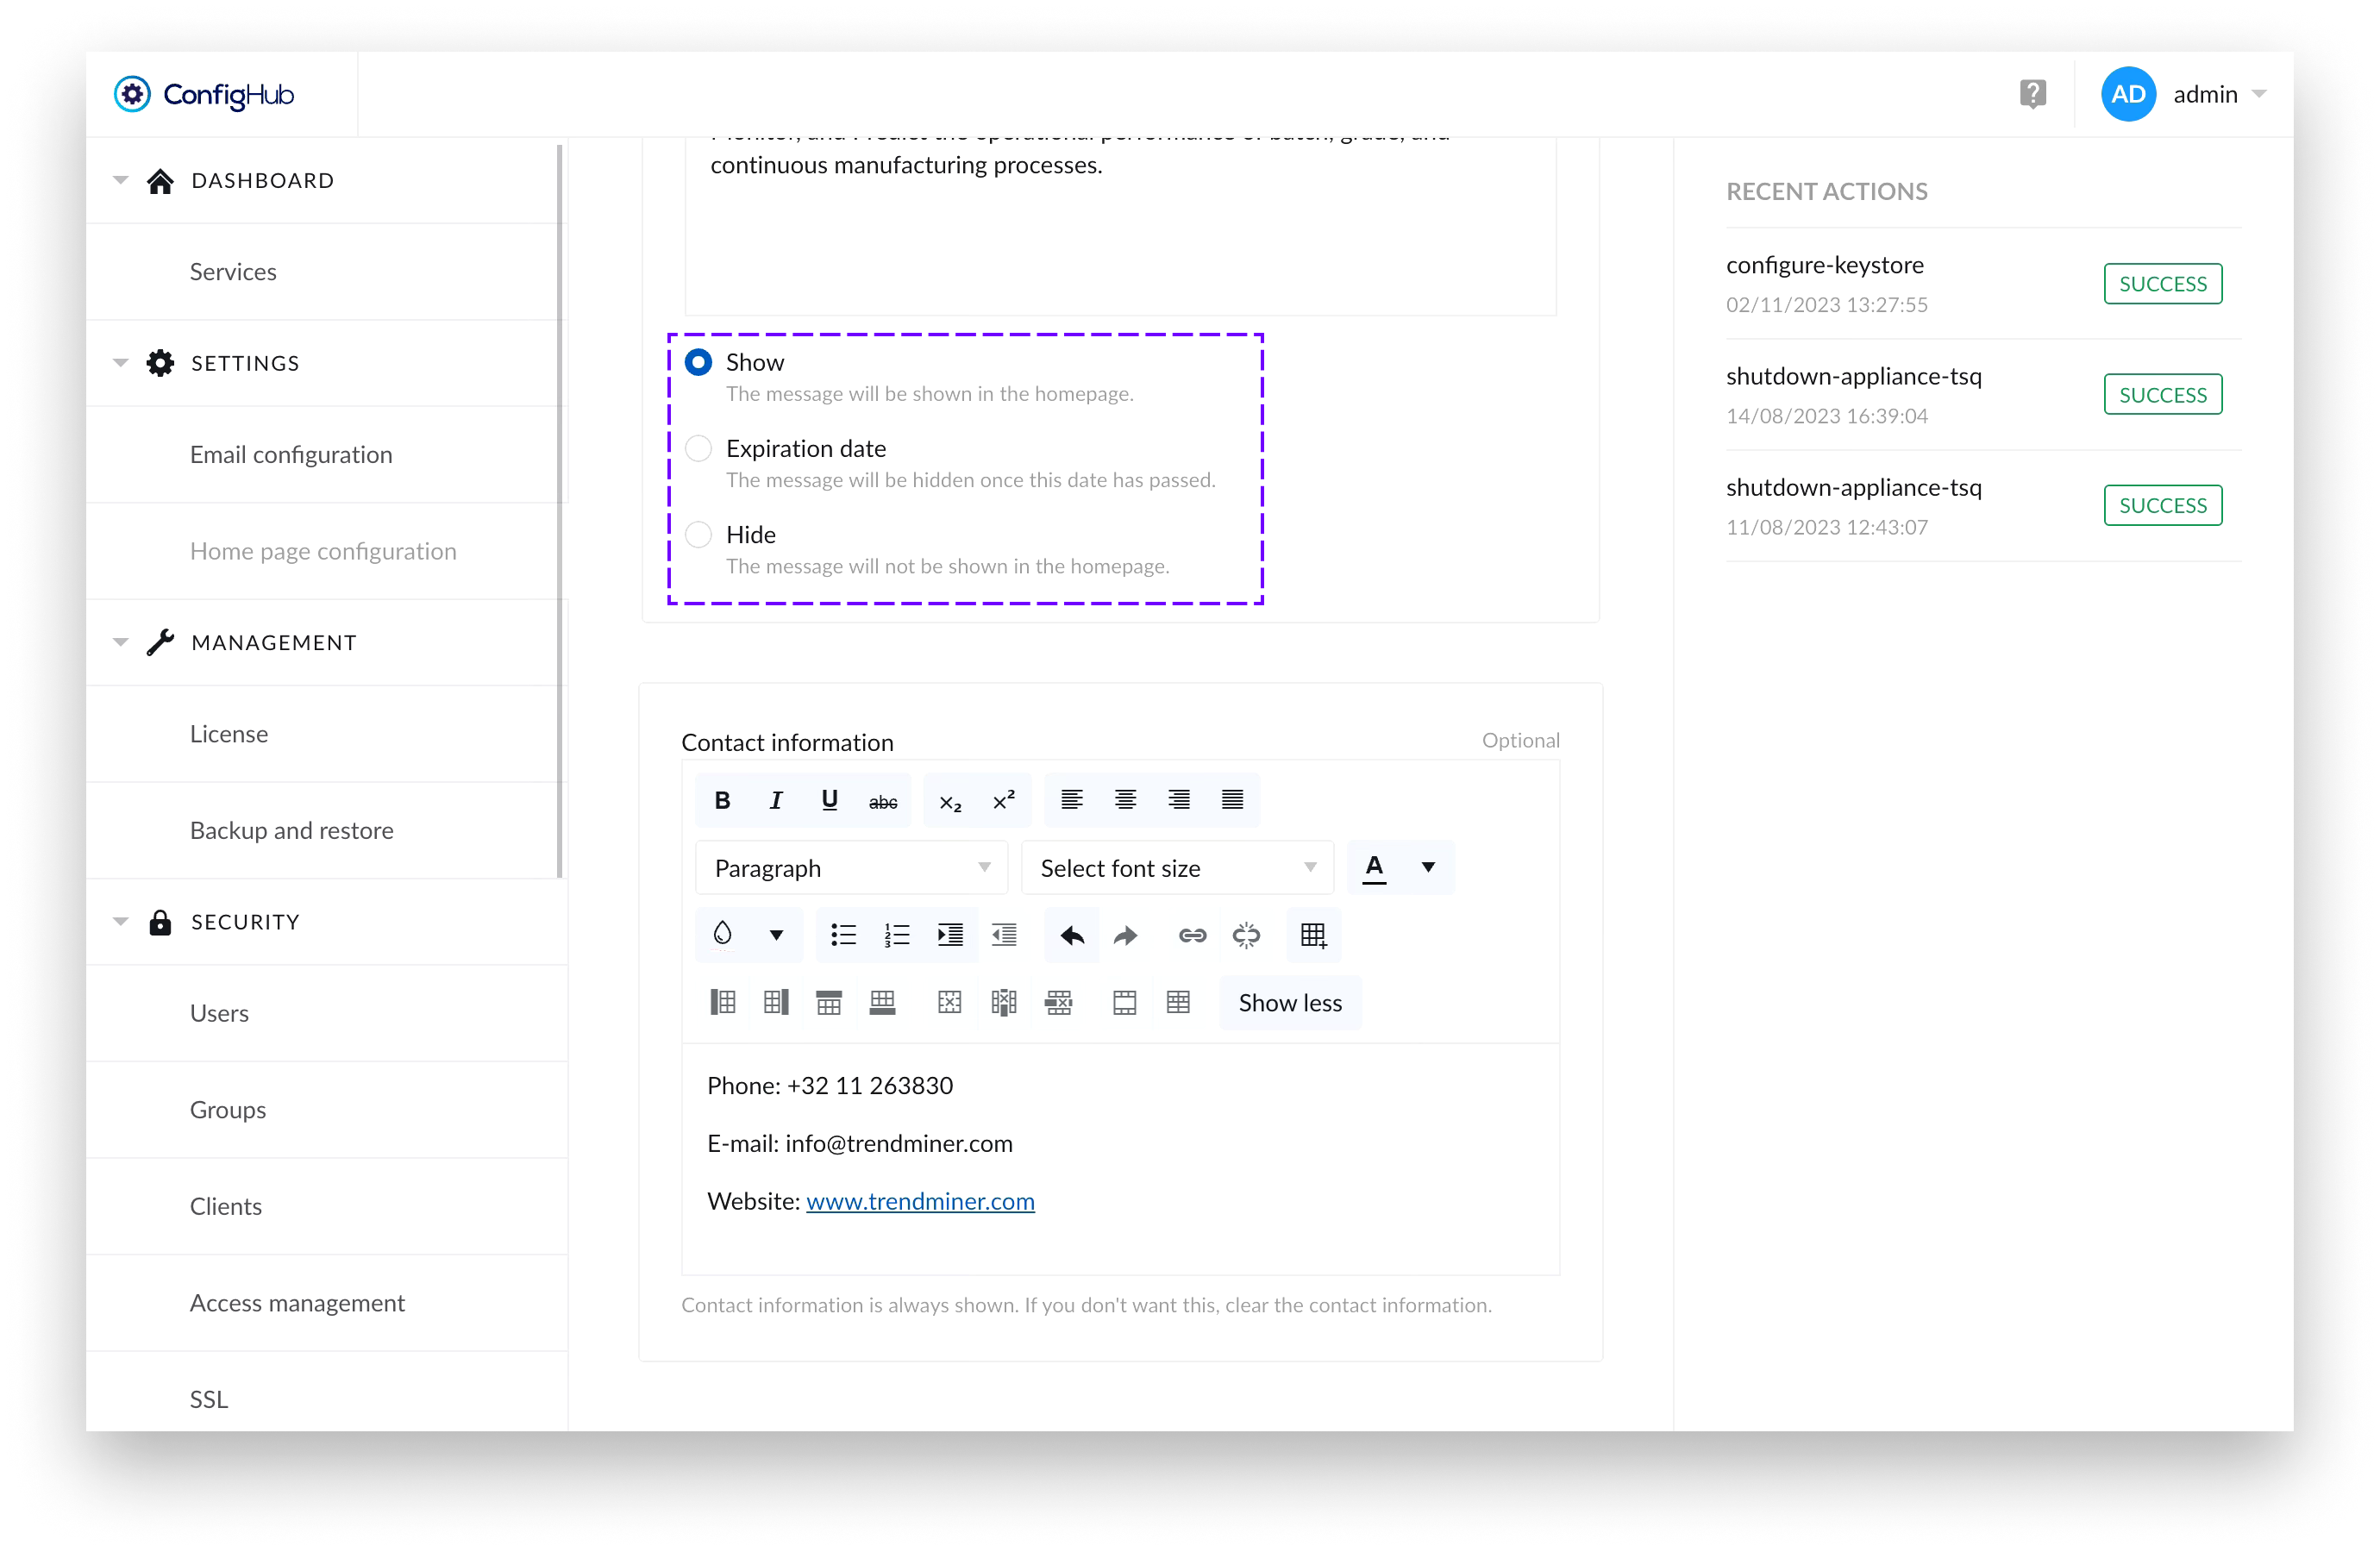
There’s a radio button which allows administrators to control whether the message tile is displayed to users on the Home Page or not.
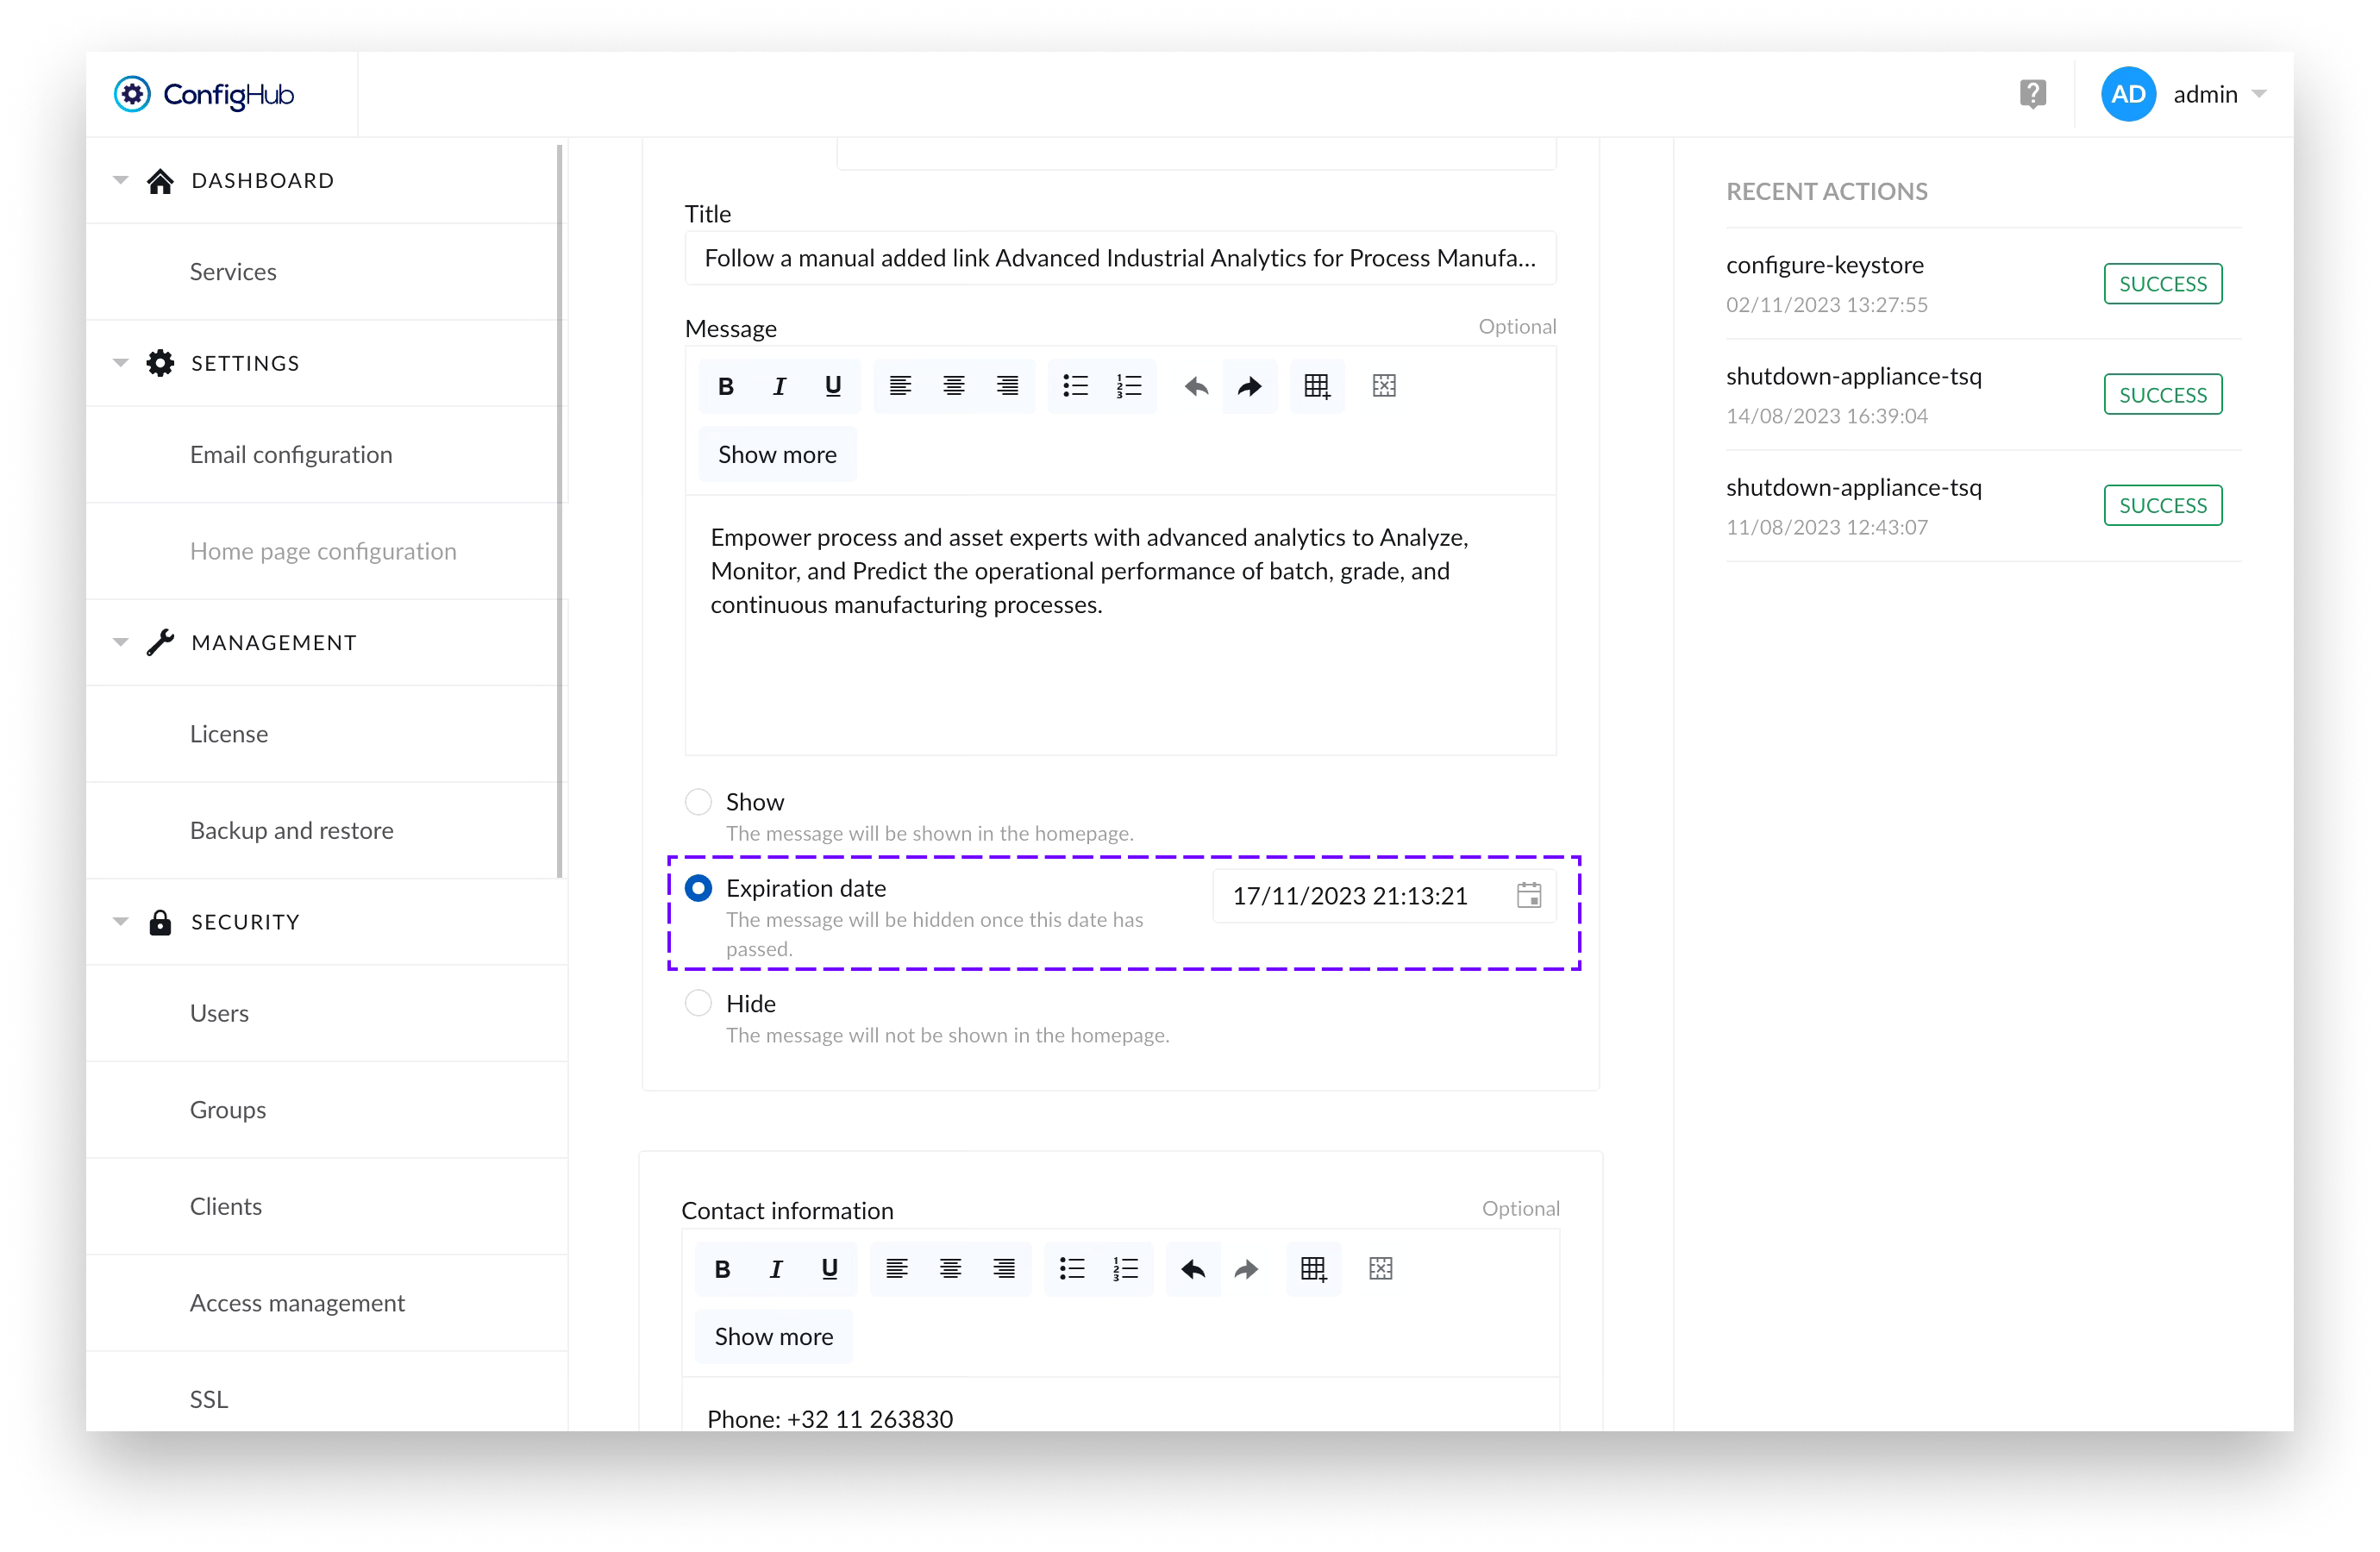
Additionally, there’s an option to set an expiration date for the message part of the tile. If an expiration date has been set, once the date has passed – the message part of the tile and the logo would disappear, but if filled in – the contact information would remain visible.
If only the contact information is filled, the message is set to “Hide” or there has been an expiry date set for the message that has passed - the information provided in the contact information form would still be visible to users.
Management
License
As of version 2024.R1.0 this screen is moved to Edge Manager.
Documents
The section 'documents' in ConfigHub allows users with the system administrator role to manage work items of other users.
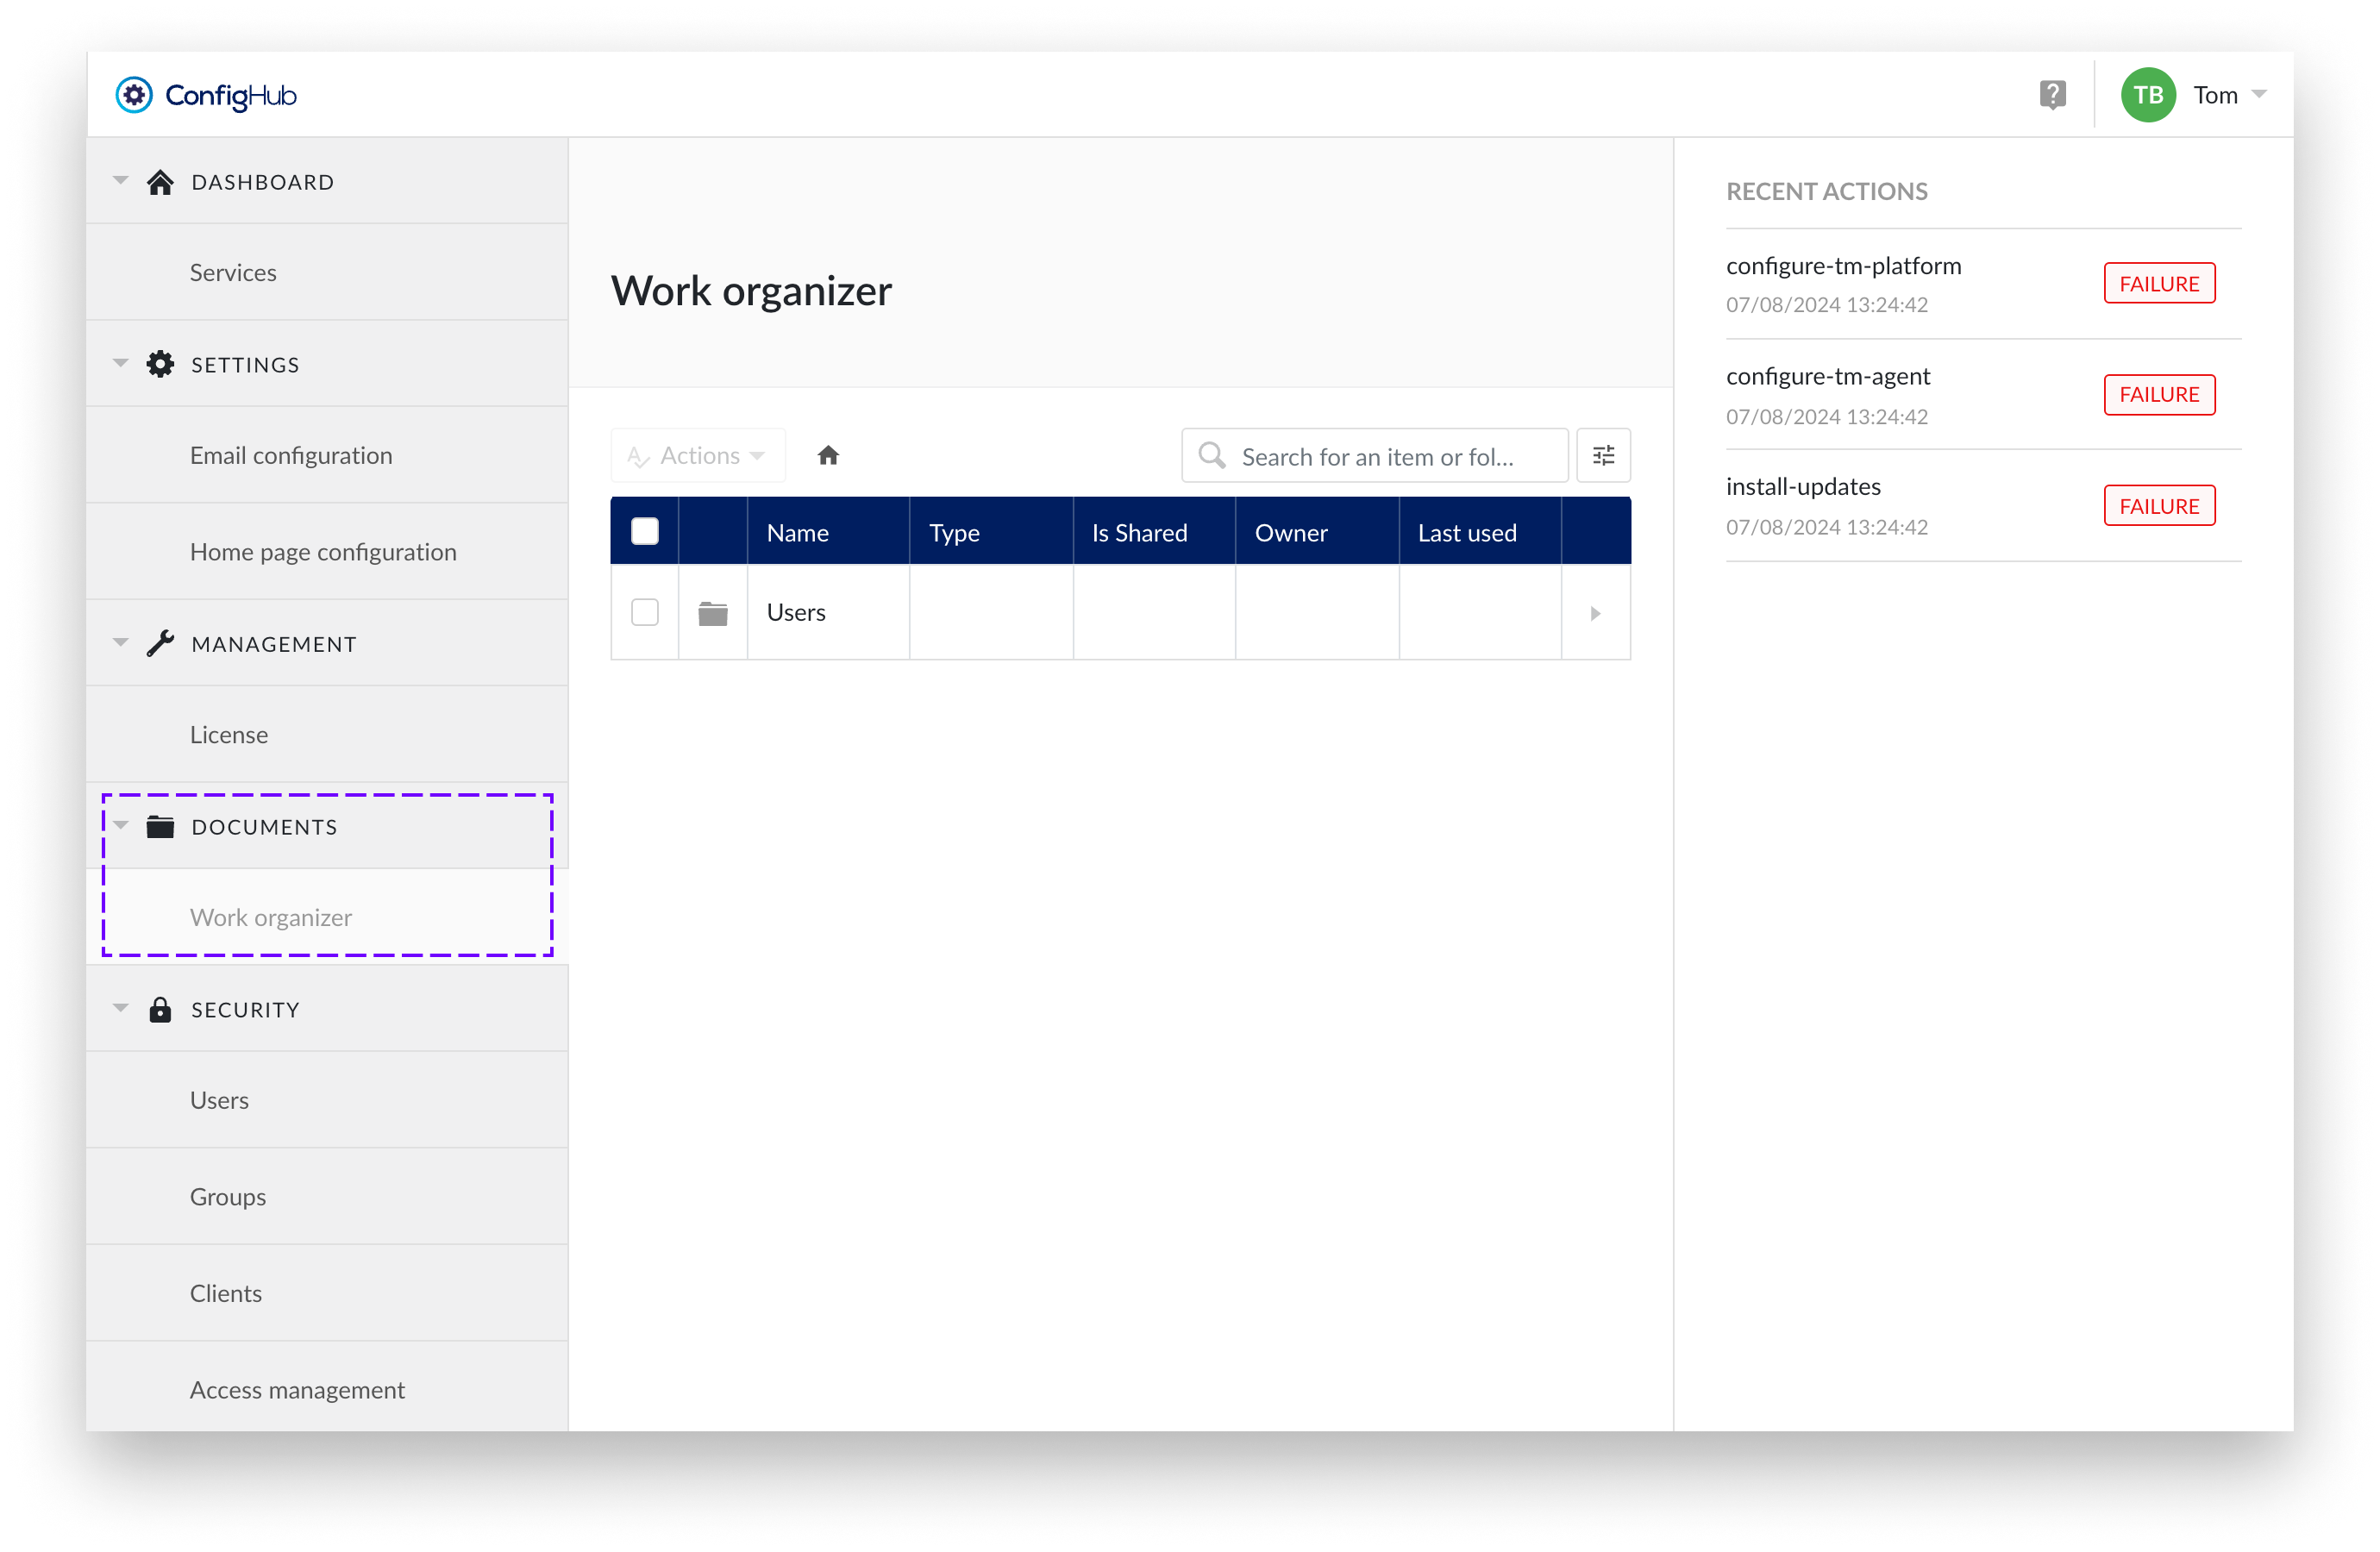
Work organizer
Work Organizer in ConfigHub gives you control over the entire Work Organizer structure. As a System Administrator, you essentially have access from the root, which is why it is also referred to as the Top Level Work Organizer (TLWO).
This access enables the management of users' home folders. It supports standard actions such as renaming, making copies, sharing items, moving items to a folder, deleting items, and creating subfolders within the same home folder.
You also have the option to transfer the entire contents of one home folder, along with all items shared with the home folder's owner, to another user's home folder.
Additionally, there is the option to delete home folders that are no longer active.
Transfer ownership
Caution
Transfer is not reversible!
Use this functionality carefully. The transfer applies to all items and shared items; it is not possible to transfer only a subfolder or a selection of a home folder.
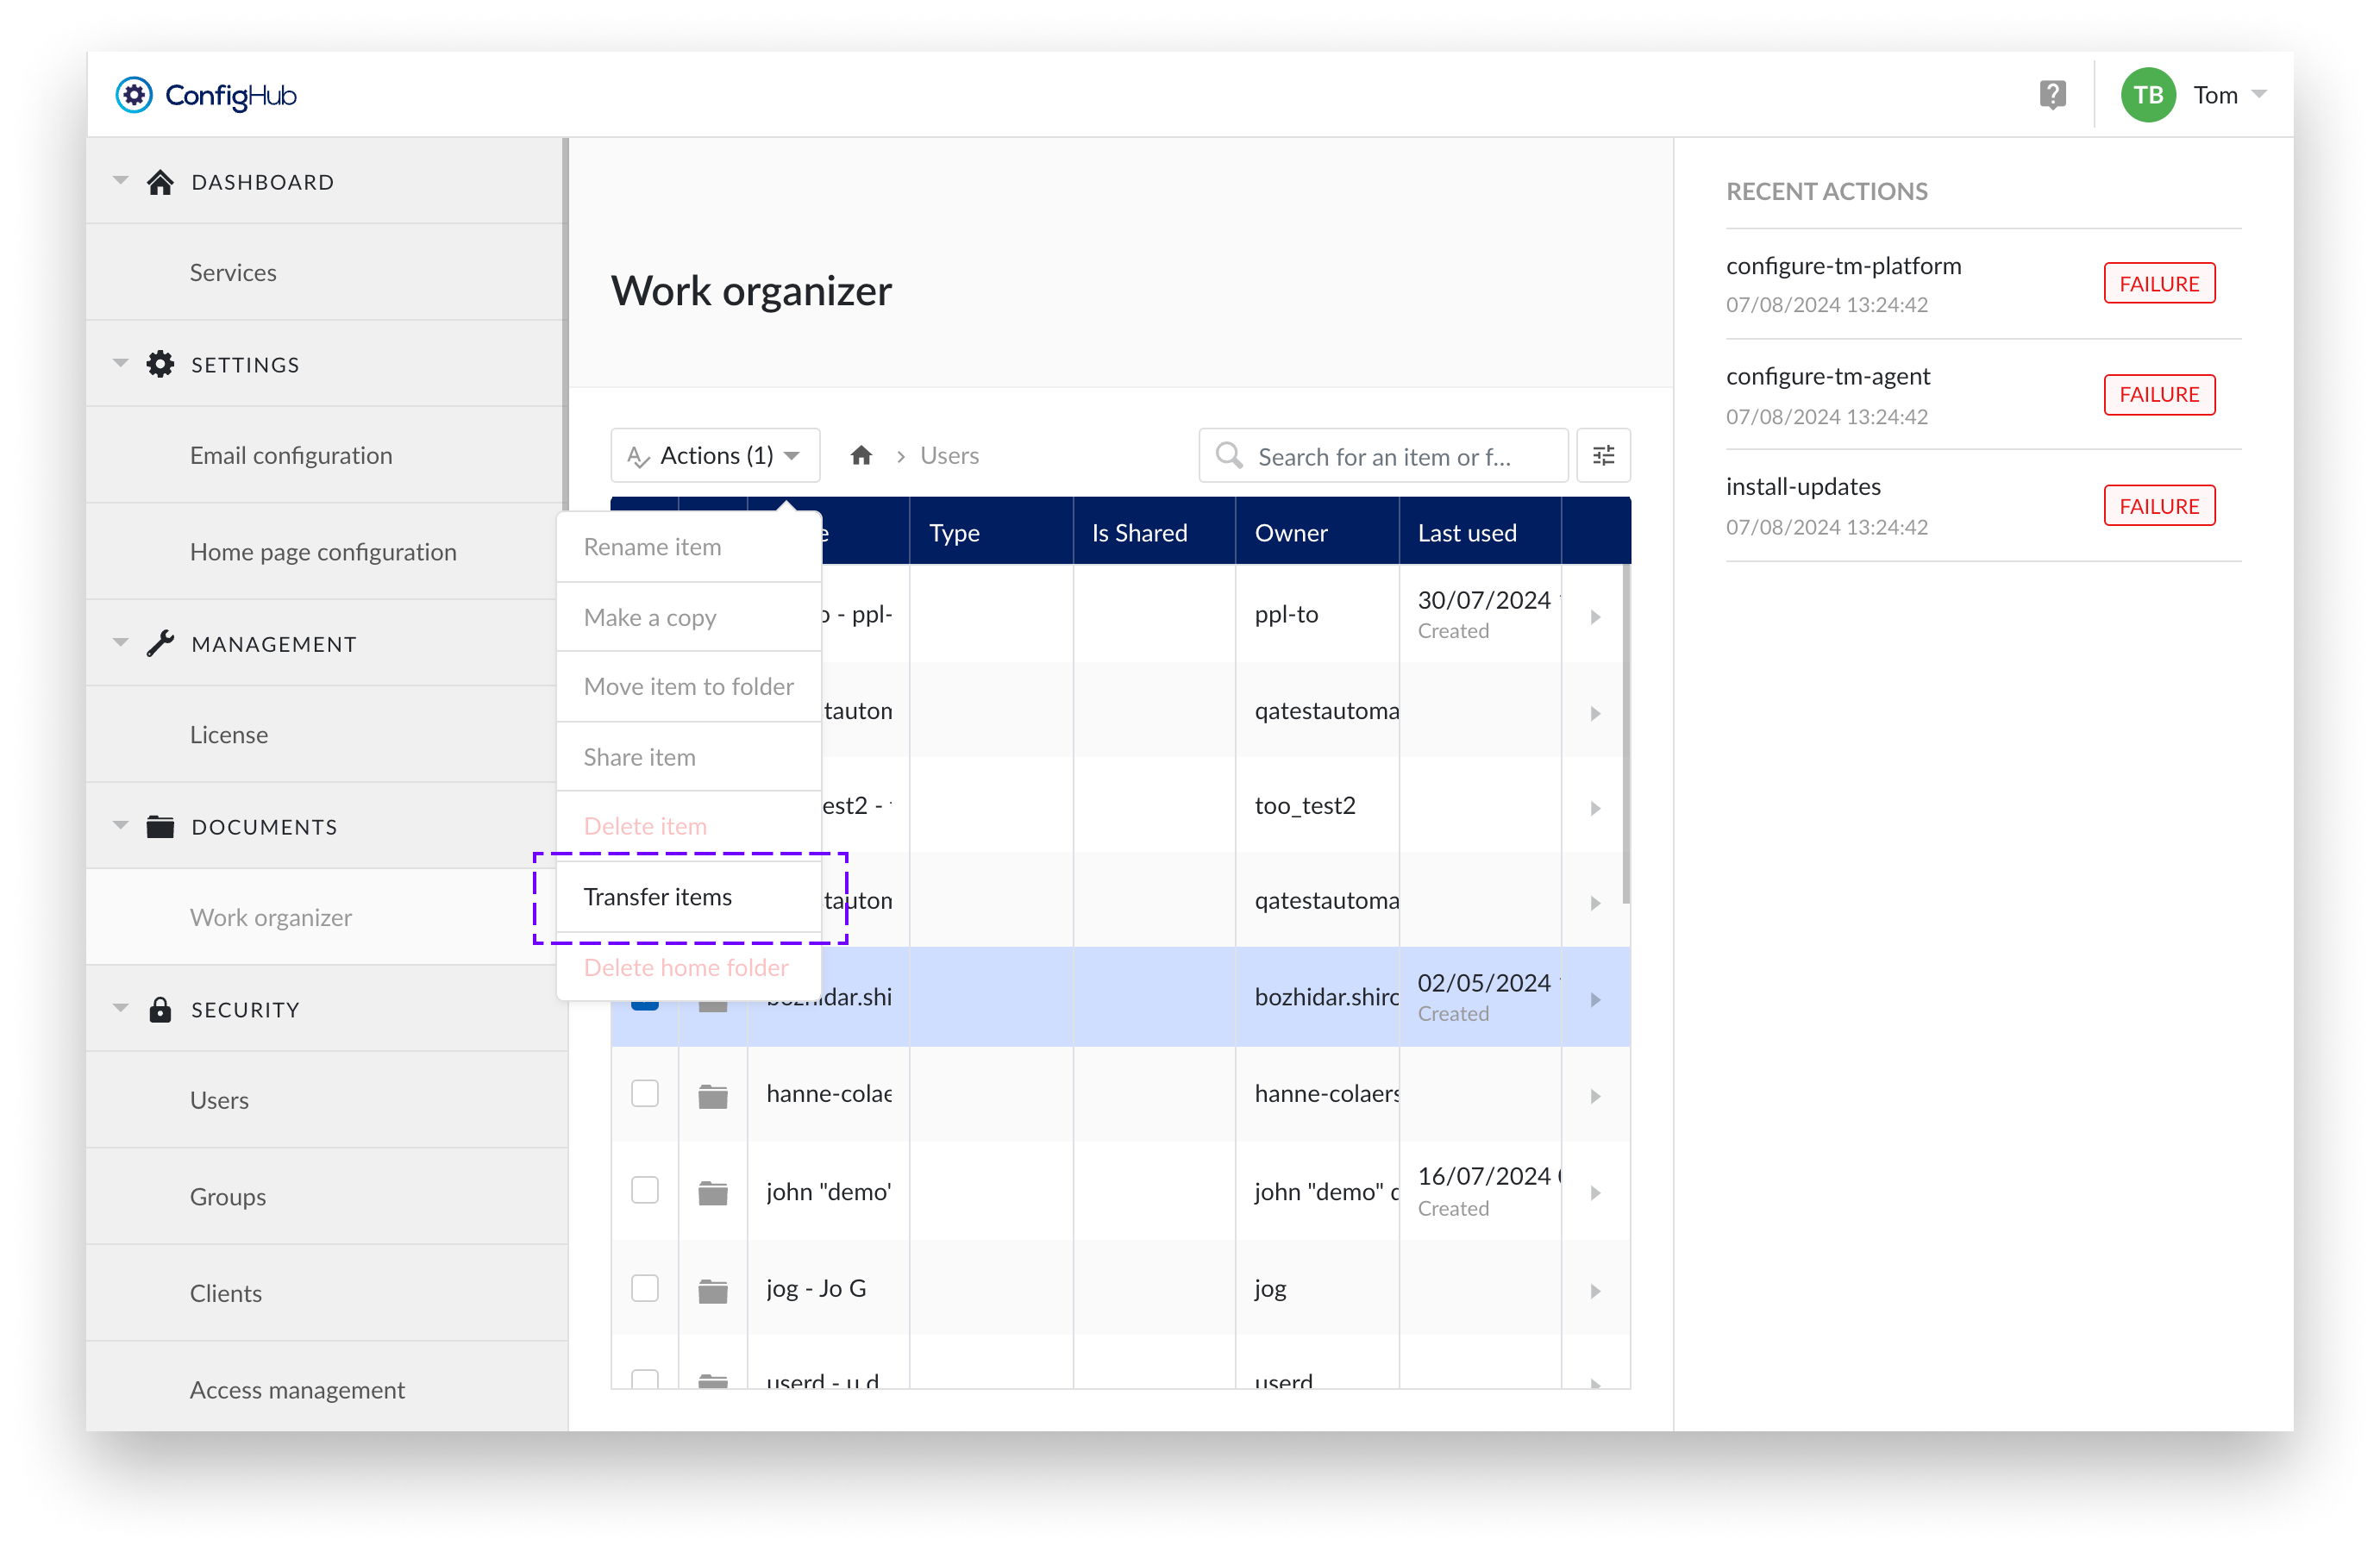
The "Transfer Items" option under the Top Level Work Organizer unlocks the potential to transfer items between users. This ensures that items from users who are no longer active or have moved on to another role are not lost but can be passed on to other users. This way, acquired insights can be preserved.
Transfer items allows you to move the entire contents of a user's home folder to another user's home folder. Additionally, all items and underlying items previously shared with the owner of the selected home folder will be shared with the new selected user.
Important
All items and underlying items previously owned by the user of the selected home folder will now be owned by the selected user.
All items and underlying items previously shared with the user of the selected home folder will now be shared with the selected user.
To transfer items from one user to another follow the steps below:
Select the home Folder
Choose the home folder you want to transfer
Choose "Transfer items" from the actions dropdown
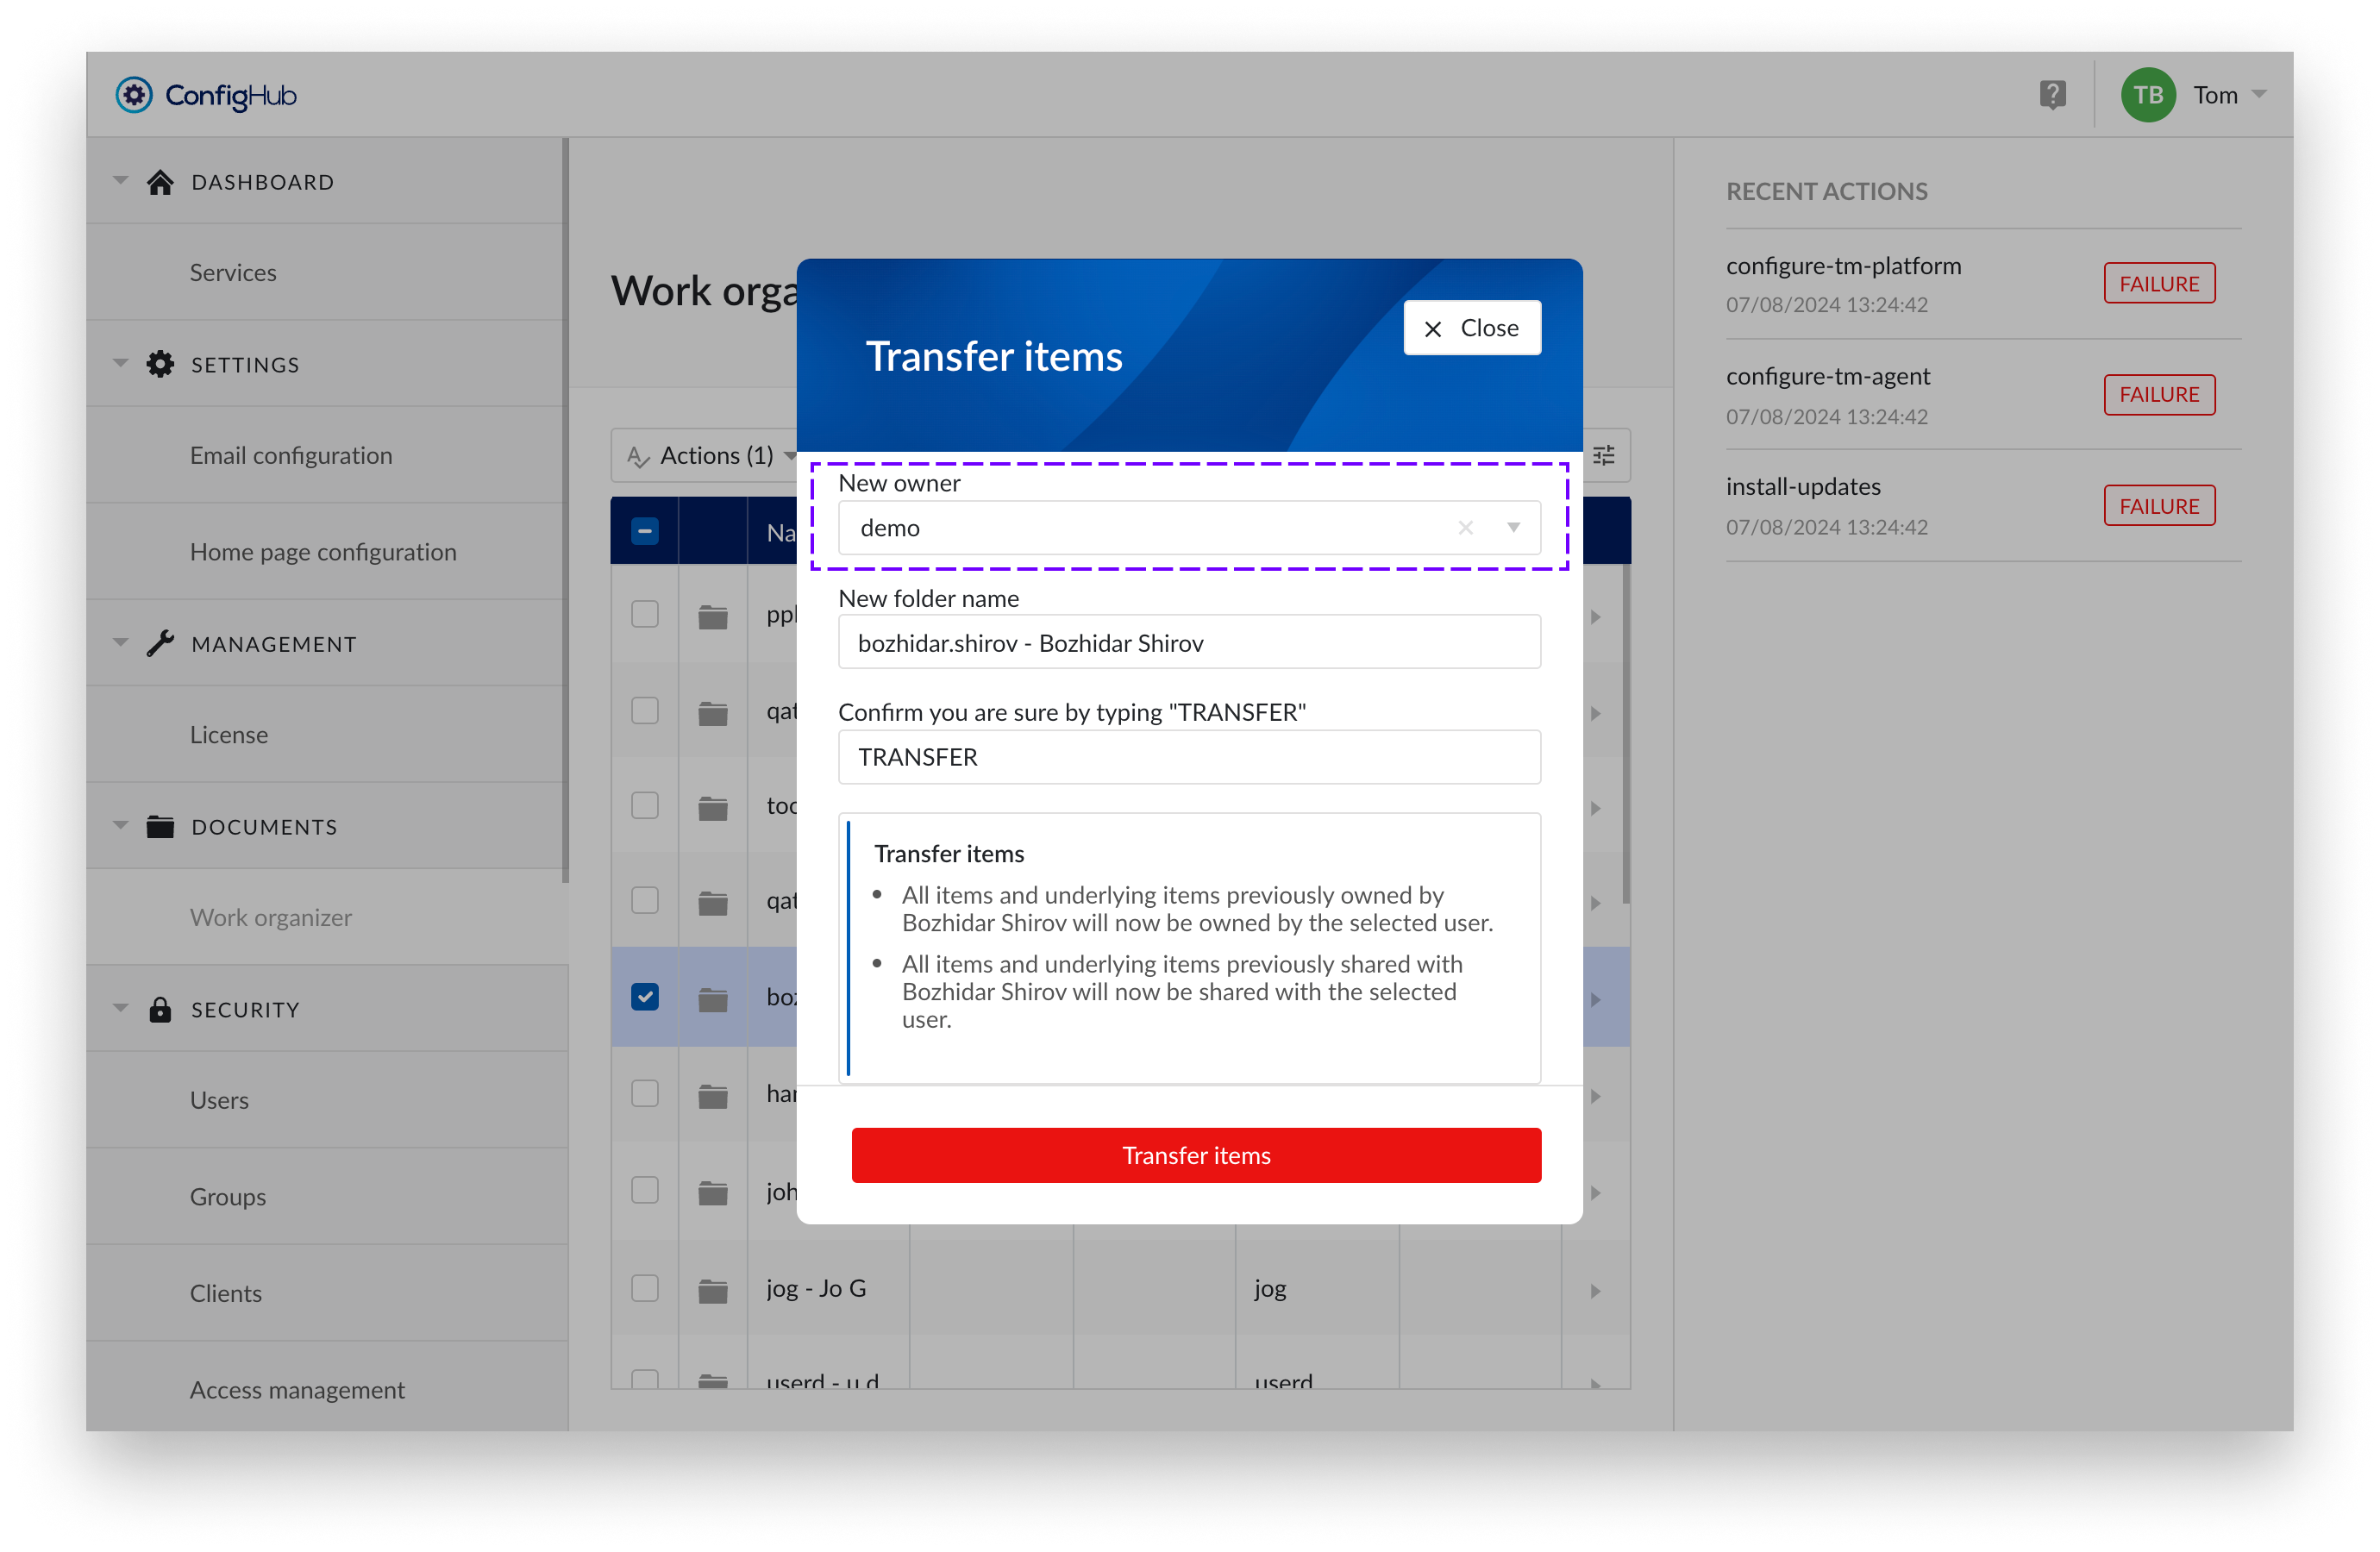
Select the option “Transfer items”.
Notification pane
You will get an overview of the actions that will be performed. Review these carefully. Transfer of ownership is non-reversible without transferring the entire content of a home folder plus all items shared with the owner of the home folder.
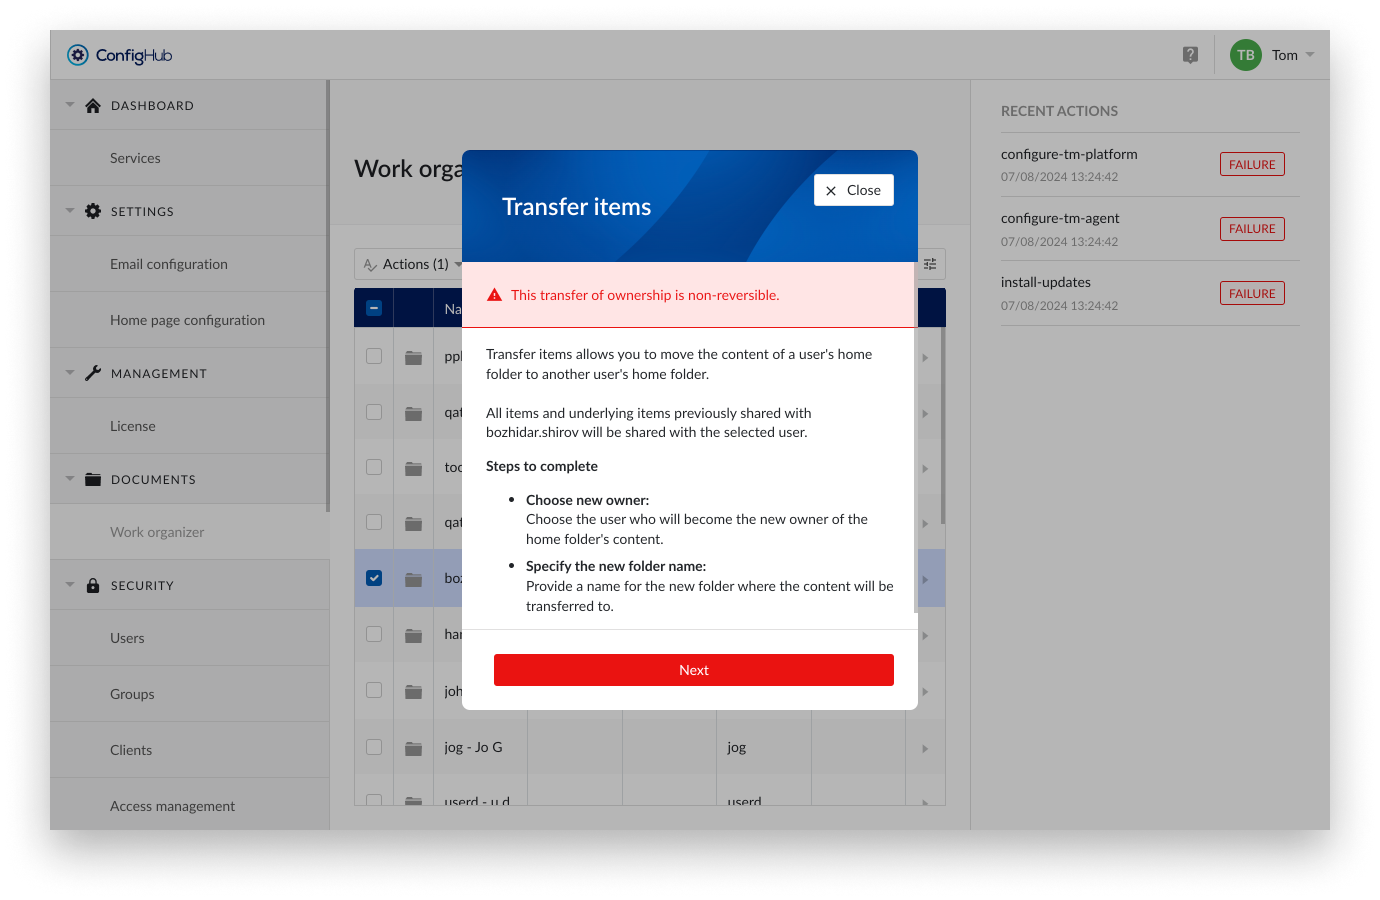
New owner
Select the user who will become the new owner.
New folder Name
Provide a clear and descriptive name for the folder. As a suggestion, we prefill the name with the username of the selected folder, but you are free to enter any other name you prefer. This folder will be created in the root of the home folder of the receiving user.
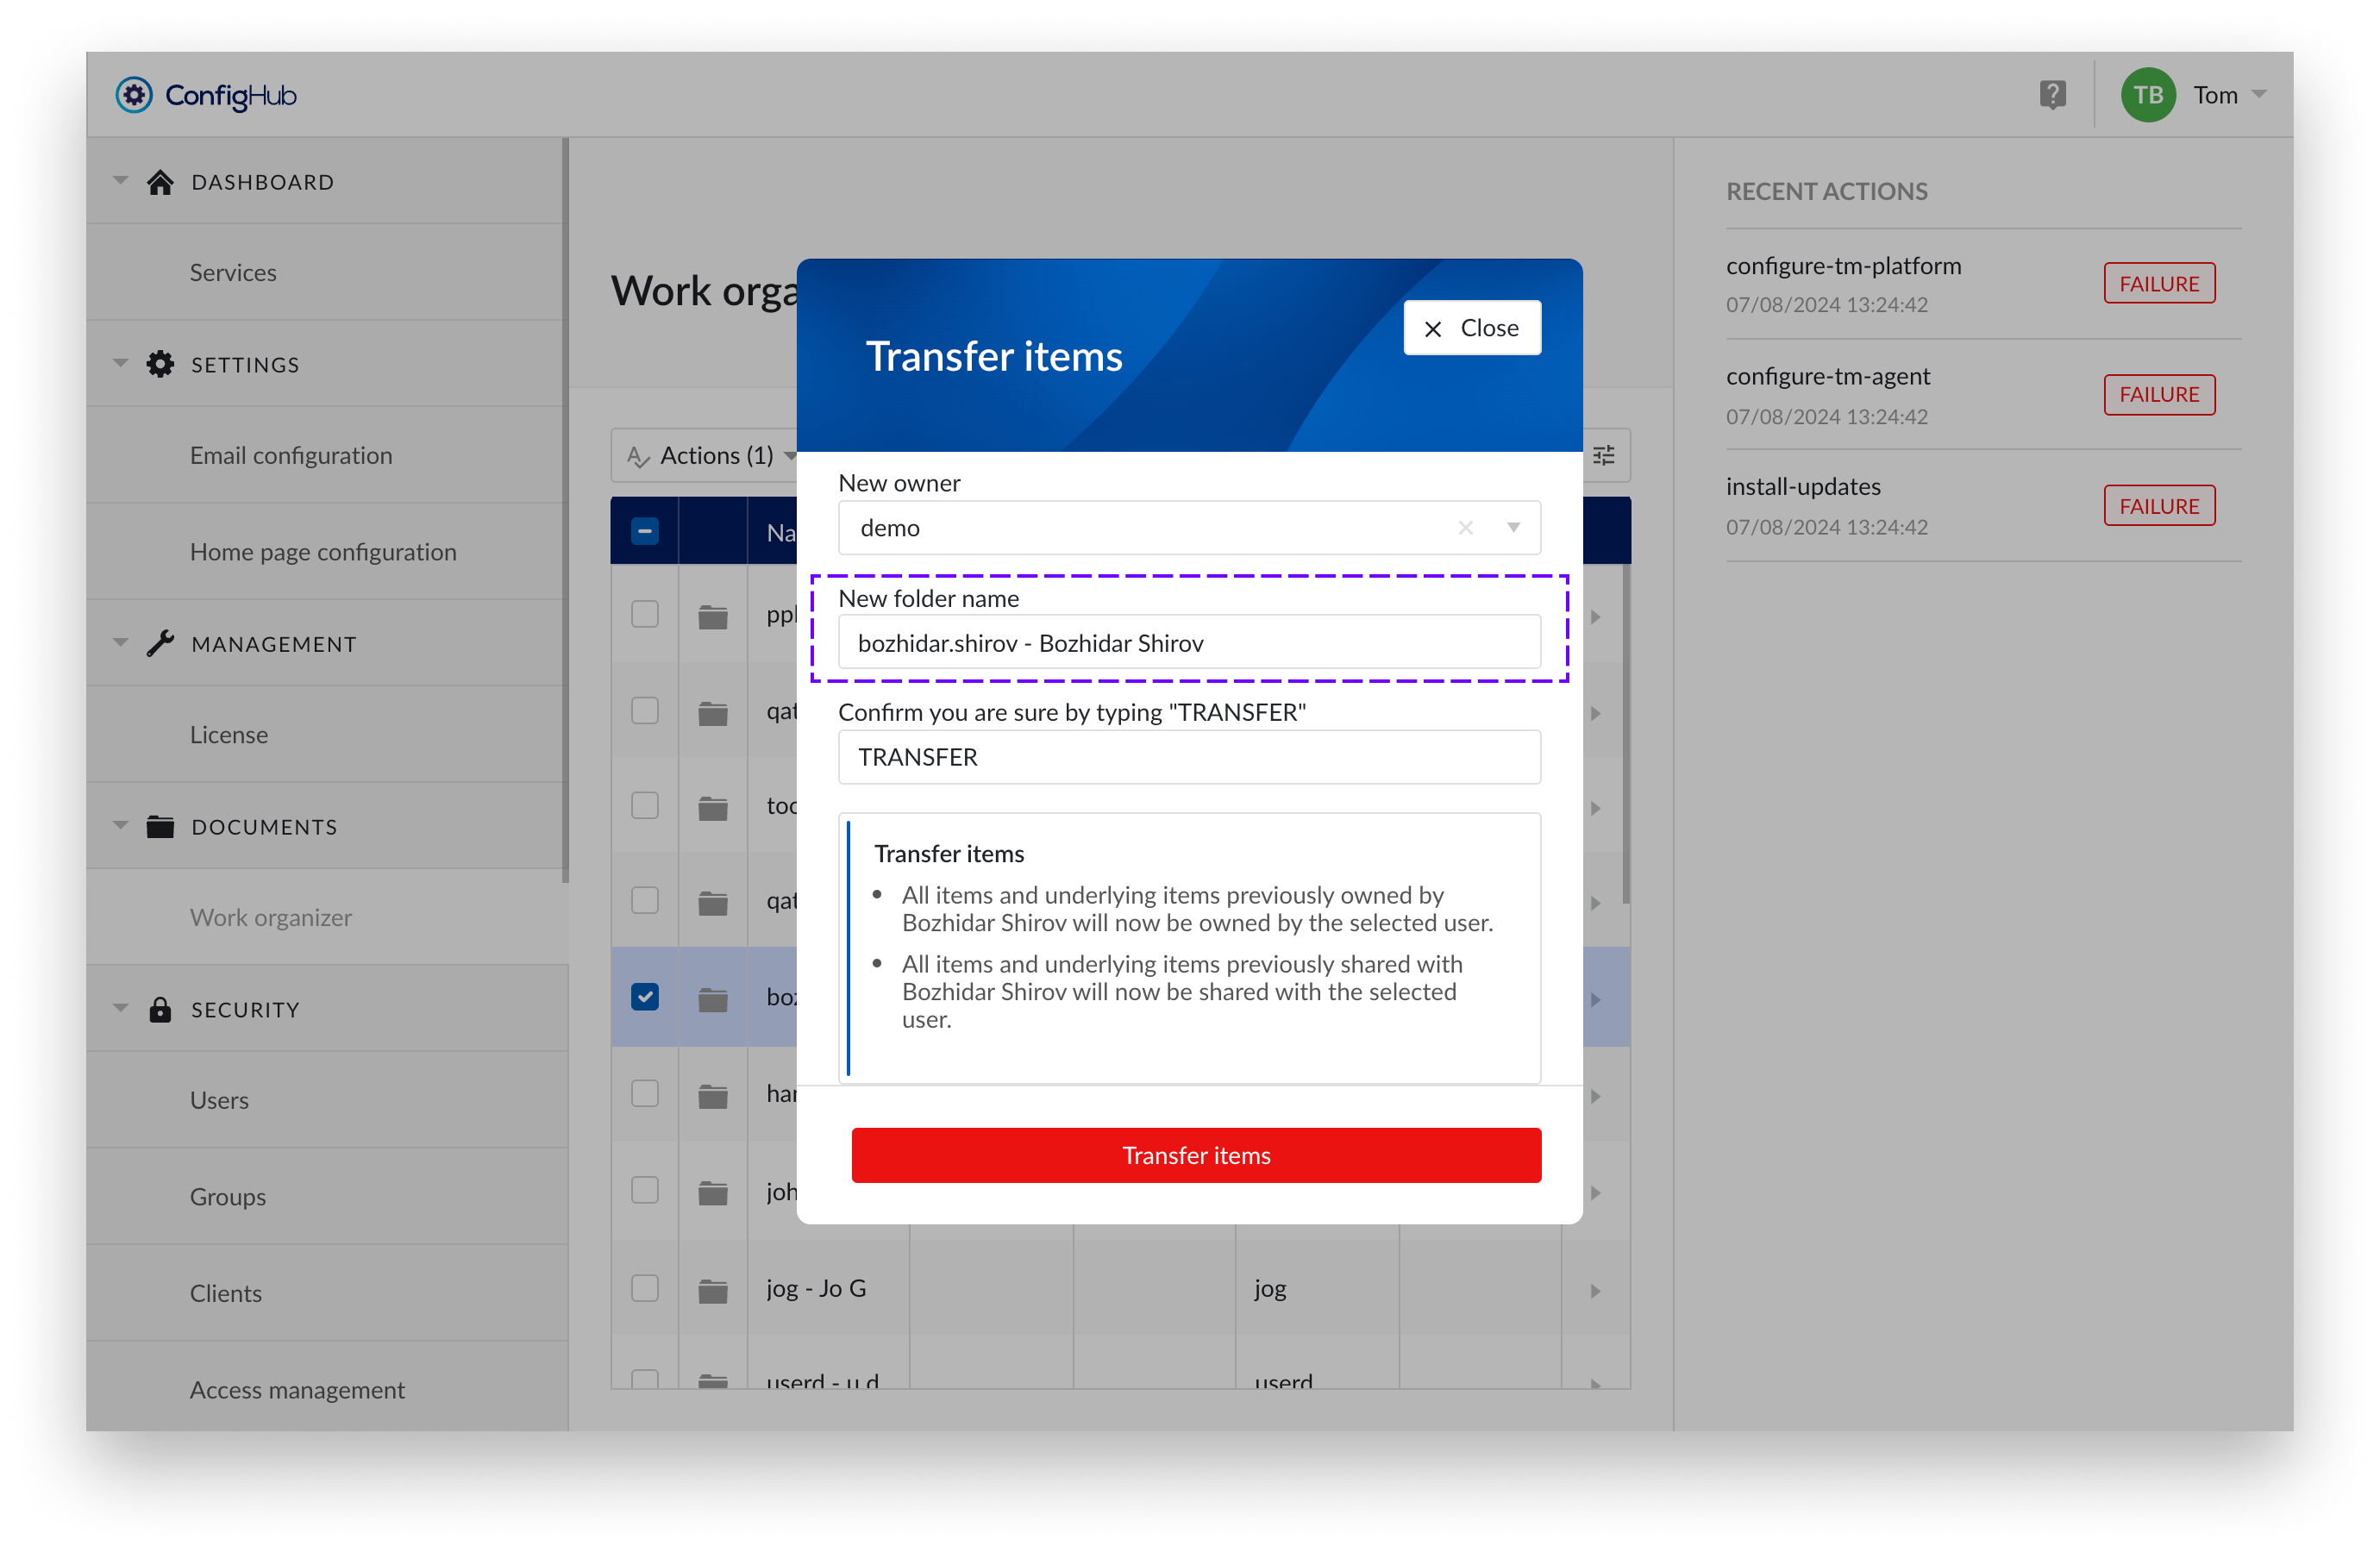
Confirm you are sure by typing "TRANSFER"
Double-check all input fields and the accompanying text. By typing "TRANSFER" in the input field, you agree to the actions that will follow.

Notifications
After the transfer, the following notifications will be sent.
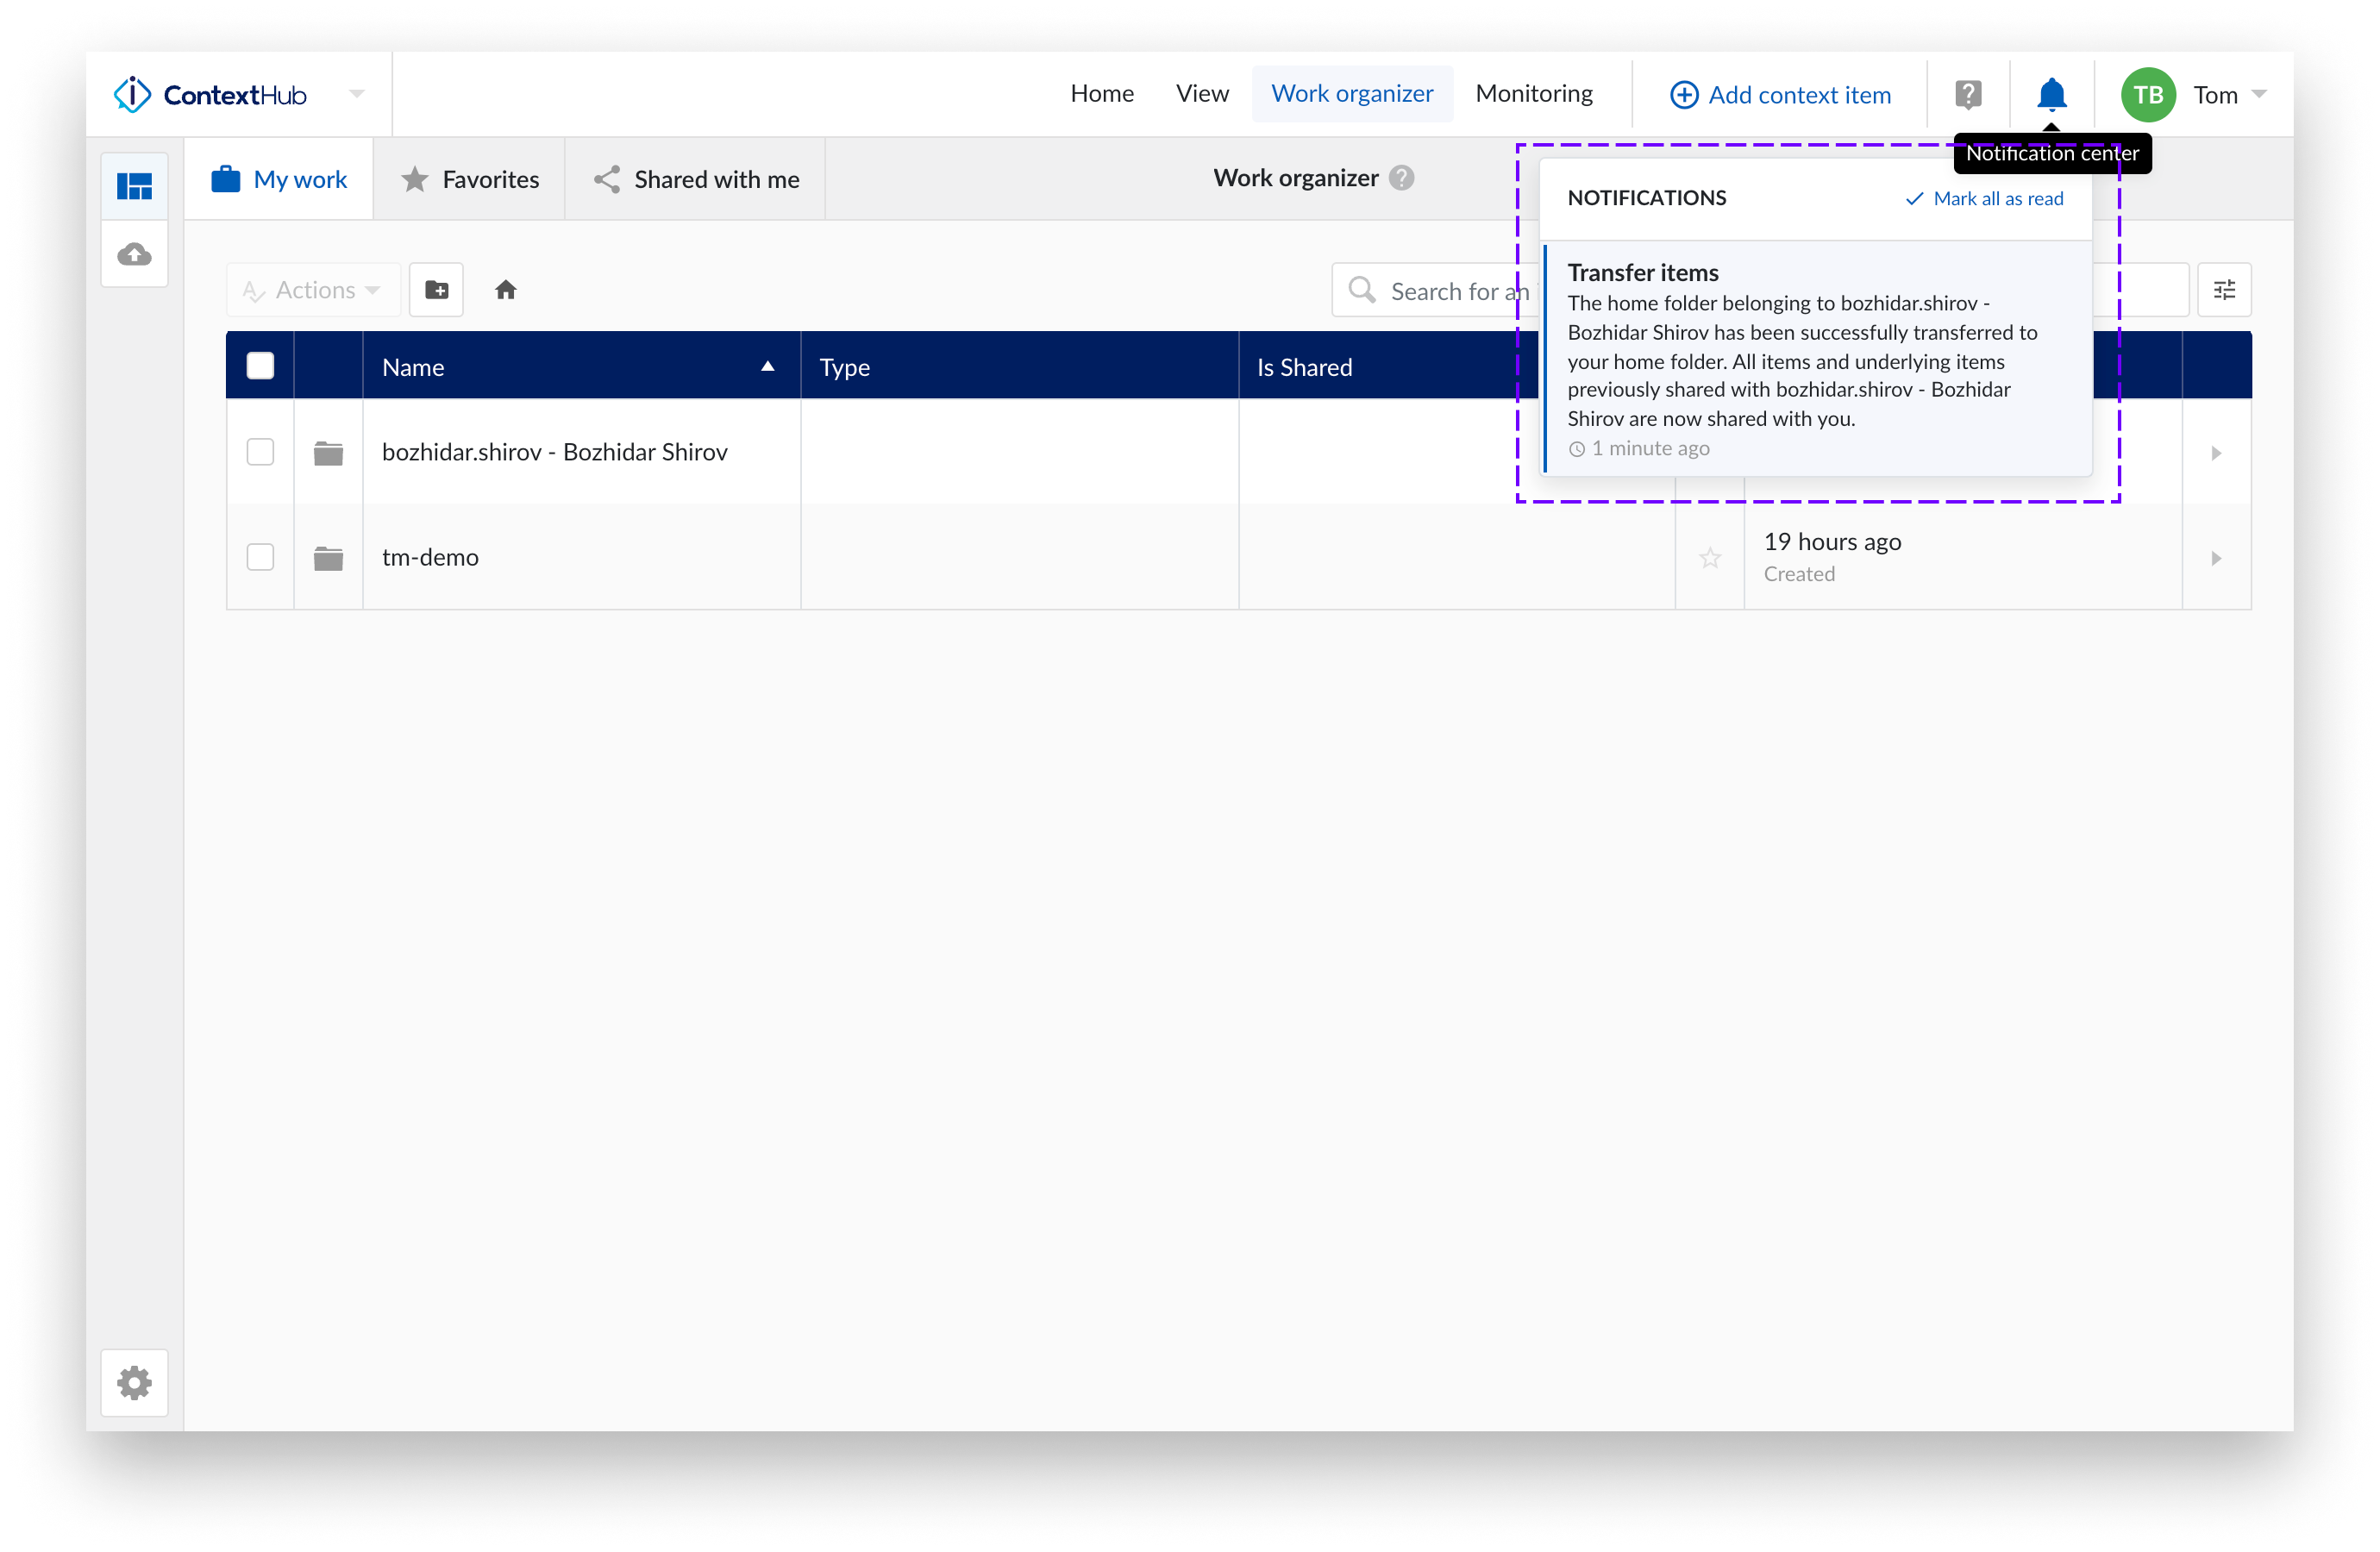
Transfer successful
Confirmation in ConfigHub:
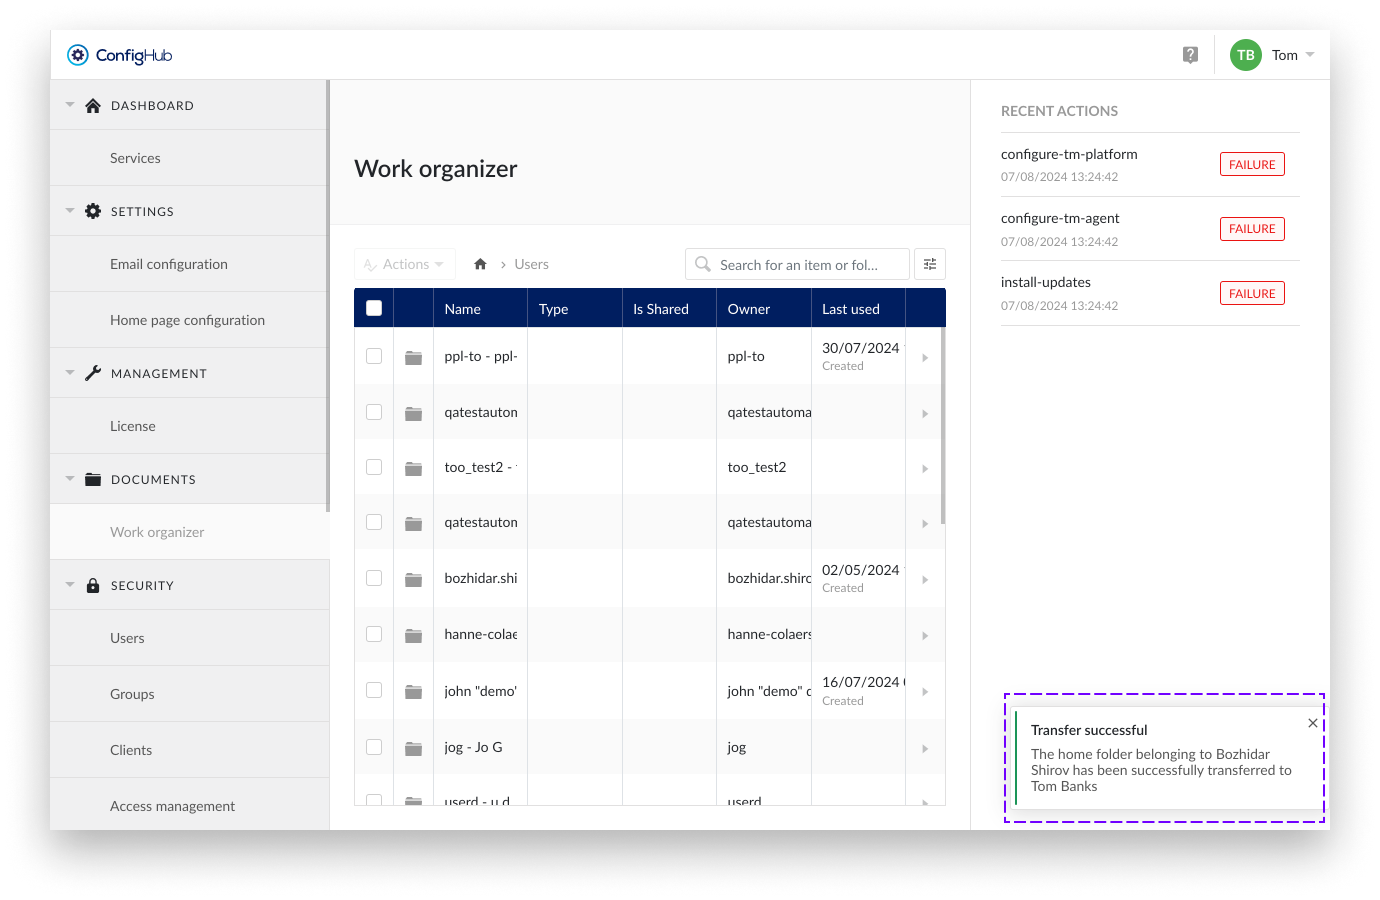
Confirmation original owner:

Confirmation transferee:
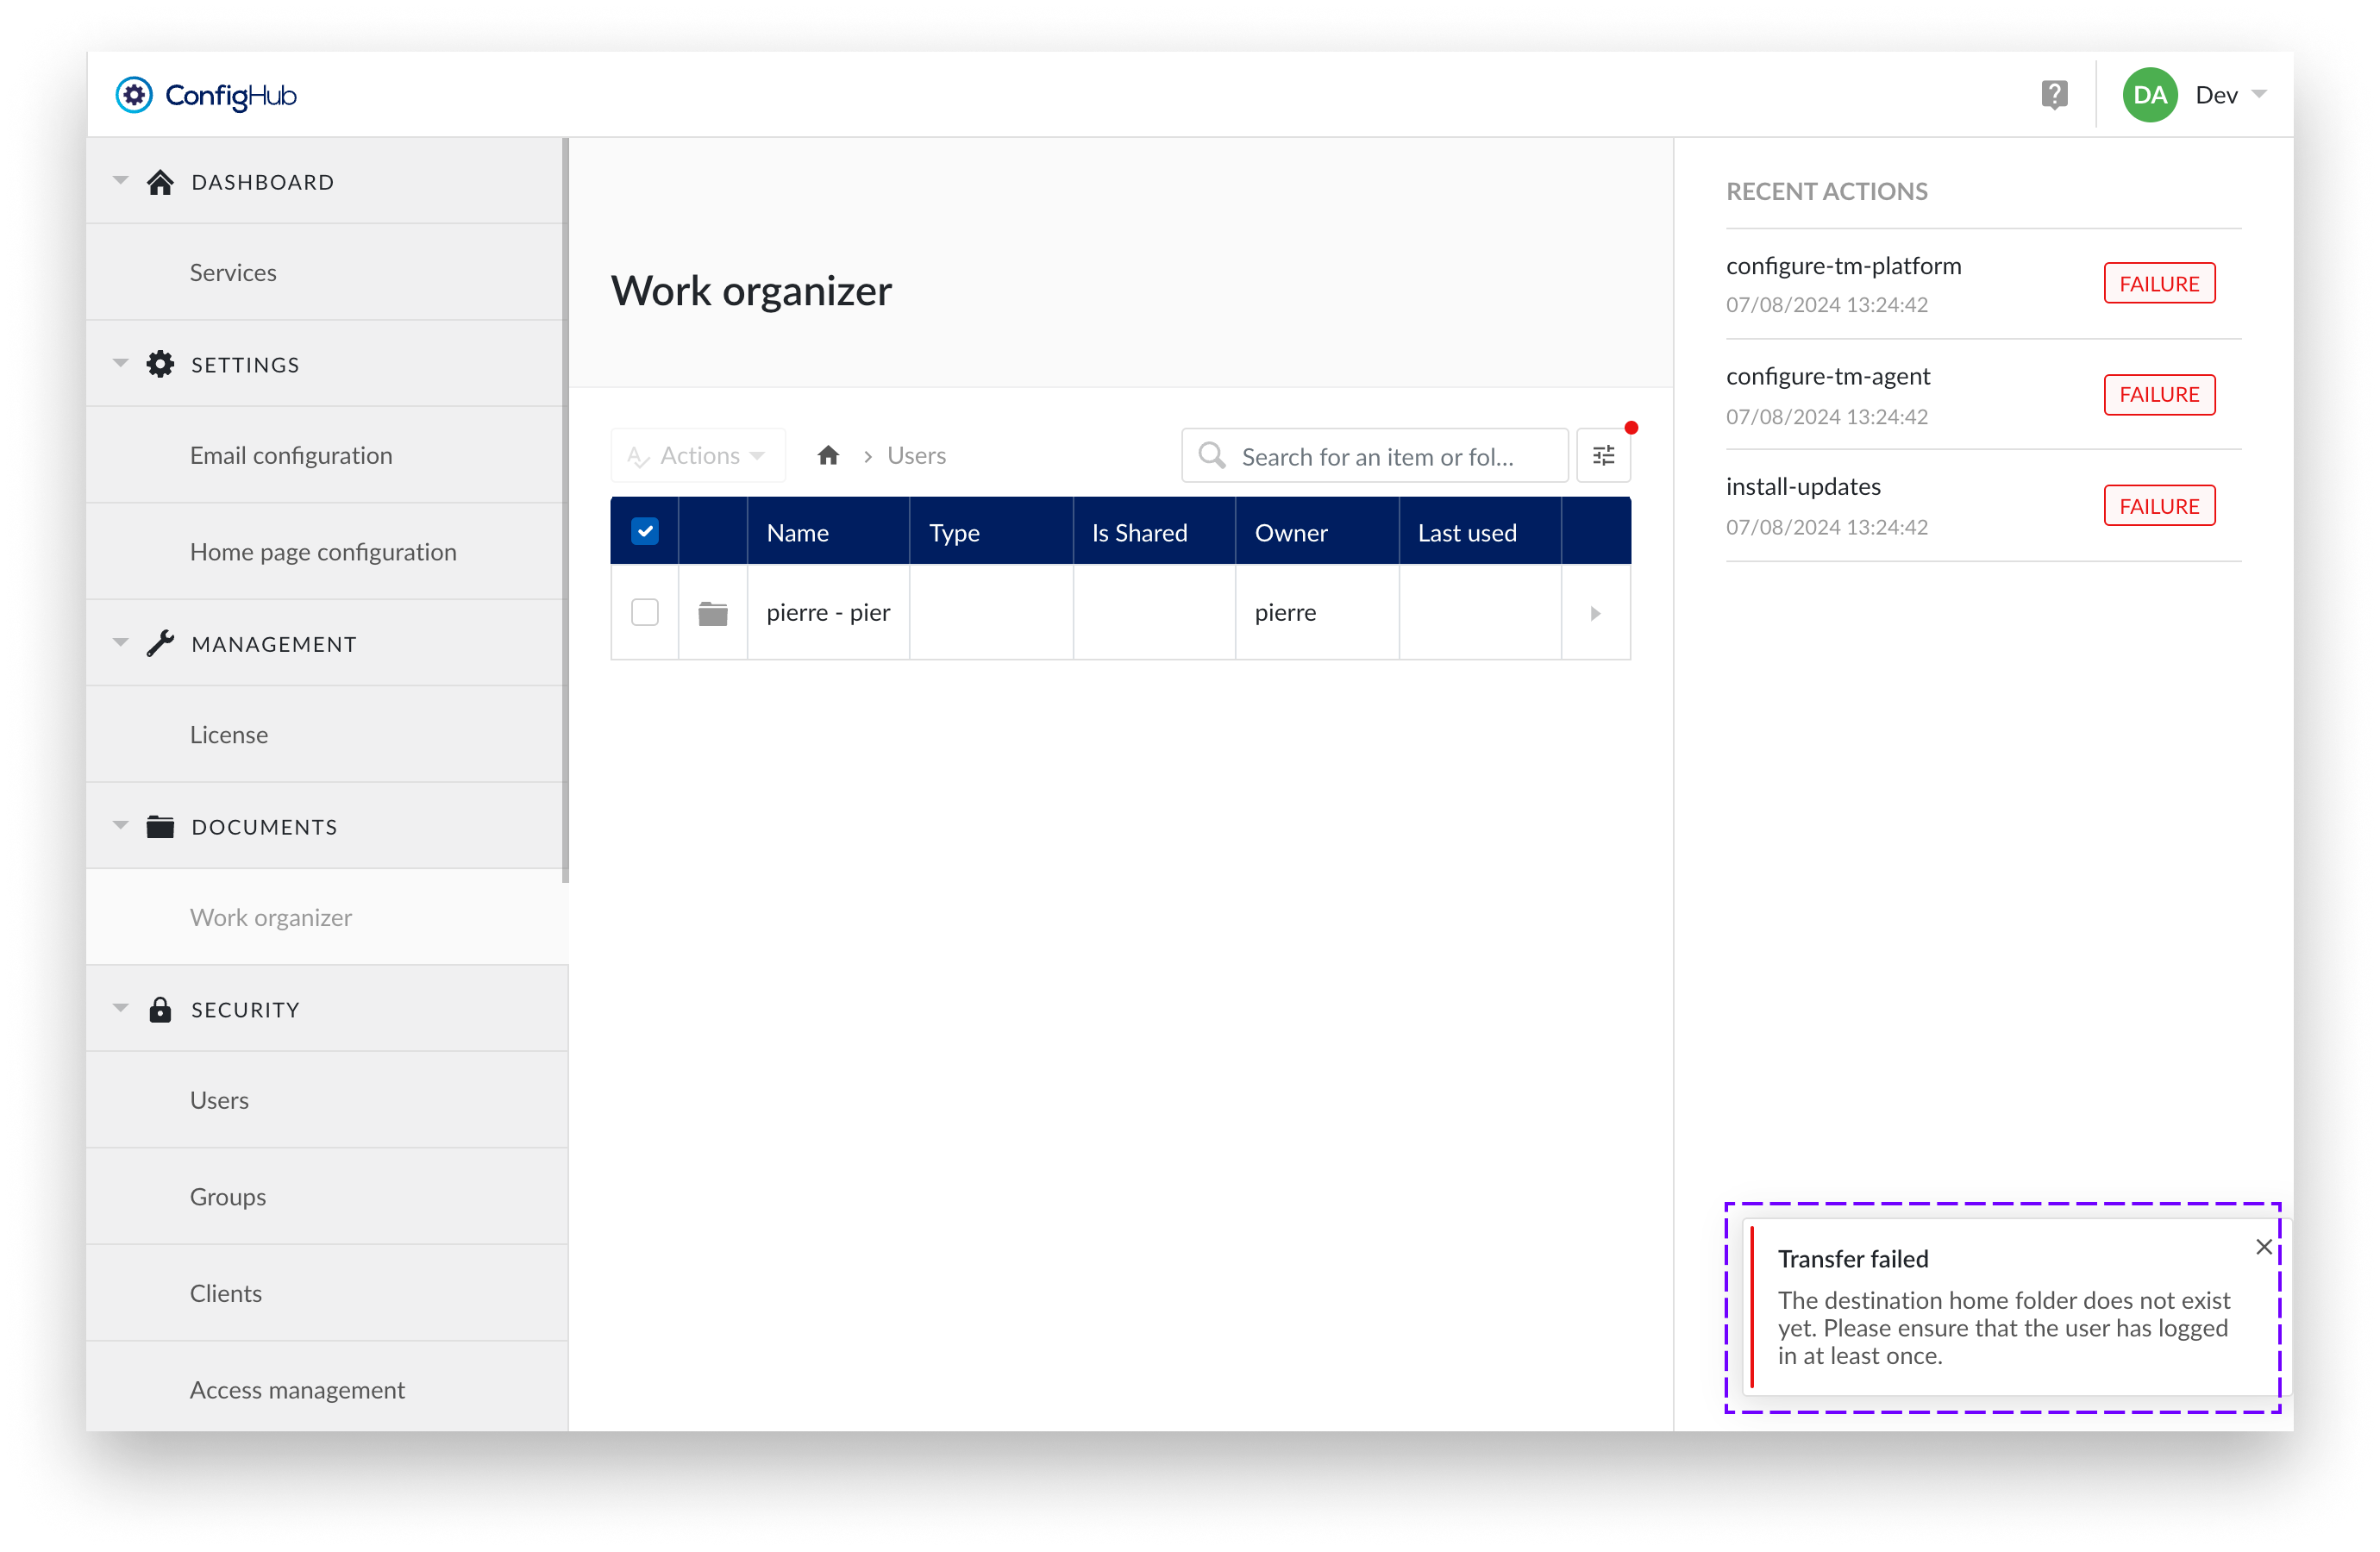
Transfer failed
If you attempt a transfer to a user who has not logged in before, it will fail because the home folder for this user has not yet been created.
Home folder filter
A new filter has been added which is only available in the Top Level Work Organizer. This filter allows you to specifically search for a user's home folder.
The filter was added because the home folder list is not sortable or alphabetically arranged by the user's name. This is because TrendMiner separates personal data from the application and does not store it in the Work Organizer. To avoid scrolling through long lists of unsorted home folders, the home folder filter has been added.
Note
The home folder filter is only applied at the level of Root > Users to avoid interfering with the behavior of the standard filters.
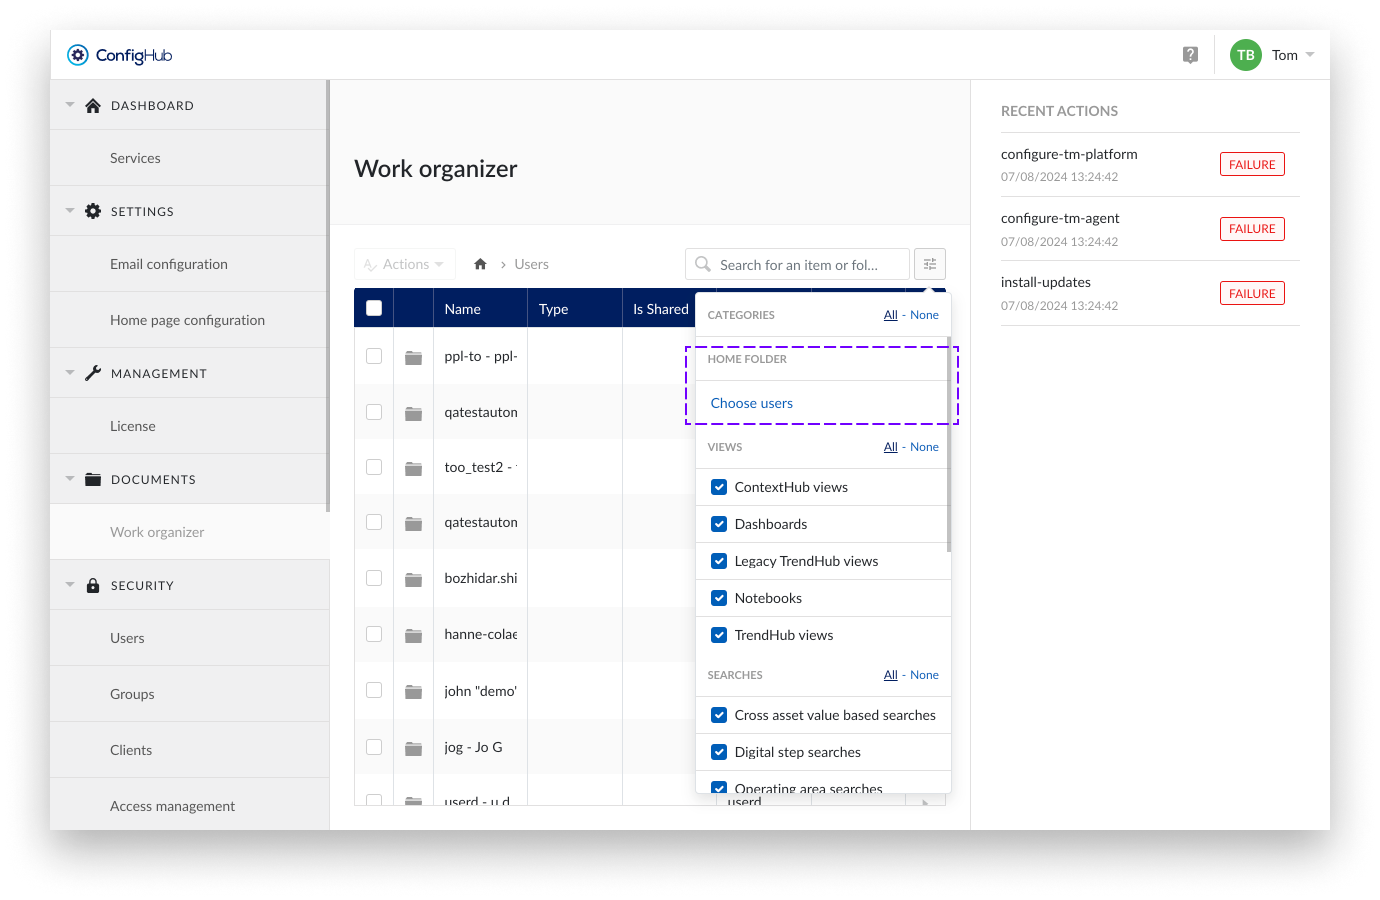
Steps:
Open the filters and "Choose users"
Access the filter options and select "Choose users" under HOME FOLDER.
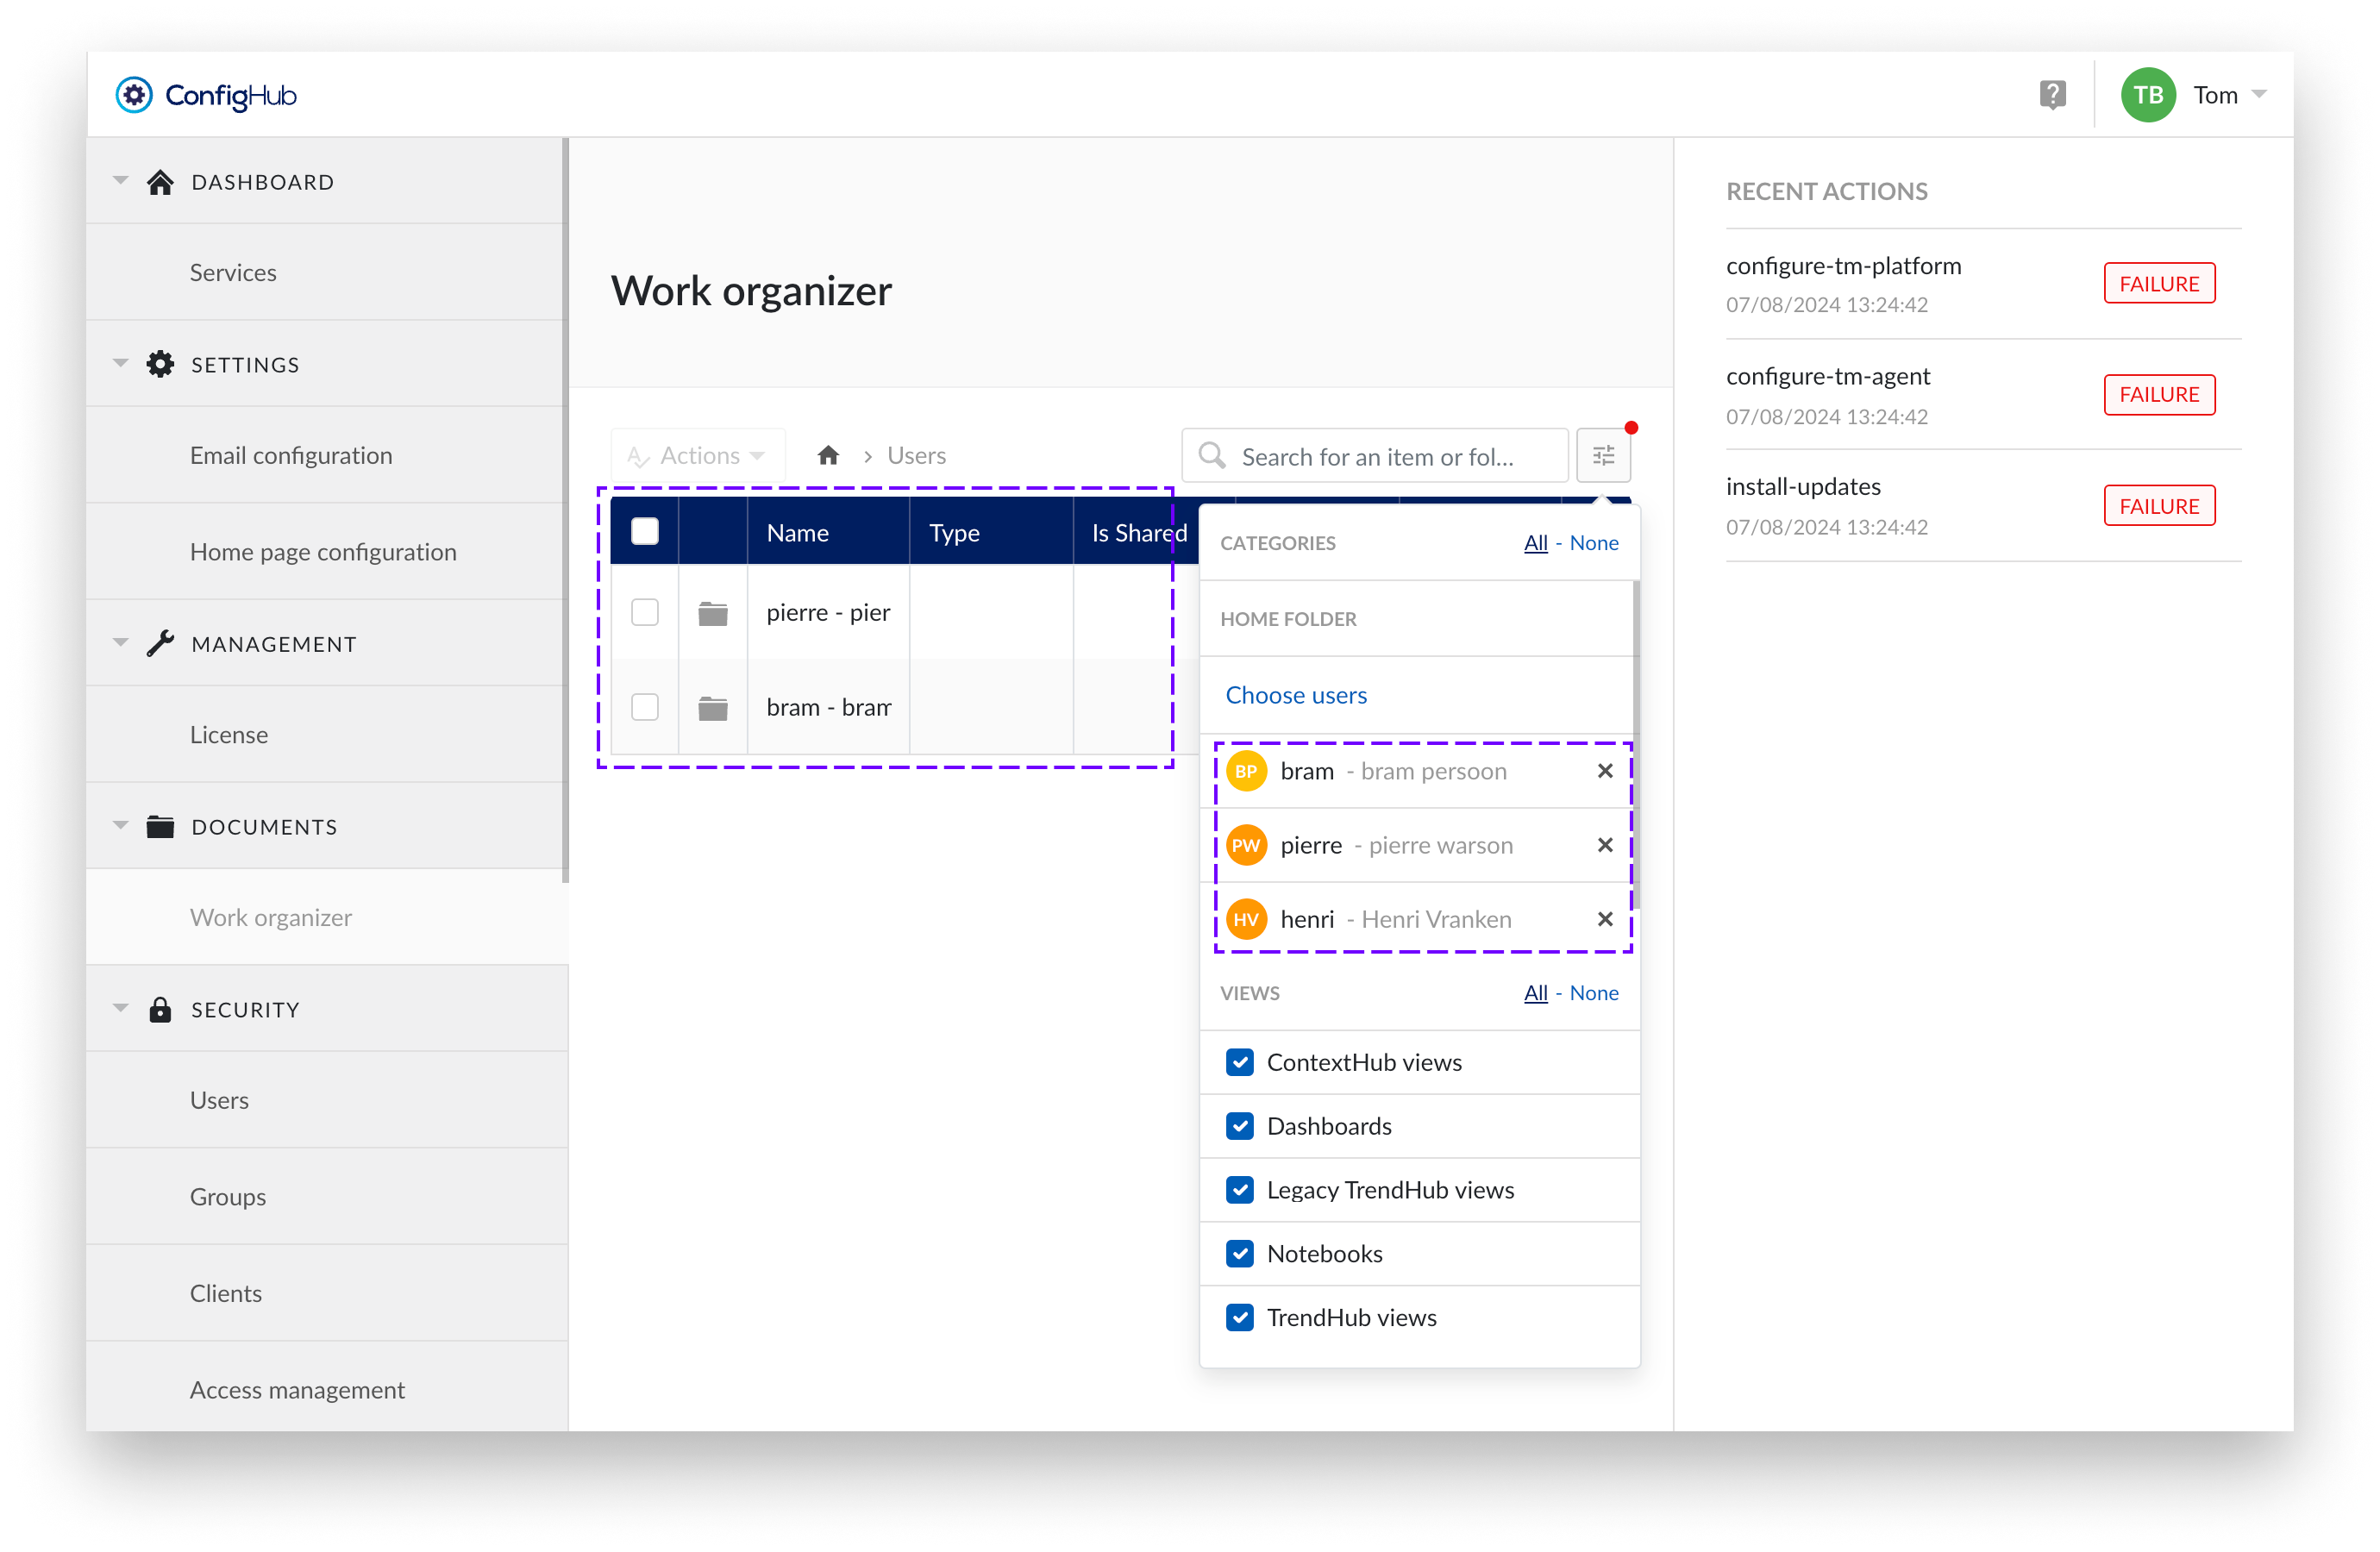
Search for Users
Search for users. Both active and deleted users will be displayed. This helps you find the home folders of deleted users and transfer their contents to active users.

Confirm
Confirm your filter selection.
Filter is applied
Under the Users directory, only home folders that meet the filter criteria are displayed.
Manage home folders
As a TM System Administrator, you can manage the home folders of all users within the Top Level Work Organizer (TLWO). Follow the instructions below to perform various actions on items and folders.
Notice
Search is possible for items and folders and works like the standard Work Organizer. However, the search results do not include home folders. This is because, for privacy reasons, we do not store personal user data in the Work Organizer. To still easily navigate to the desired home folder, the home folder filter has been added.
Available Actions :
To perform any of these actions, check an item or folder and then select the desired action from the Actions dropdown menu.
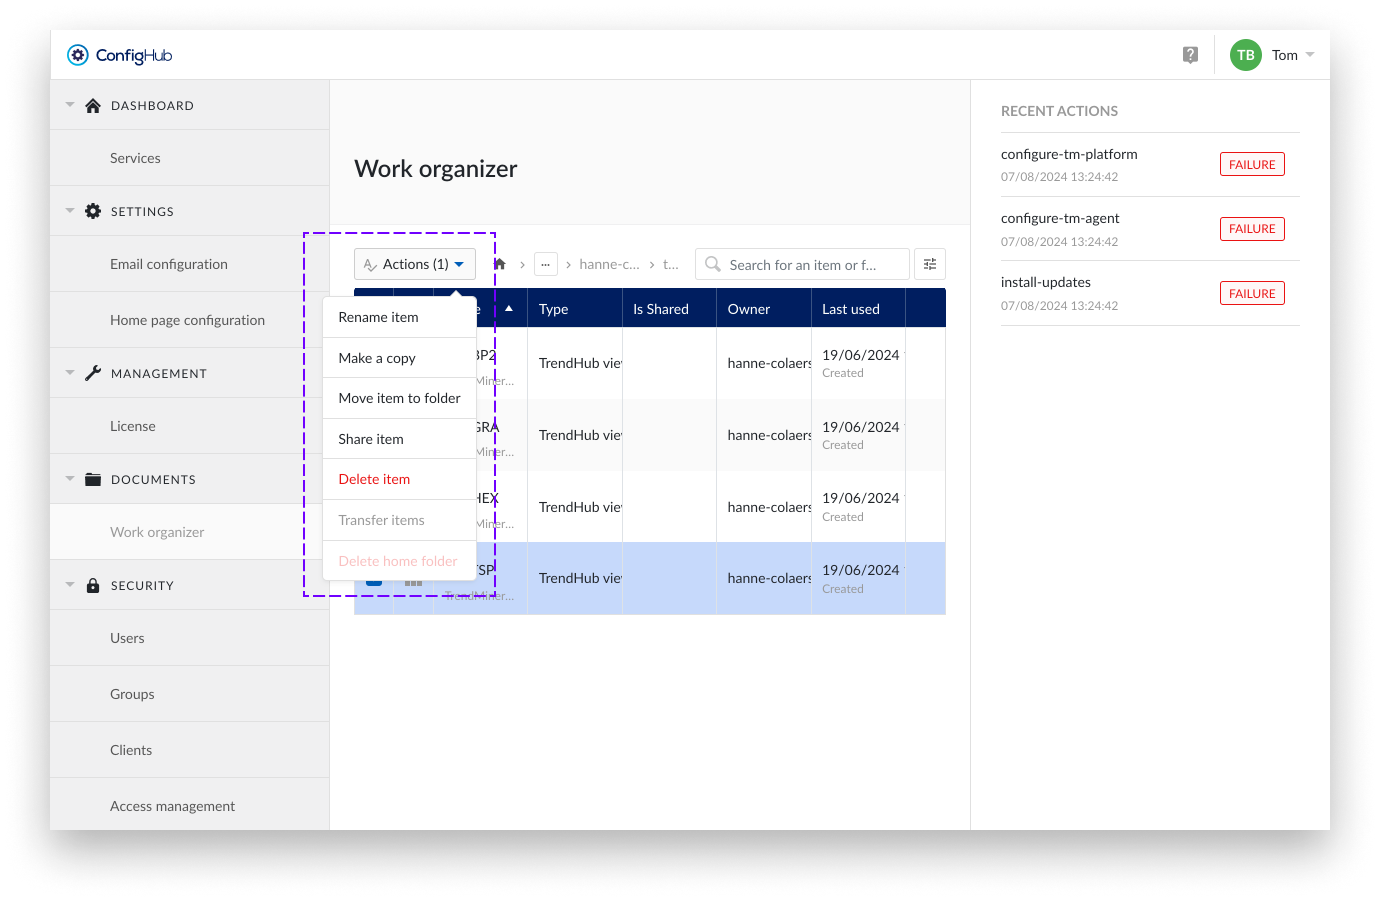
Rename item: rename an item or folder.
Only one resource (item or folder) can be selected at a time.
Steps:
Check the item or folder you want to rename.
Select Rename from the Actions dropdown.
Enter the new name and confirm with “Rename item”.
Make a Copy: create a copy of an item.
This action is only applicable to items, not folders. Only one item can be selected at a time.
Steps:
Check the item you want to copy.
Select Make a Copy from the Actions dropdown.
Enter the new name and confirm with “Copy item”.
Move Item(s) to folder: move resources within the same home folder.
Moving to another home folder implies a transfer of ownership.
Steps:
Check one or more items or folders you want to move.
Select Move Item(s) from the Actions dropdown.
Choose the destination within the same home folder.
Confirm with “Move”.
Share Item(s): share items with a user, providing read access.
This action is only applicable to items, not folders. Multiple items can be shared in one action.
Steps:
Check the items you want to share.
Select Share Item(s) from the Actions dropdown.
Add or remove the user(s) you want to grant Read access.
Delete Item(s): delete selected resources.
Both items and folders can be deleted.
Steps:
Check the items or folders you want to delete.
Select Delete Item(s) from the Actions dropdown.
Confirm the deletion.
Transfer Items: transfer ownership of the contents of one home folder to another user's home folder.
Only one home folder can be selected at a time.
Steps:
Select the home folder you want to transfer.
Choose Transfer Items from the Actions dropdown.
Follow the prompts to complete the transfer.
Caution
Transfer items is an action that cannot be undone. Therefore, be sure to review the documentation, which can be found here.
Delete Home Folder: delete the home folder of a user who has been permanently deleted. This helps maintain the administration of the Work Organizer.
Only one home folder can be selected at a time.
Steps:
Select the home folder of the deleted user.
Choose Delete Home Folder from the Actions dropdown.
Confirm the deletion.
Notice
Due to internal caching, it takes an hour for changes to users, such as deletions, to be recognized. Therefore, if you have just deleted a user, please wait an hour before attempting to delete their home folder as well.
Note
Deleted user folders
For users who are permanently deleted by external identity providers, we can no longer retrieve their user details. As a result, their home folders are renamed to “Deleted user”. Since no additional information is available, you may encounter multiple folders with the name “Deleted user.” It is recommended to review these home folders and either transfer their contents or delete the home folder entirely.
Security
The section 'security' in ConfigHub allows users with the system administrator role to manage users, groups, access permissions etc.
Users
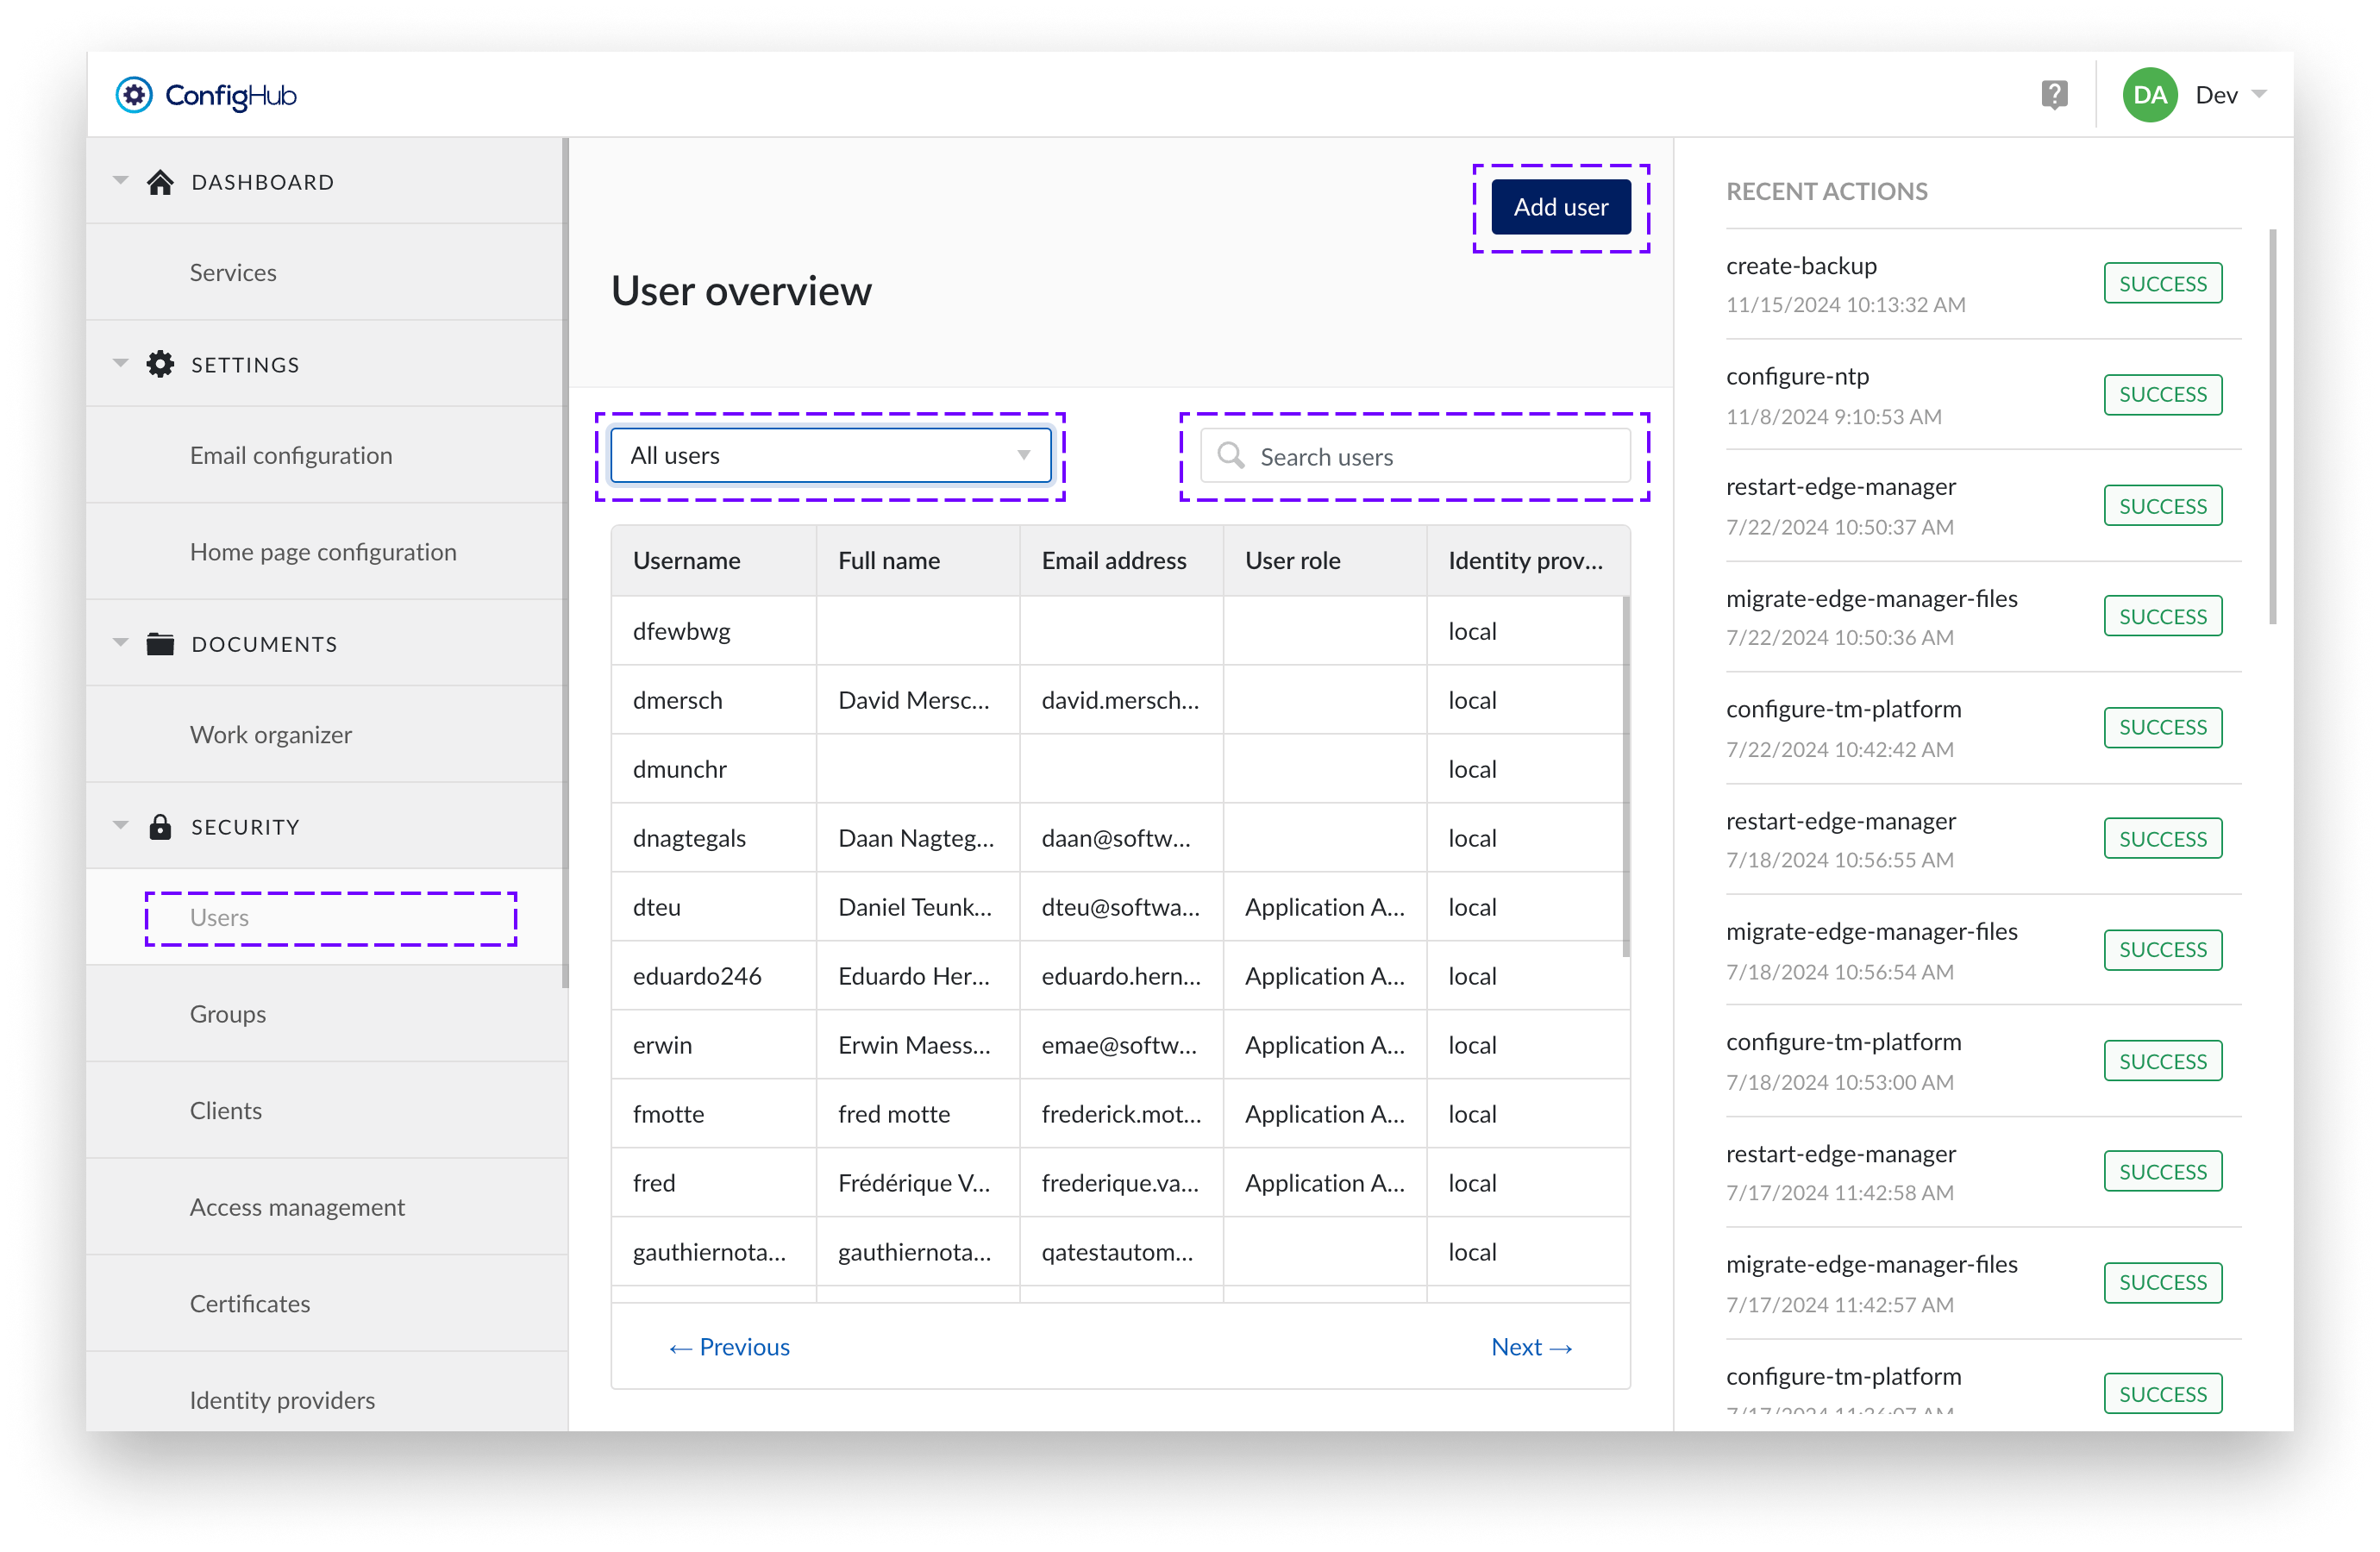
TrendMiner users can either exist locally or via an external Identity Provider. An overview of all users can be found under the "Security" section in ConfigHub.
The user overview displays the username, full name, email address, and identity provider for each user. To find specific users, you can use the search bar. There is also a User Role dropdown filter for narrowing down the list based on roles. It is important to note that you cannot use the search bar and the dropdown filter at the same time.
Creating users
Only local users can be created via ConfigHub. In the case of an external Identity Provider (IdP), the users are synced instead and should be managed via the IdP.
To create users you will need to go to the user-menu under the "security" section. From there users can be added via the "+add user"-button.
You can review a list of user roles to each specific user using the “User role” column in the table.
Note
Usernames need to be unique and cannot be changed afterwards.
User details
From the user overview a user can be clicked to open the user details. In the user details view more options can be performed such as:
Editing user details (local users only)
Change password (local users only)
Change roles (e.g. give users admin rights)
Unlock the user after the user consecutively failed to enter his password correctly.
Delete the user account (local users only).
Password policy
When creating or editing local users, the password needs to adhere to the following rules:
Have a minimum length of 8 characters
Contain at least one uppercase character [A-Z]
Contain at least one lowercase character [a-z]
Contain at least one digit [0-9]
Contain at least one special character [?!@#%$…]
Not have been recently used in the previous three passwords
Not a common password
For users account managed by an external LDAP or SAML identity provider the passwords cannot be changed in TrendMiner.
User roles
3 roles are available:
Application Administrator: can perform application administrator tasks such as deleting tag indexes or configure asset permissions in ContextHub.

System Administrator: has all permissions an application admin has + can access ConfigHub
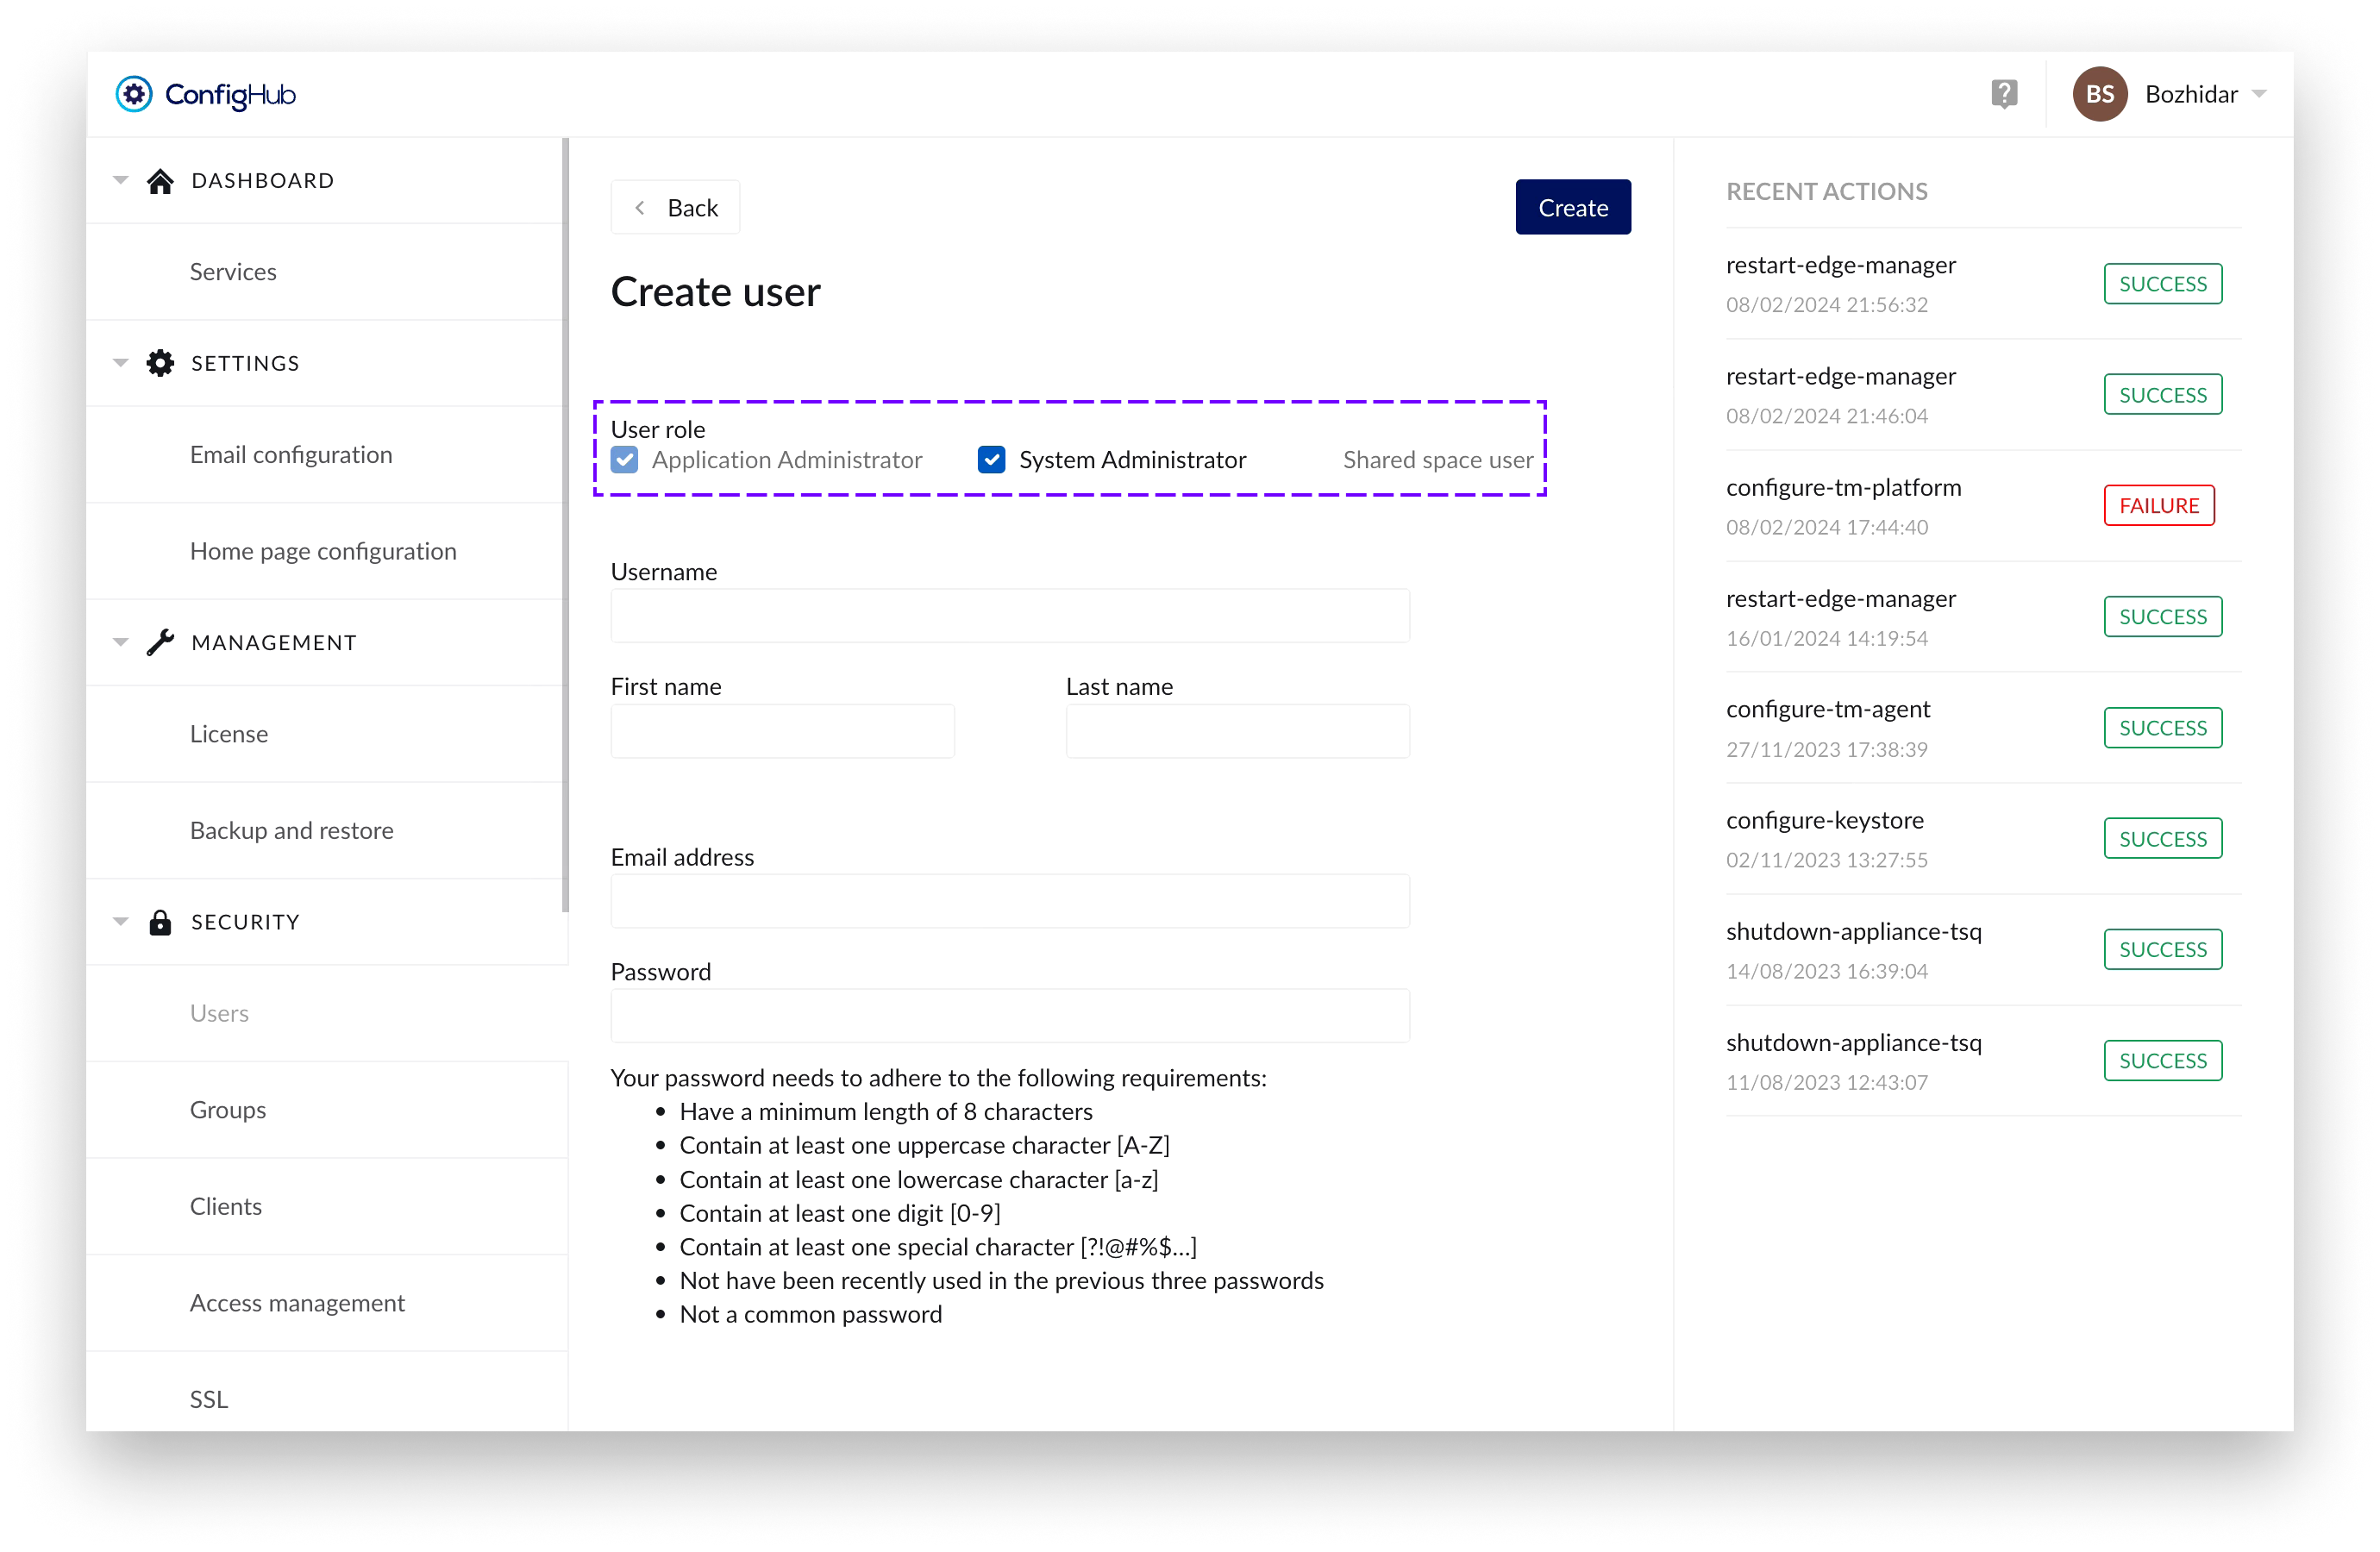
Shared space user:
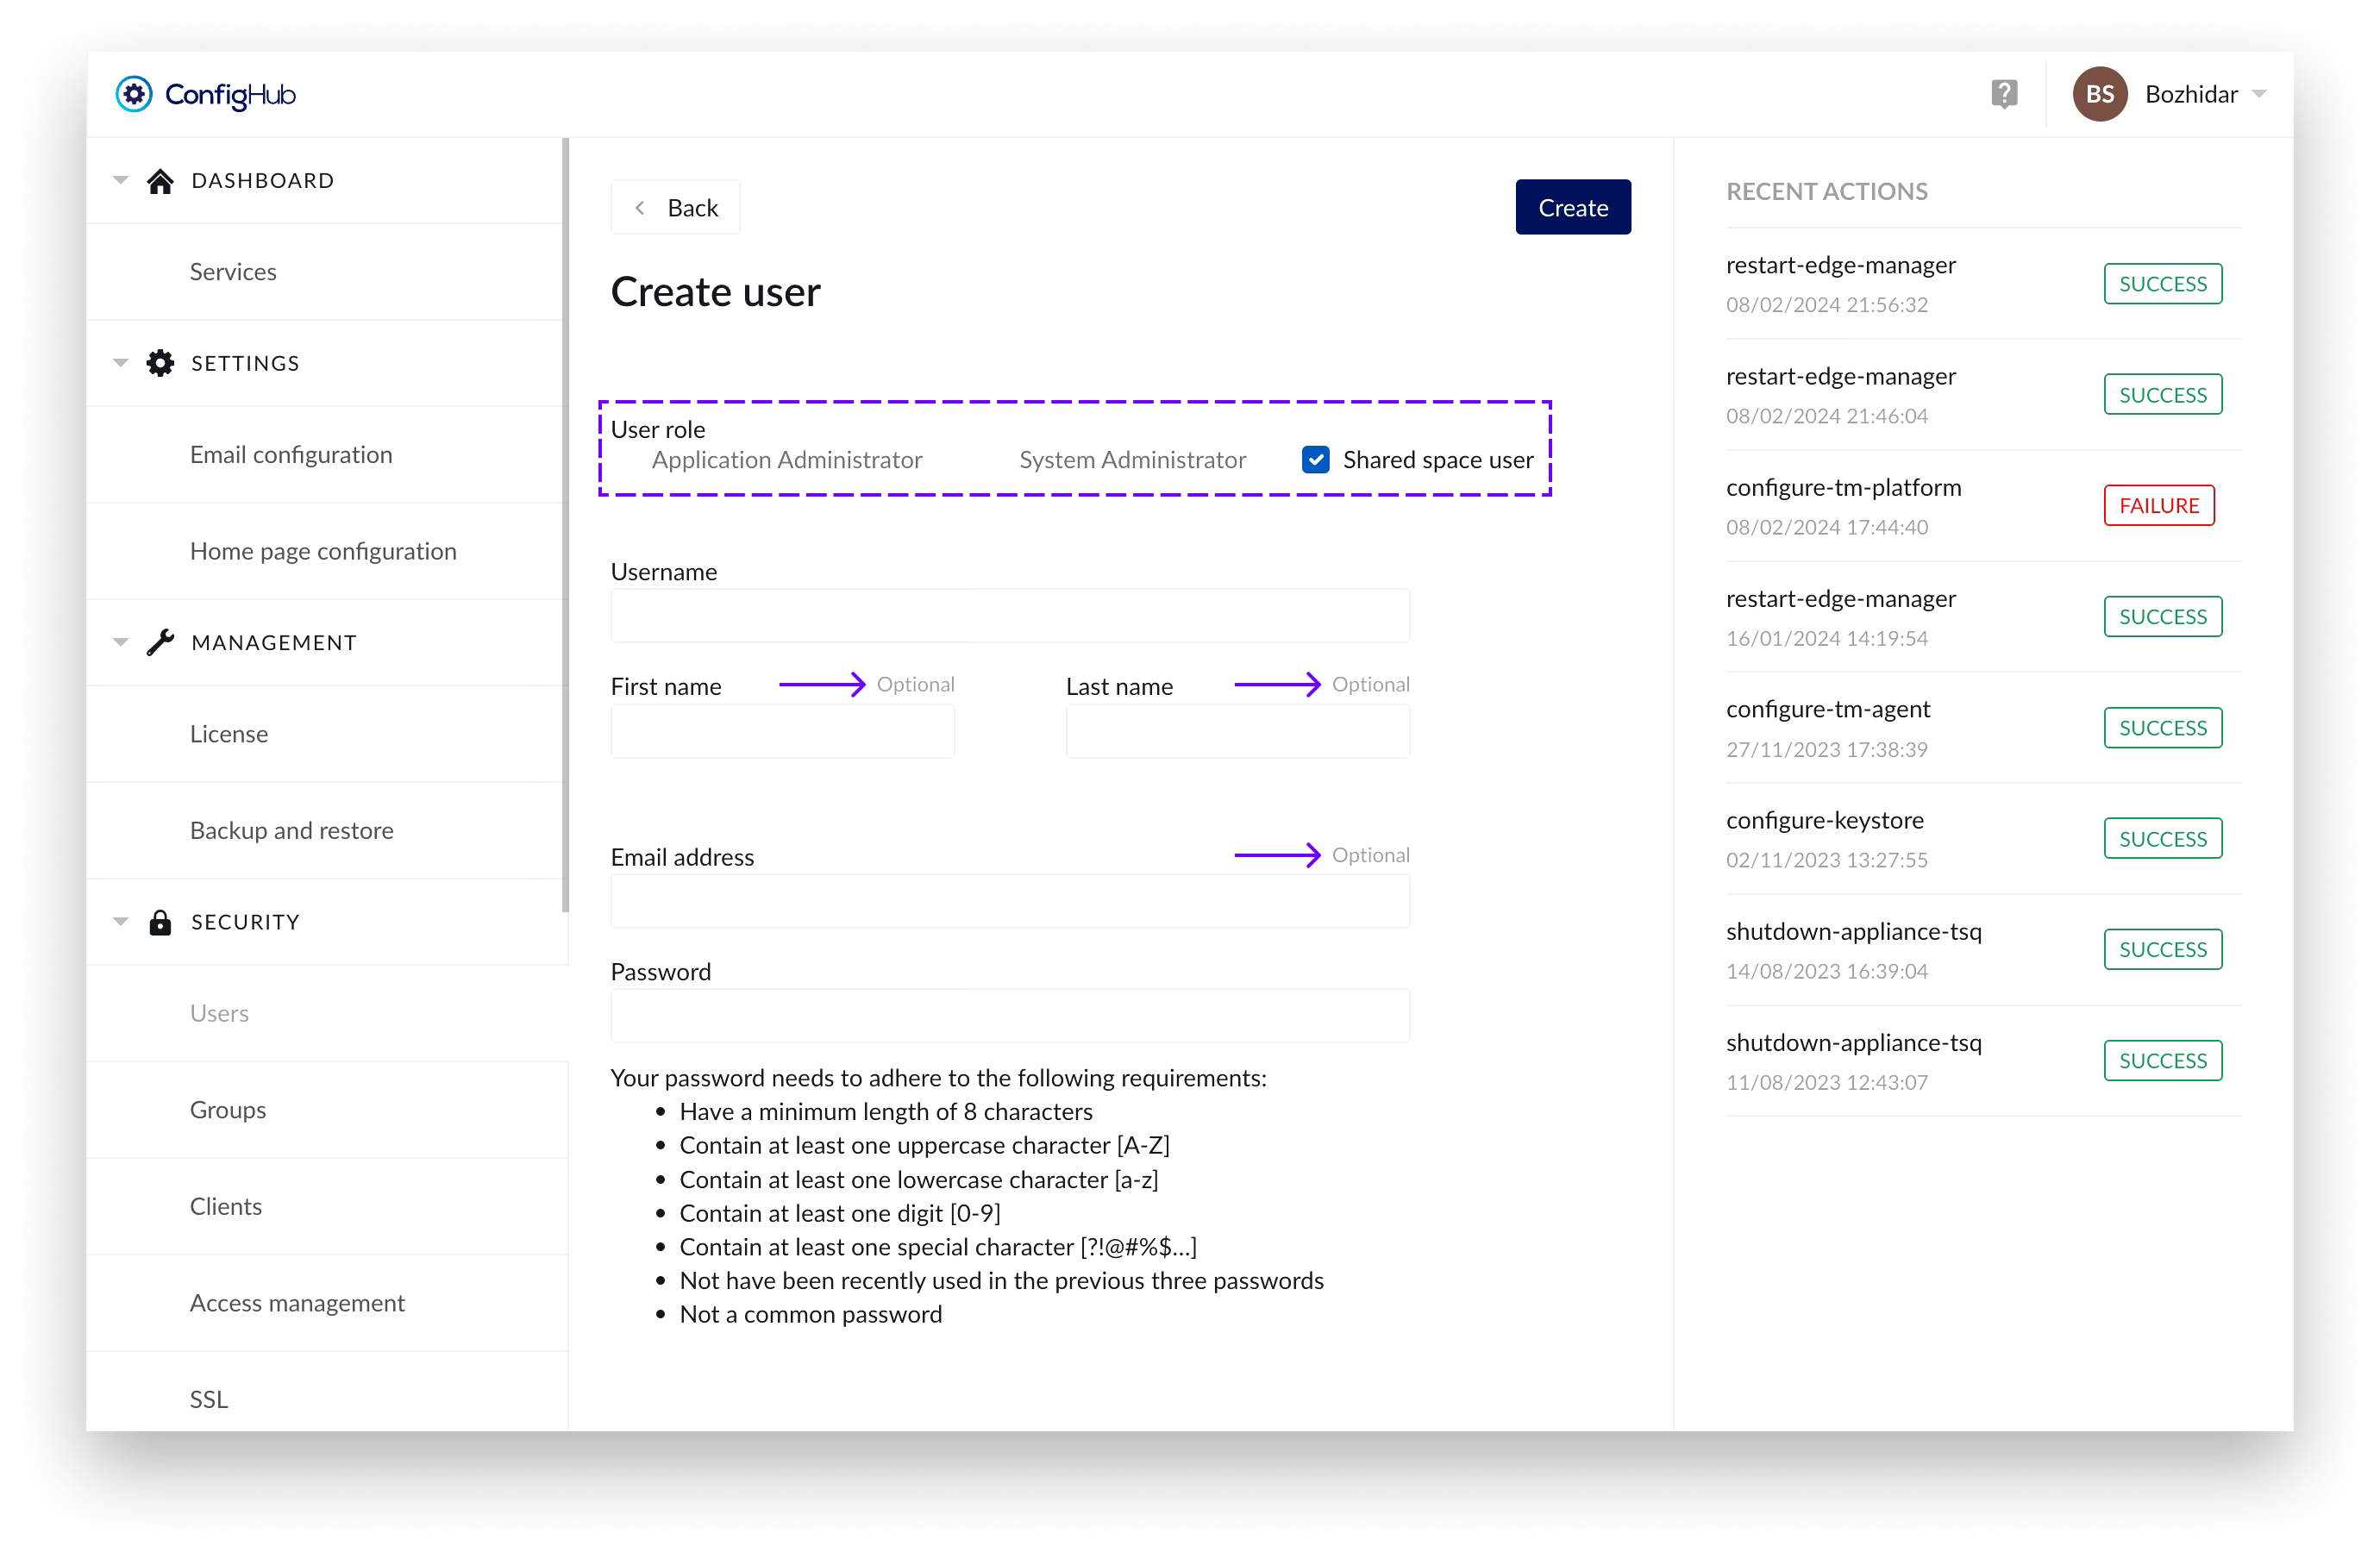
User with an extended login timeout of 1 year to ensure their usability in shared spaces for displaying dashboards and other content for prolonged periods of time.
Users with this role have the following fields as optional: “First name”, “Last name” and “Email address”.
For security reasons - assigning “Shared space user” role to a specific user would prevent you of assigning any administration role in combination with it.
A forceful logout of such users can be initiated by clicking on the “Revoke token” in the “User edit” screen (to which you can navigate by clicking on an already created user in the table):
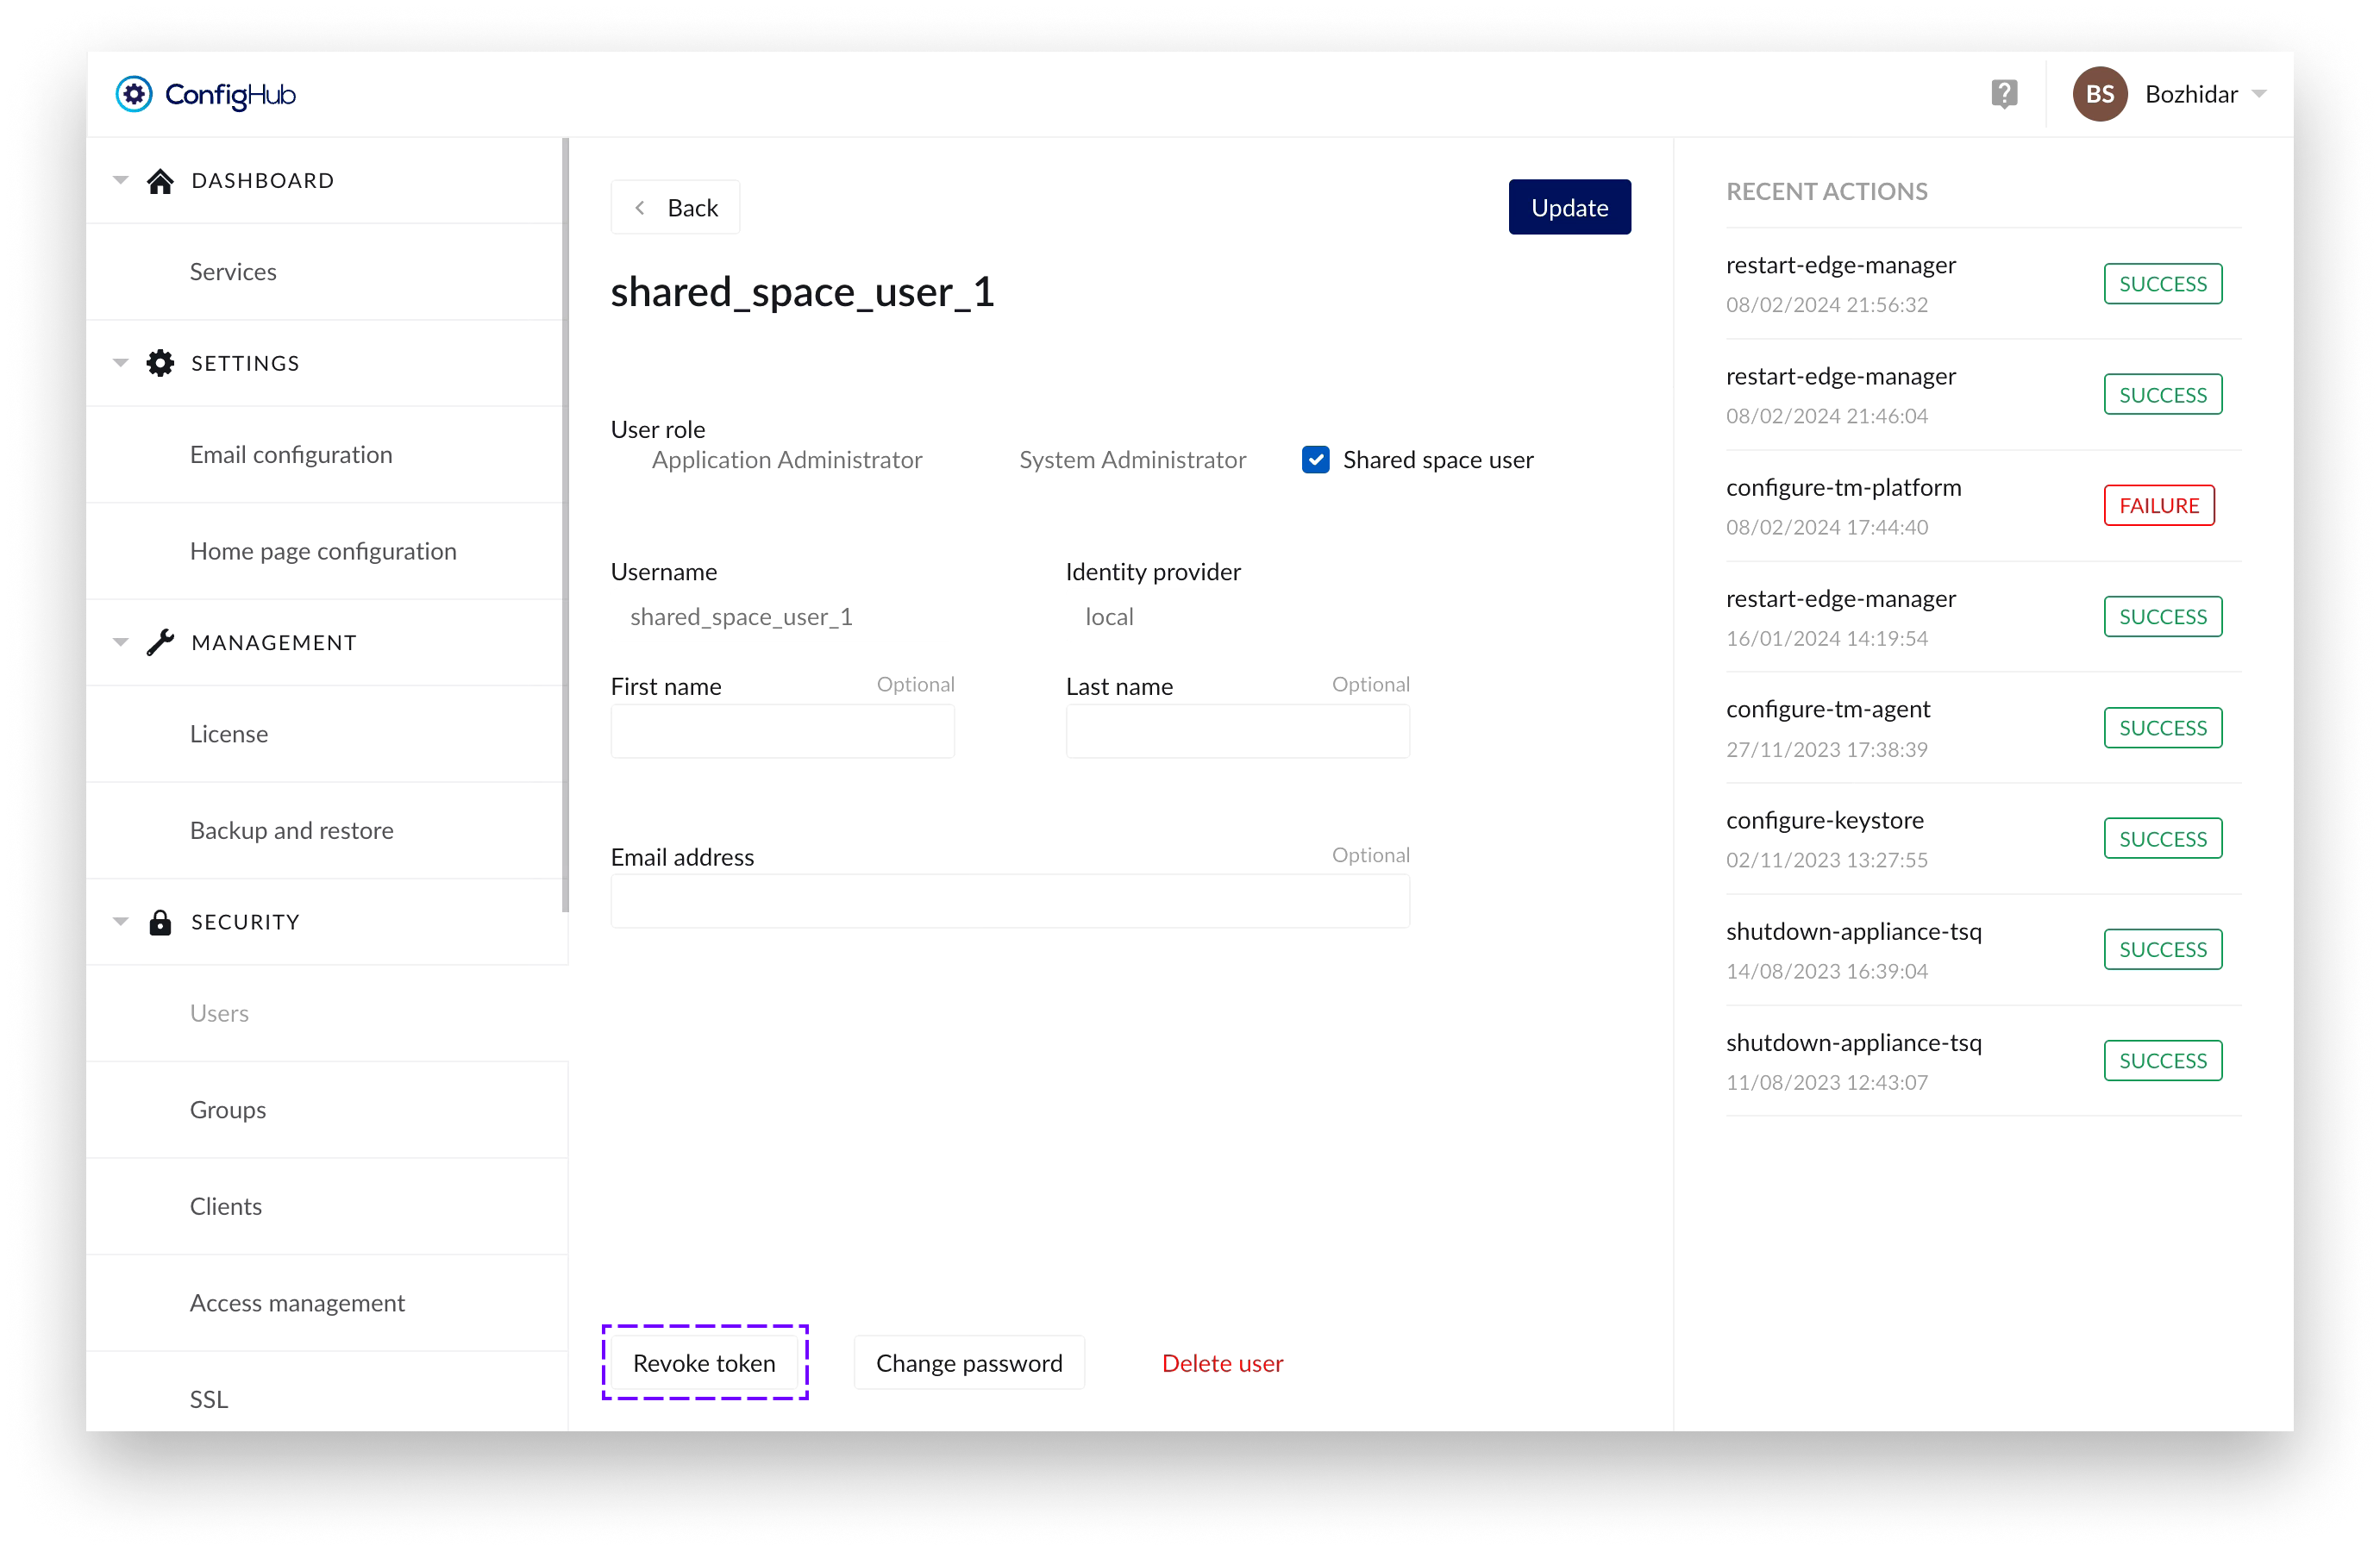
Once that's done a confirmation dialogue would appear, from where you can also select for the user to have to update his password on next login:
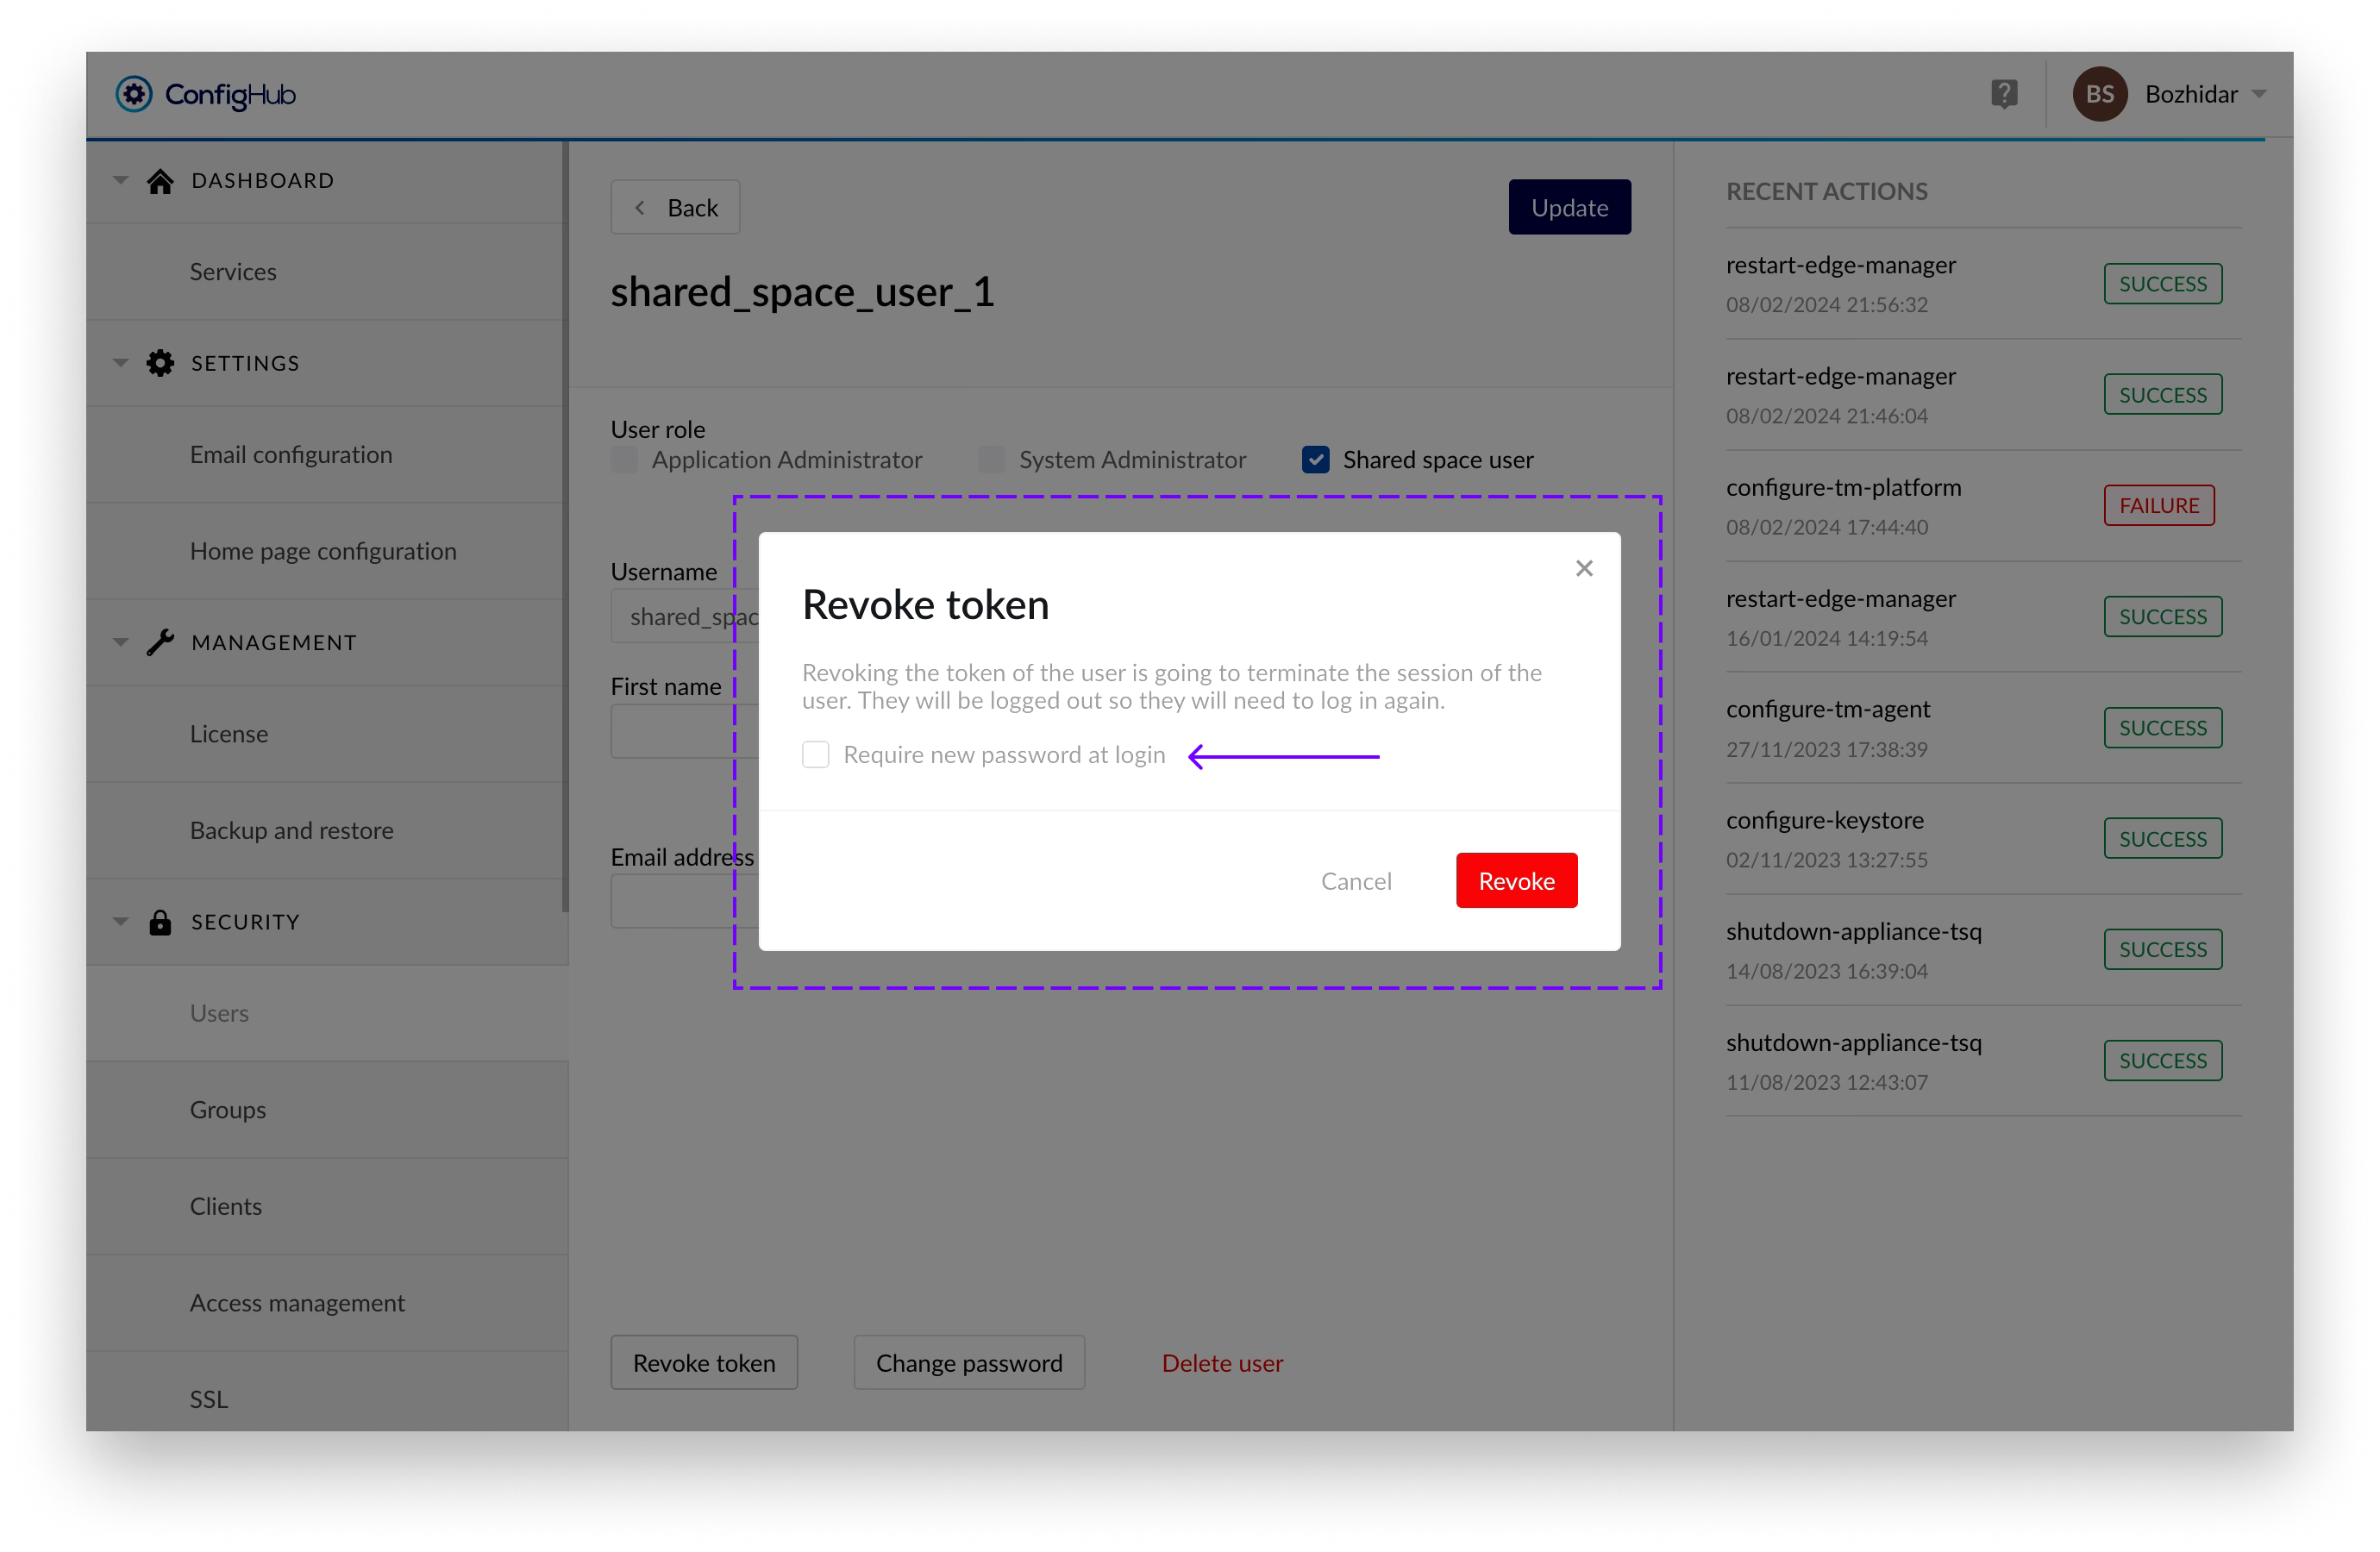
The user can remain logged in for a maximum of 5 minutes after the process has been initiated, after which he will be forcefully logged out.
Unlock user account
A user account is automatically temporarily locked after 3 login attempts using the wrong password (both for local accounts as for LDAP accounts). The user itself will not be able to see the difference between entering a wrong password or the access being denied because of a locked account. In both cases a generic error message is shown on the login page: "Invalid username, password or locked account". This is by design for security reasons.
Only users with the system administrator role can access ConfigHub and look up the user account to check if the account is indeed locked. A locked account can be recognized as follows:
A little lock icon in front and the word "Locked" behind the username
An "Unlock" button in the top right
No option to edit the user details or change the password as long as the account is locked
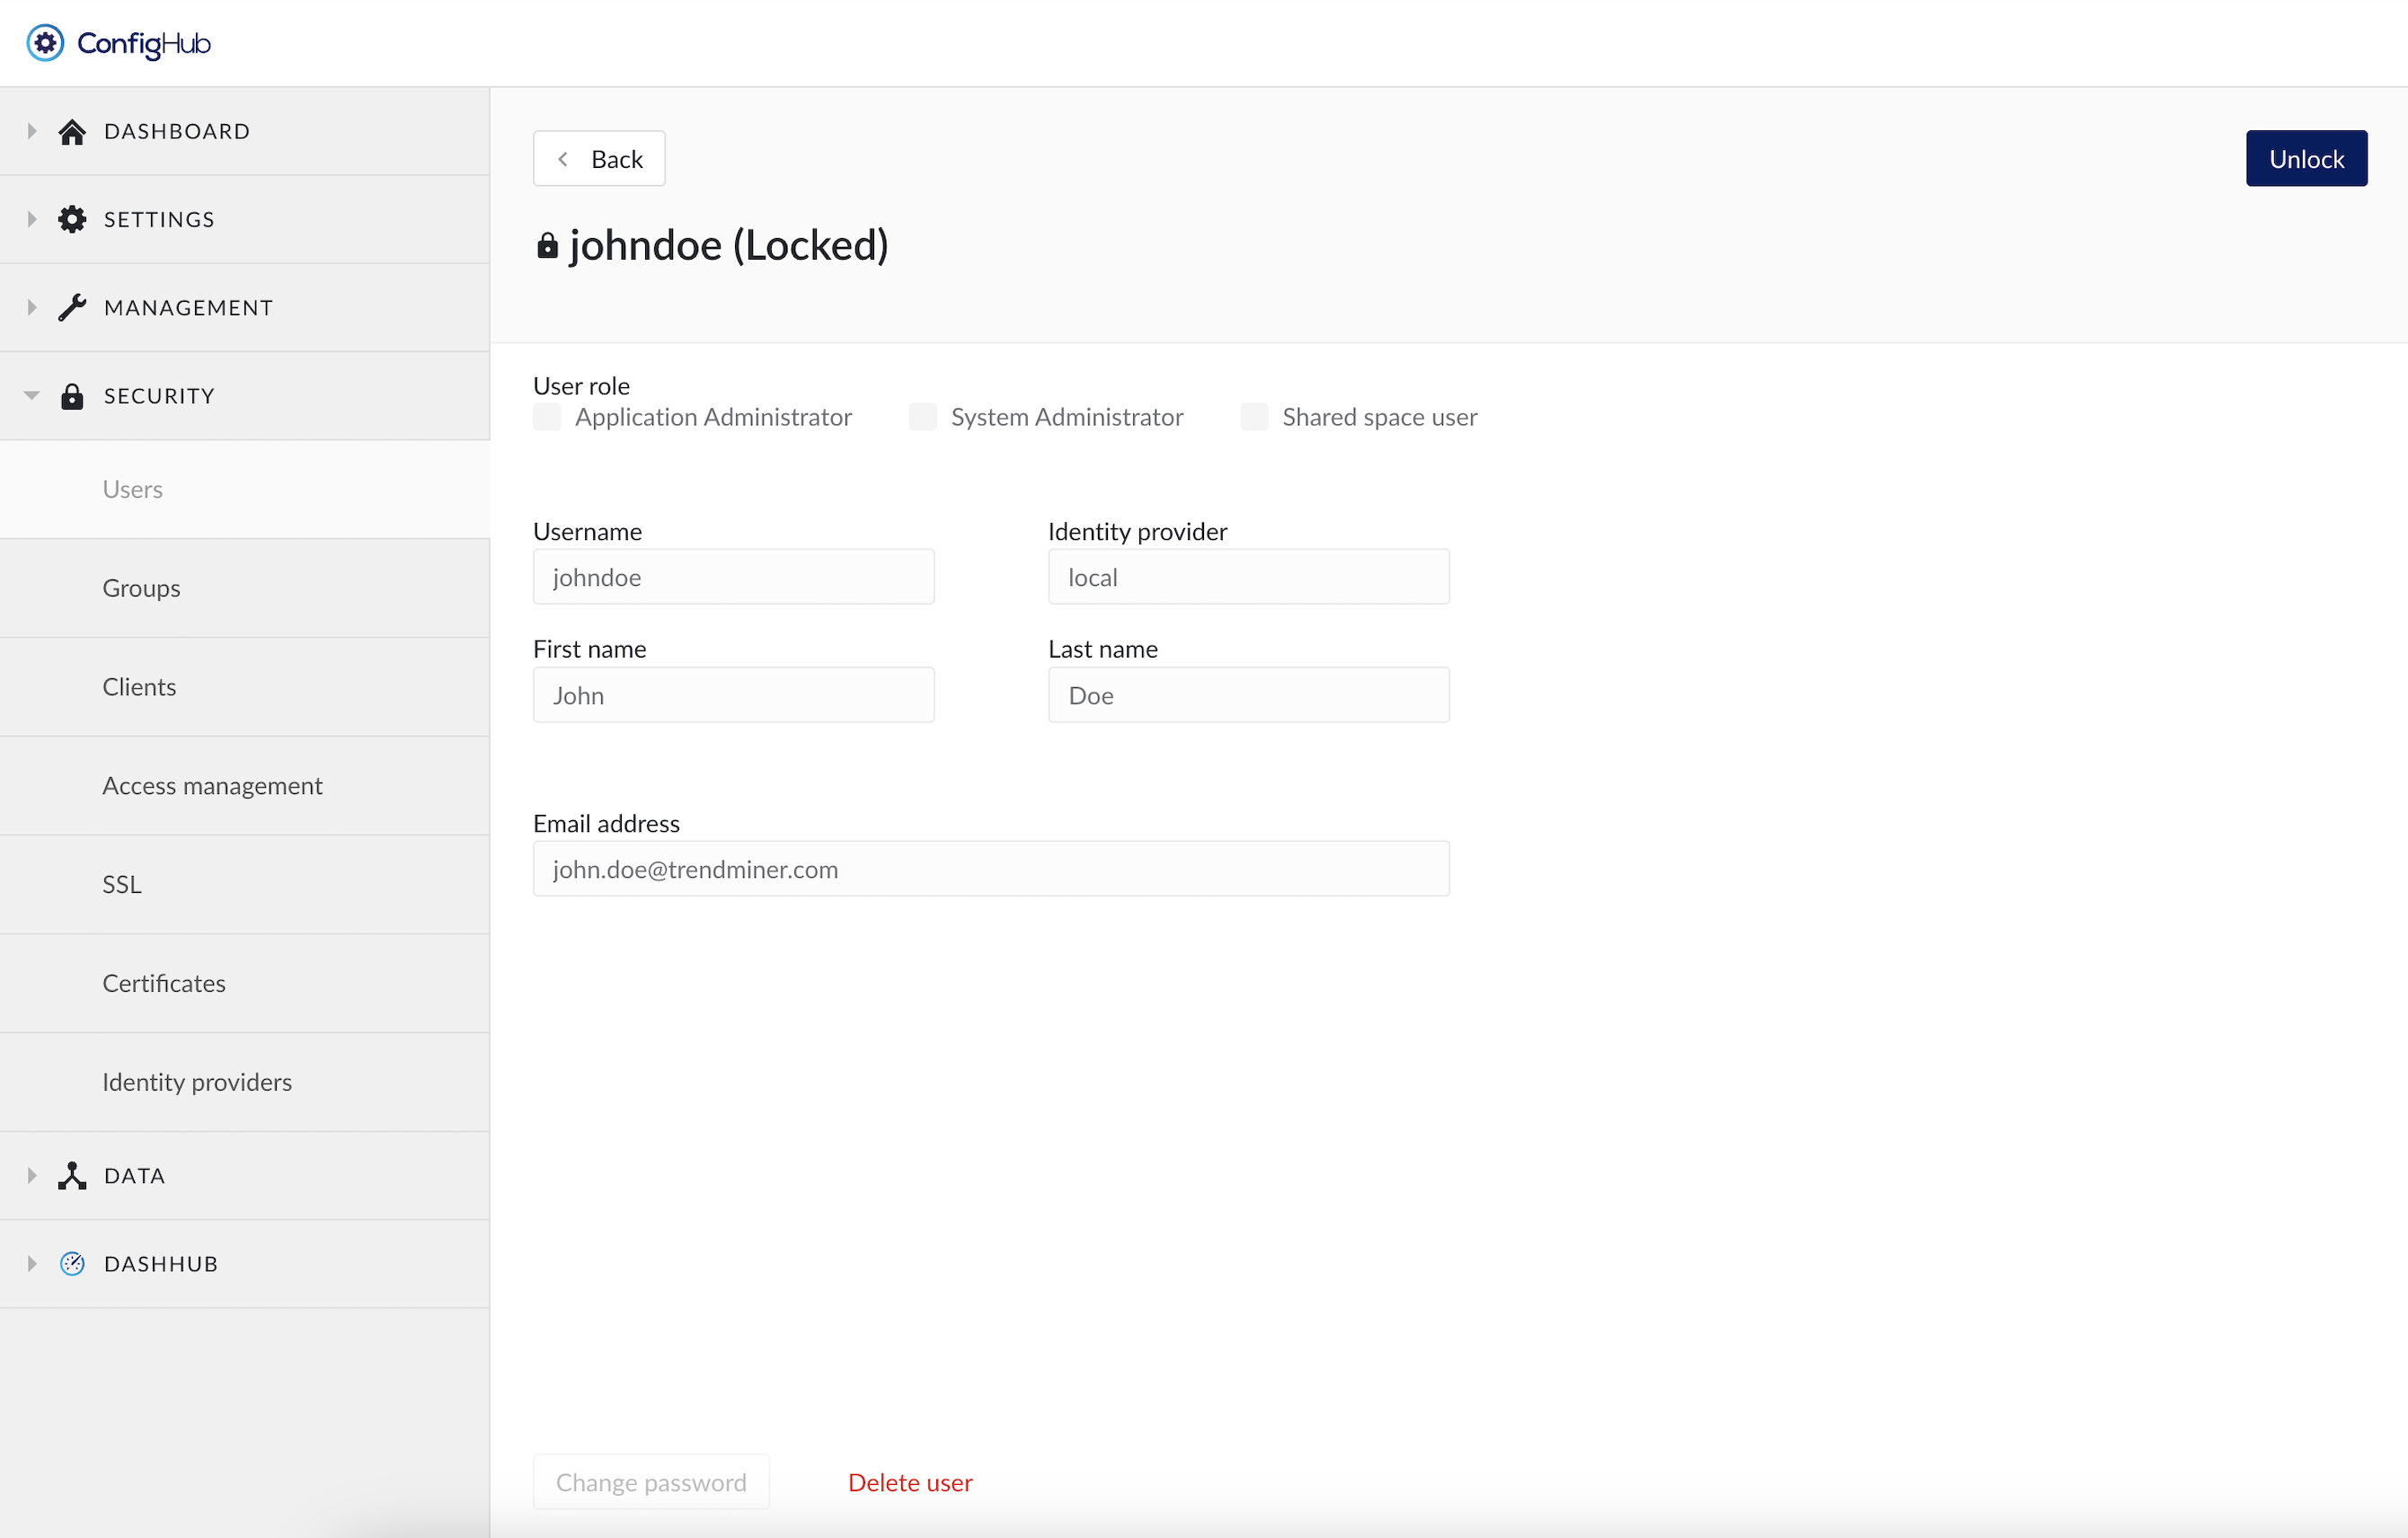
To unlock a user account:
Click the "Unlock" button on the top right in the user detail screen in ConfigHub.
All locked accounts get automatically unlocked when the tm-keycloak security service gets restarted.
Accounts get automatically unlocked after 1 hour. This lock time increases exponentially with the number of failed login attempts (the more failed logins, the longer the accounts remains locked).
Delete a user account
In the user details screen there is the option to delete a user account. This option is only available for local users. User accounts managed by an external identity provider cannot be deleted in TrendMiner. Instead these accounts need to be revoked TrendMiner permission on the IDP side, or they can be deleted on the IDP side. Note that revoking access or deleting a user in the external IDP will not delete the TrendMiner user account.
The saved work of a deleted user will not be deleted and will remain available for other colleagues with whom the work was shared before the account deletion. Monitors owned by the user will be disabled.
The deletion of a user account cannot be undone and the username cannot be reused afterwards for the creation of a new user.
Warning
The “admin” username is the principle main admin user of the TrendMiner Platform. This user can't be deleted, and cannot be linked to any IDP provider. This user is kept local, in case recovery to ConfigHub is needed.
Groups
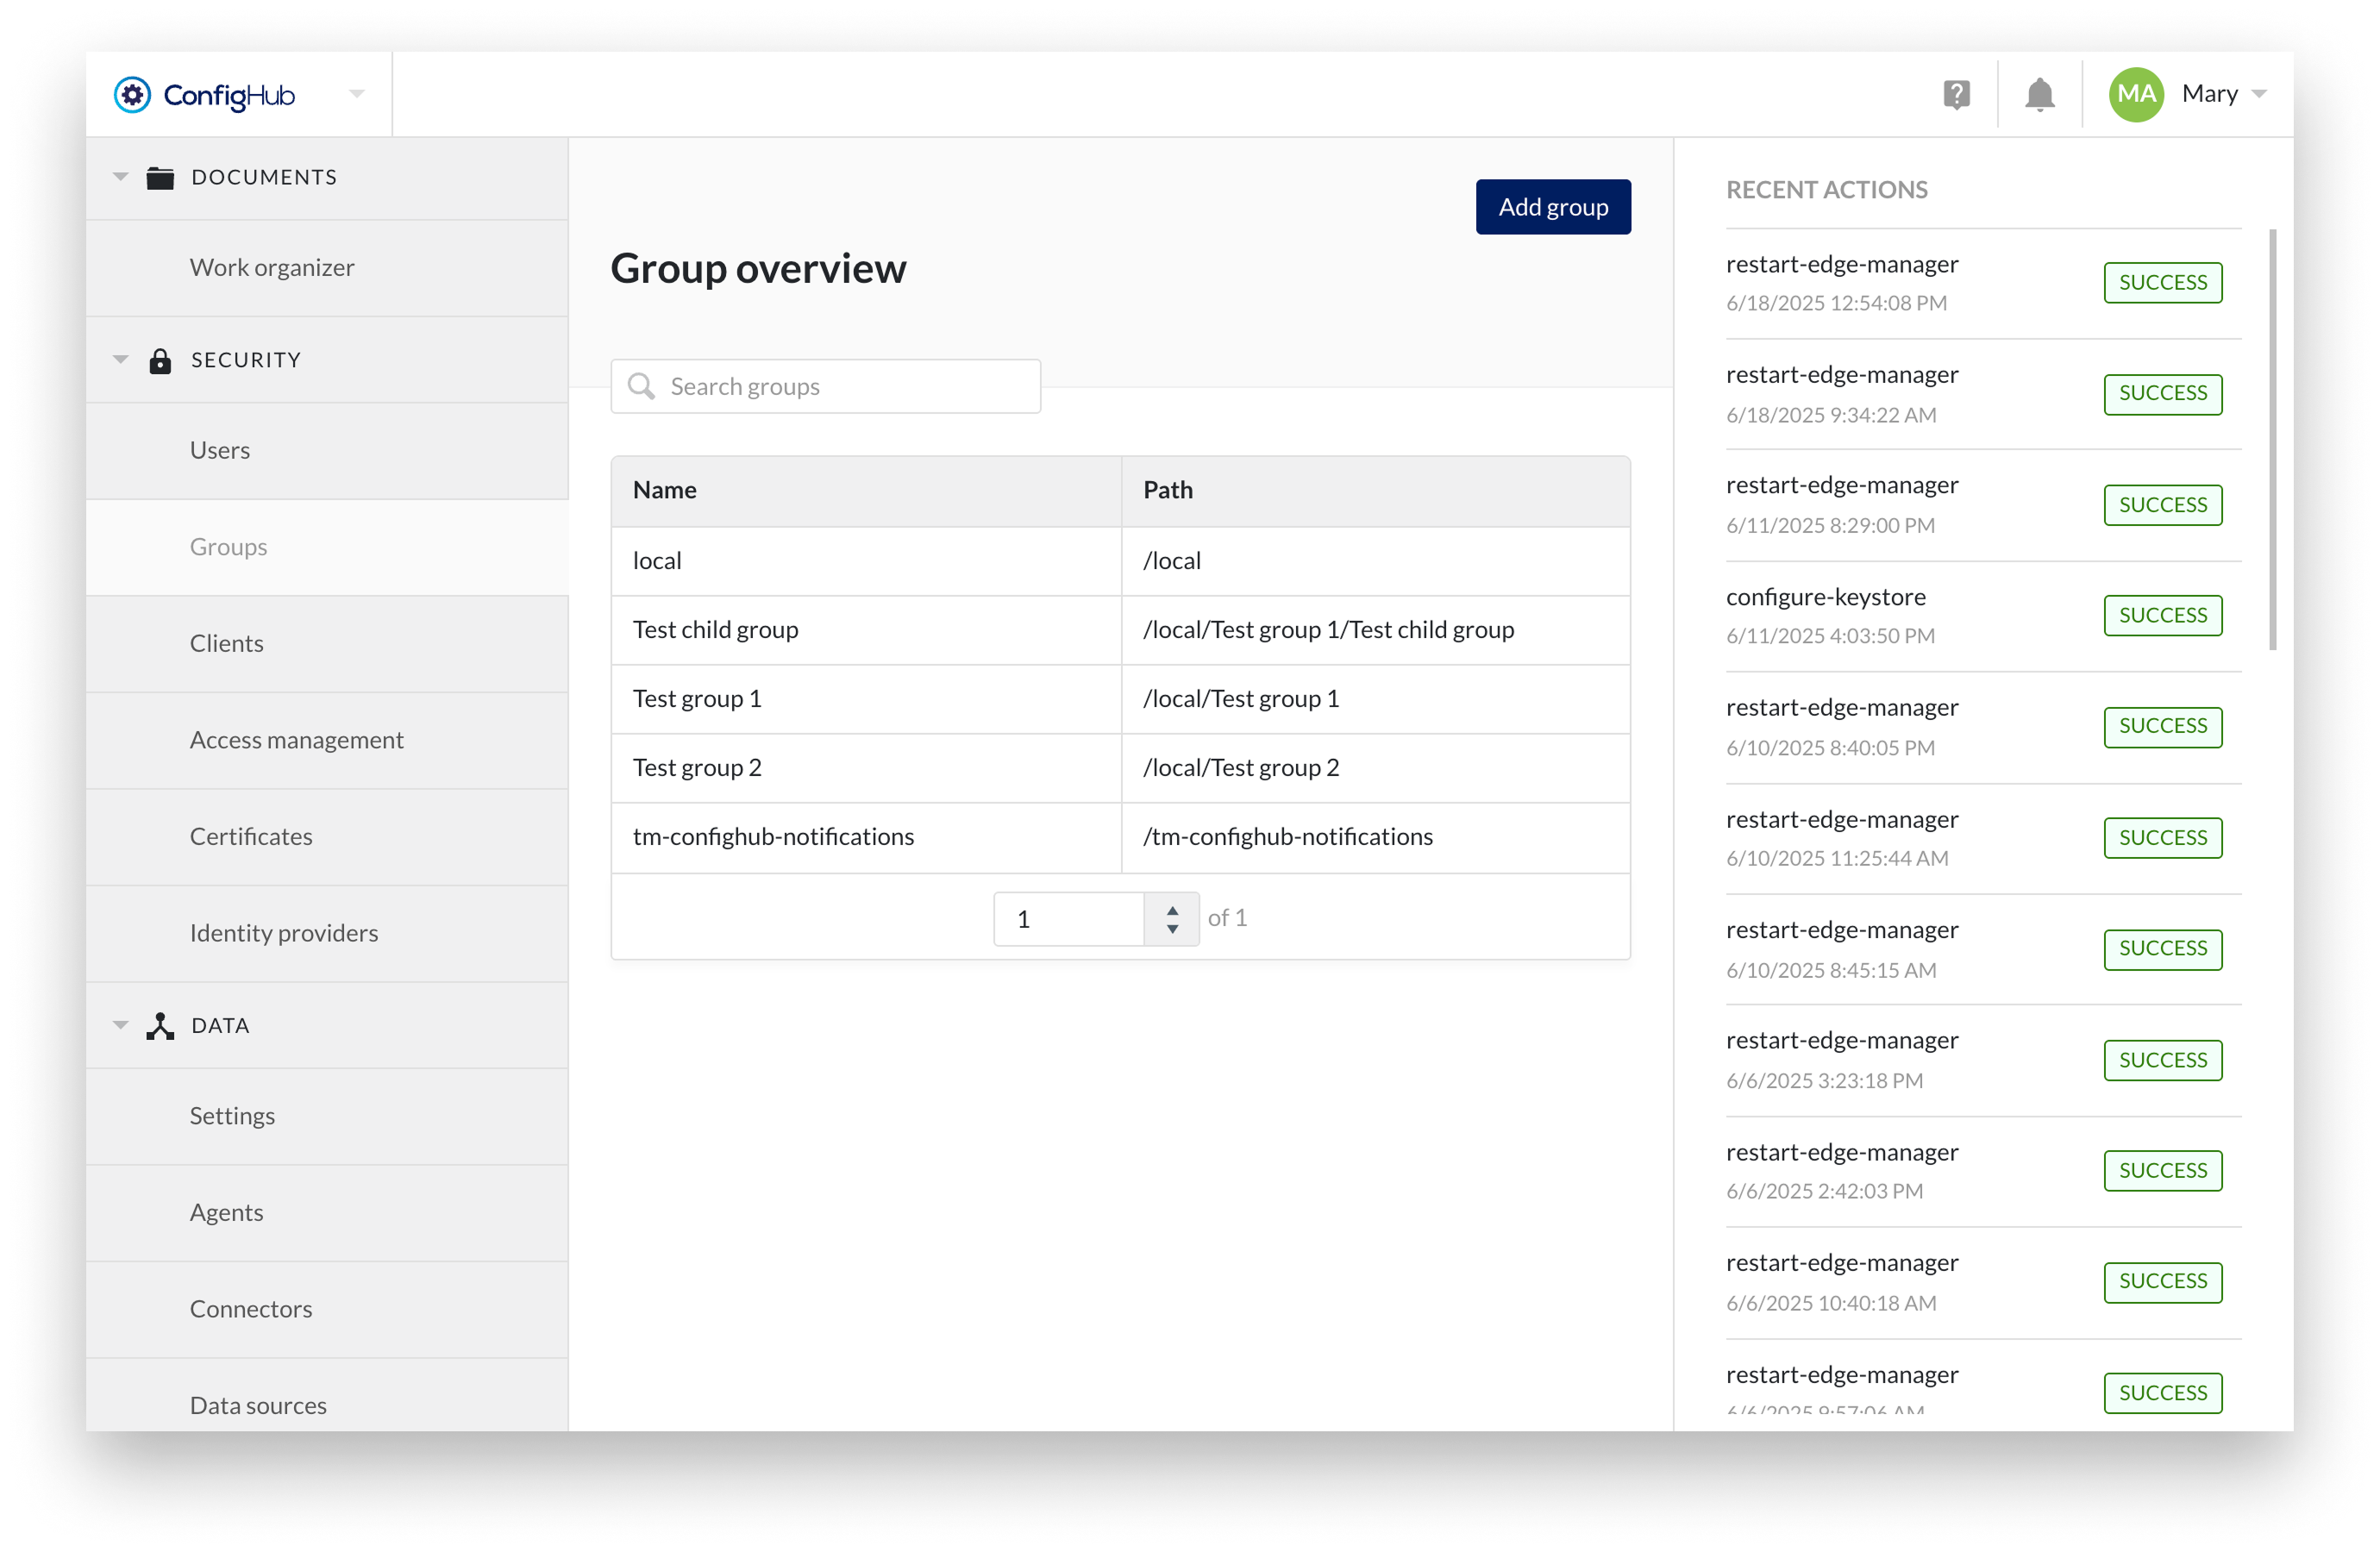
Group management allows the creation of a collection of users and other groups (i.e. nested groups). An overview of all existing groups can be found under the "SECURITY" section in ConfigHub.
The group overview shows the group name and path of the groups so that it can be linked to its corresponding identity provider.
Specific groups can be searched through via the top right search bar above the table.
Creating Groups
Creating Groups is only allowed on a local level. In case of an external provider the groups are managed and synced into TrendMiner from the IdP itself.
It is possible to create local groups and assign users coming from LDAP or SAML or locally, to local groups and use access management to configure datasource access at group level.
To create a new group you will need to go to the Groups menu under the "SECURITY" section. From there groups can be added via the “Add group” button.
Note
A group can have only one parent group.
Configuring Group details
From the group overview a group can be clicked to see more details in the side-panel. Here more options can be performed such as:
Edit the name of a group
Delete the group
Add existing users/groups as member to that group
Note
These actions can only be done for local groups. Groups synced from an external IdP are non-editable and should be managed from the IdP itself.
Warning
Deleting a group will also delete all subgroups. A modal will be shown when this is the case. In case you want to keep the subgroups you will need to remove them first from the member list.
System group tm-config-notifications
The group tm-confighub-notifications is a non-deletable system group used to send important notifications via email to its members — even if they are not actively logged into TrendMiner.
This group is designed for admin users who should be immediately informed about critical configuration or data flow issues, such as:
Tag synchronization errors
Webhook delivery failures (see article “How to create a webhook?" for more details)
Failed context item writes to external systems (see article “How to configure Context Write capability?" for more details)
Adding users to this group ensures that email notifications (and in-app notifications) are delivered when issues arise, allowing for faster awareness and resolution.
Note
Only users with a valid email address will receive emails.
Clients
Creating Clients
TrendMiner allows the creation of a client and secret in order to generate a token to be used in external API calls.
To create a new client you will need to go to the clients-menu under the "security" section. From there clients can be created via the "+add client"-button.
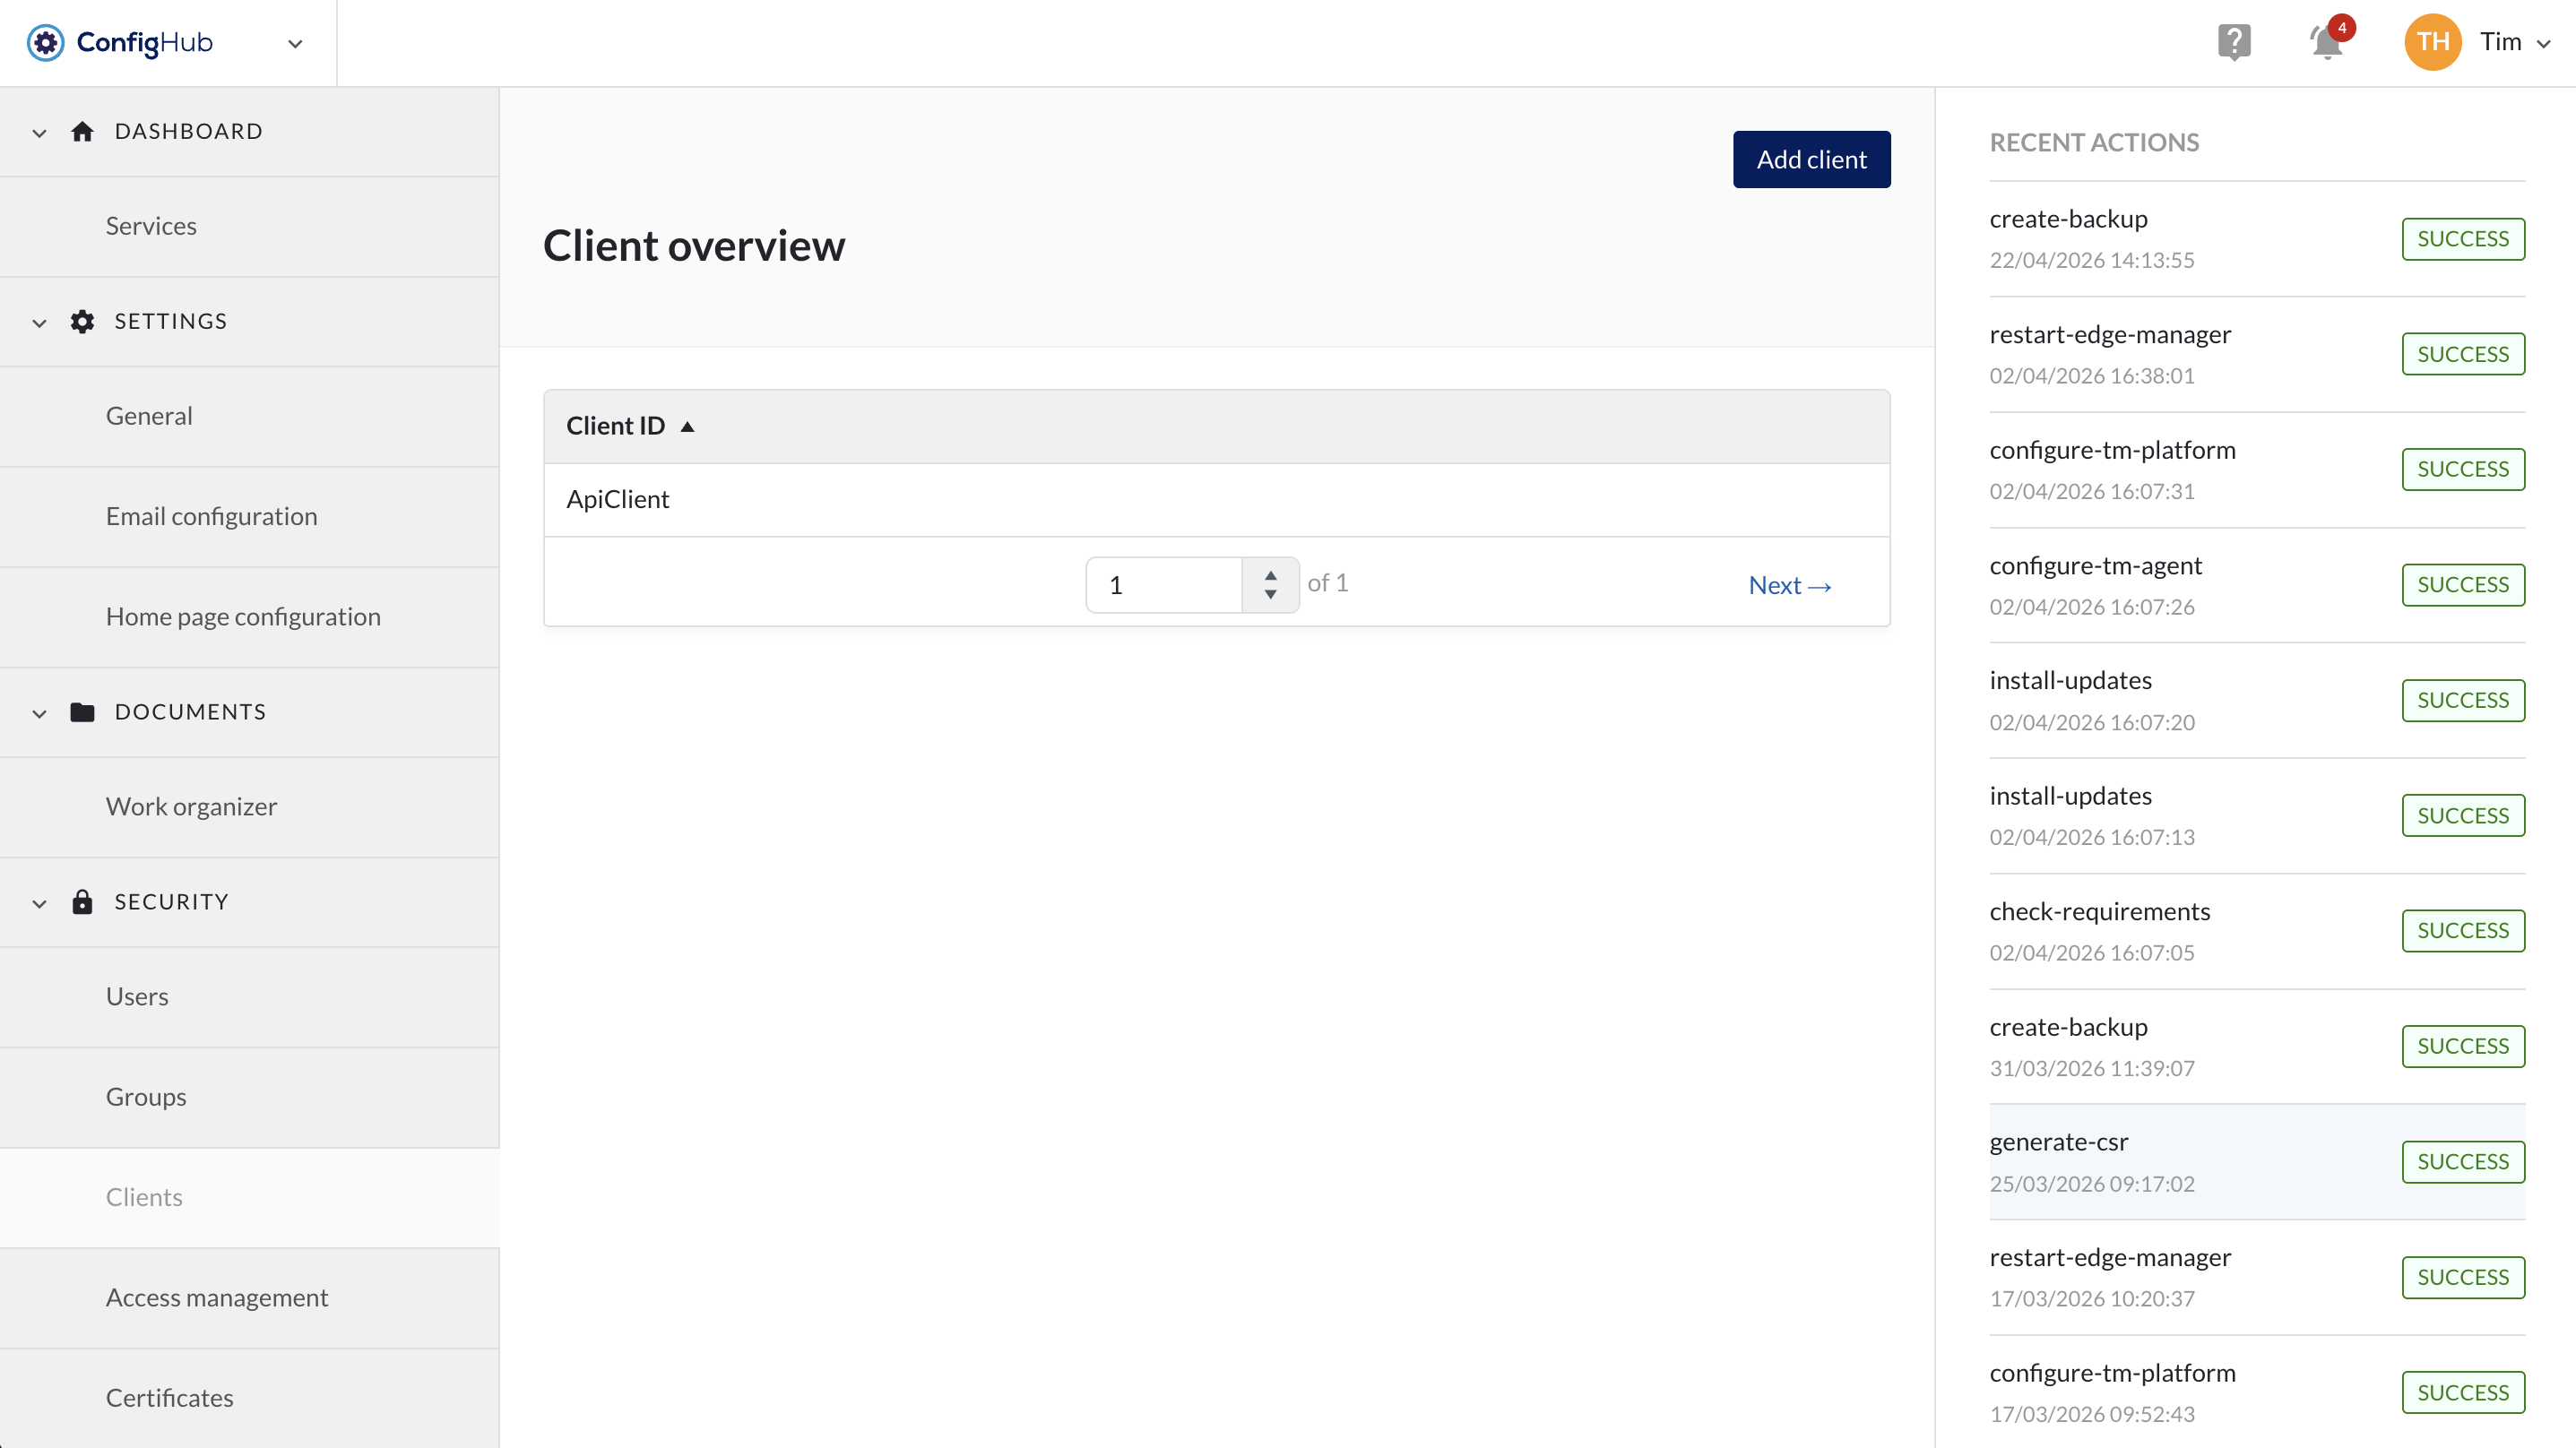
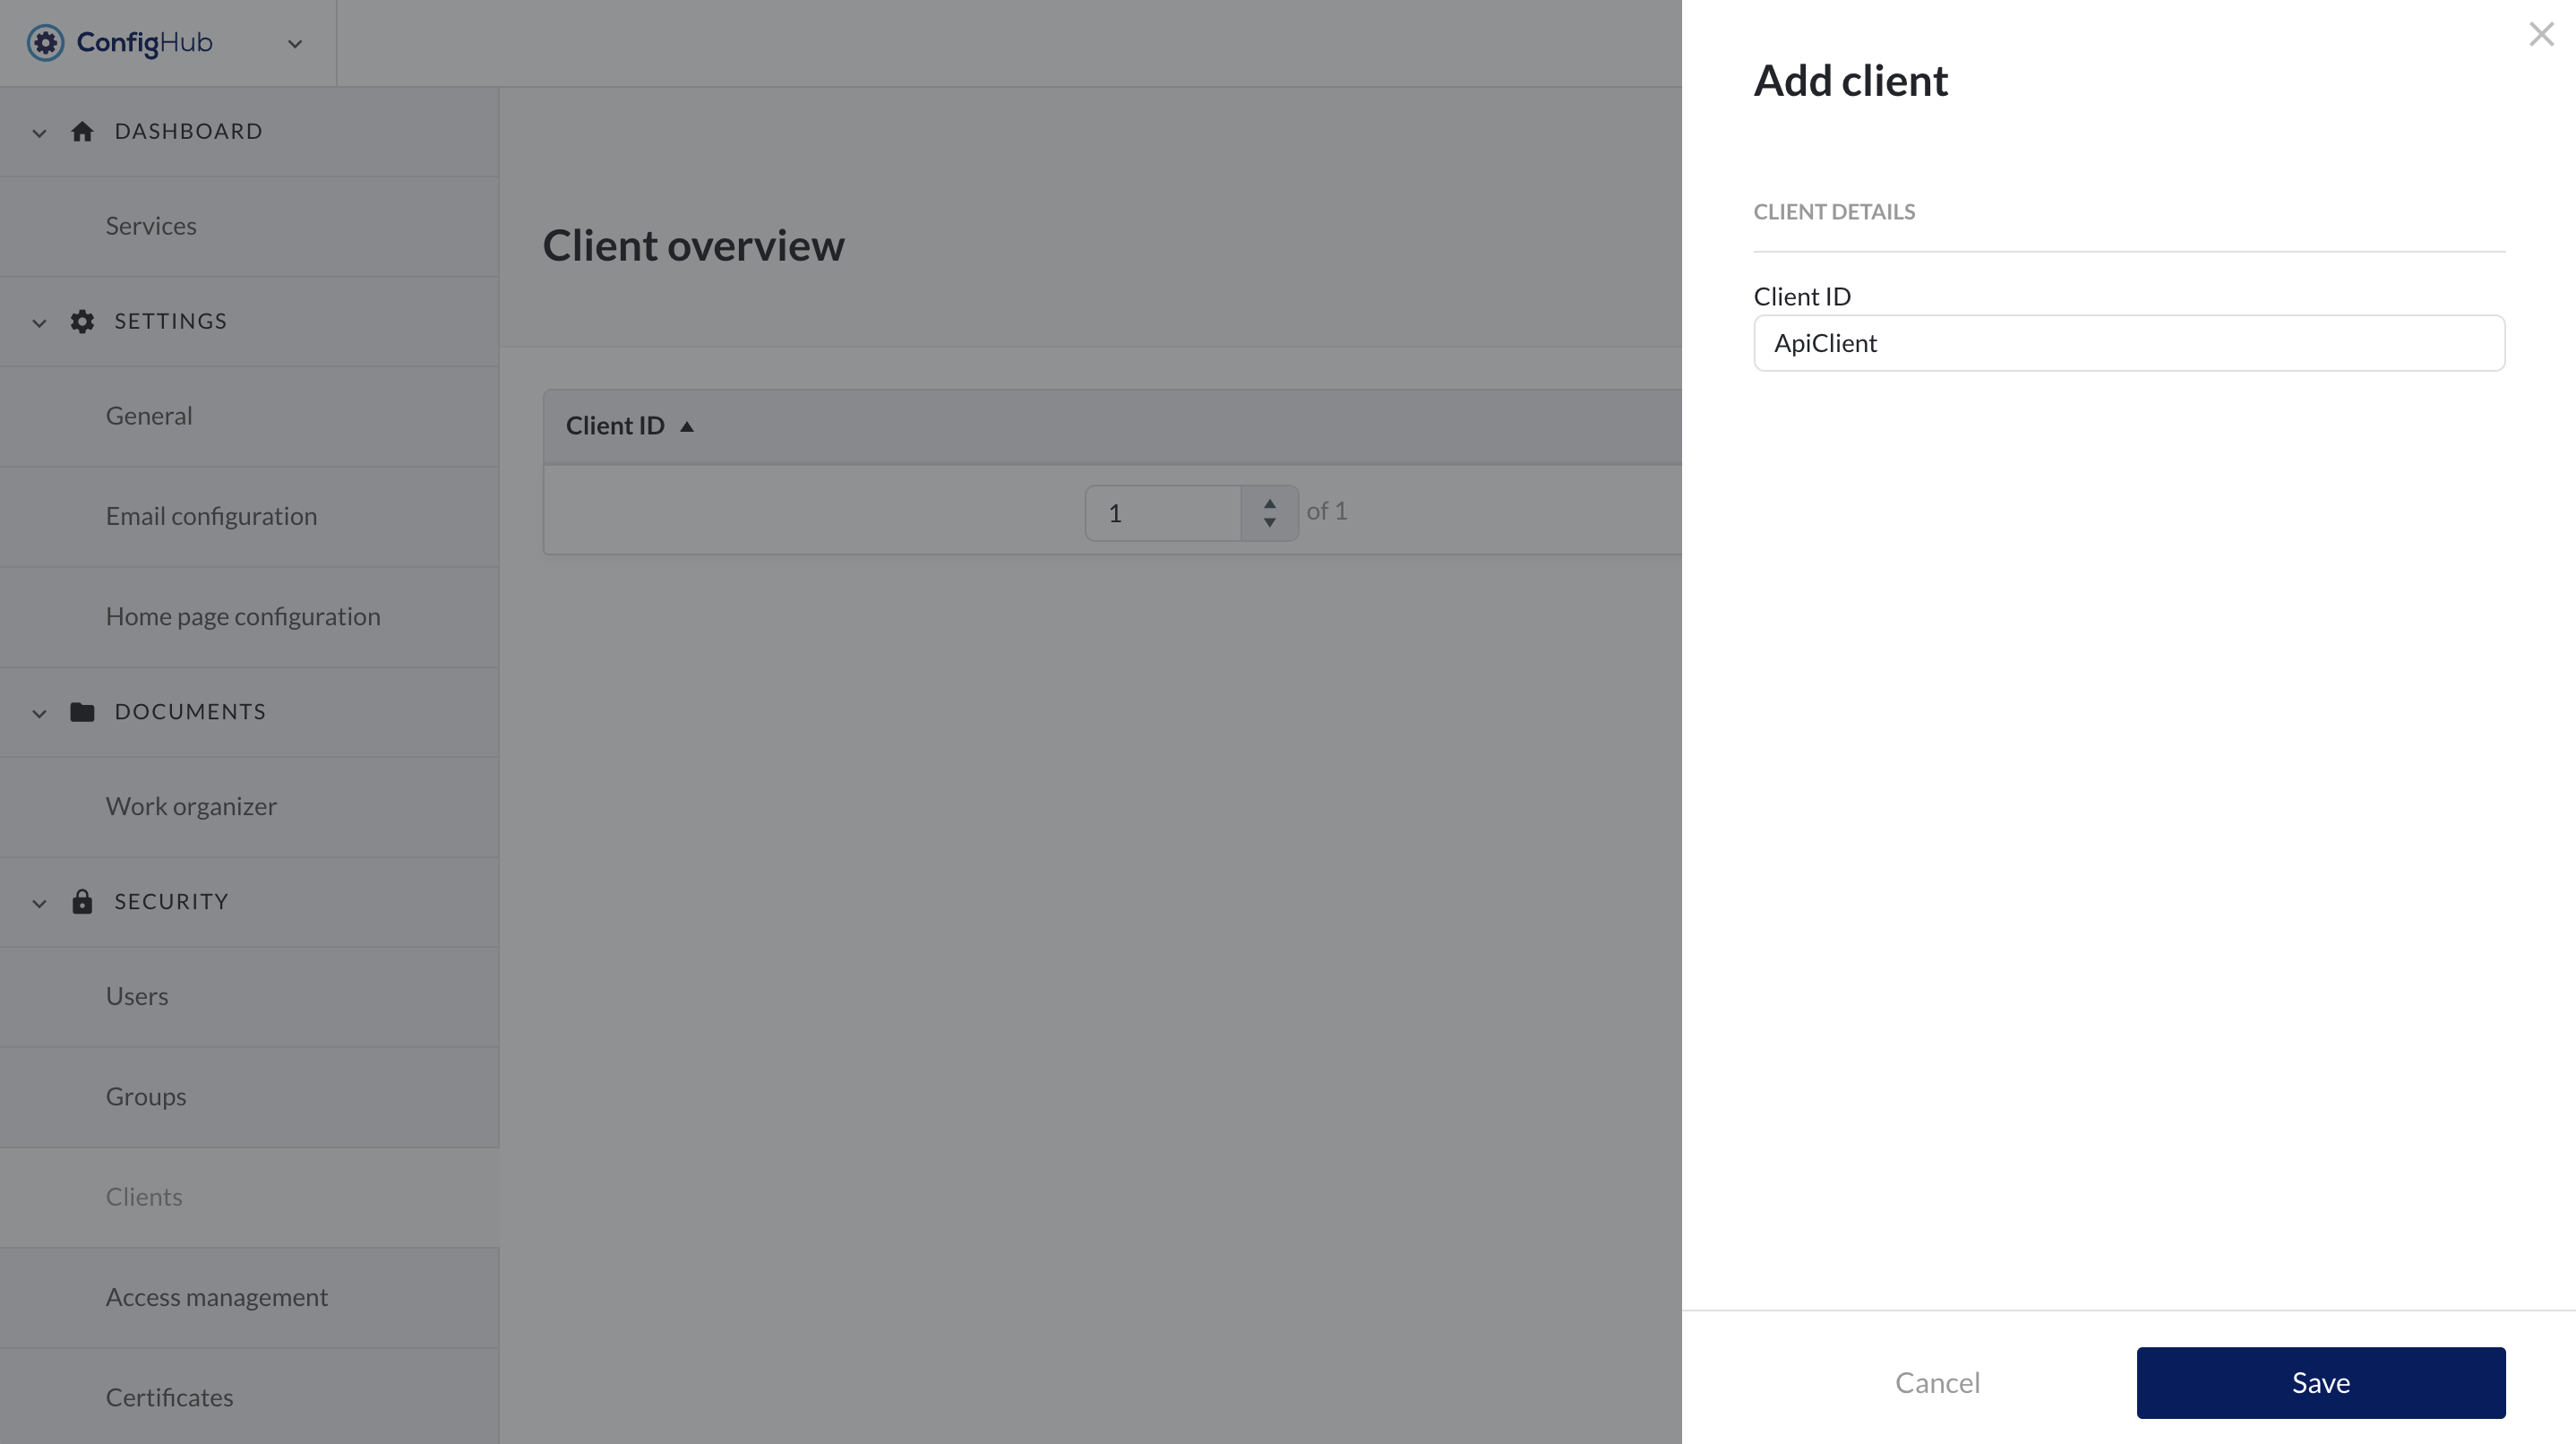
You will be asked to enter a name (client ID) for your client which will be used for external references. Once the client is created you can click on it to:
Edit the client ID
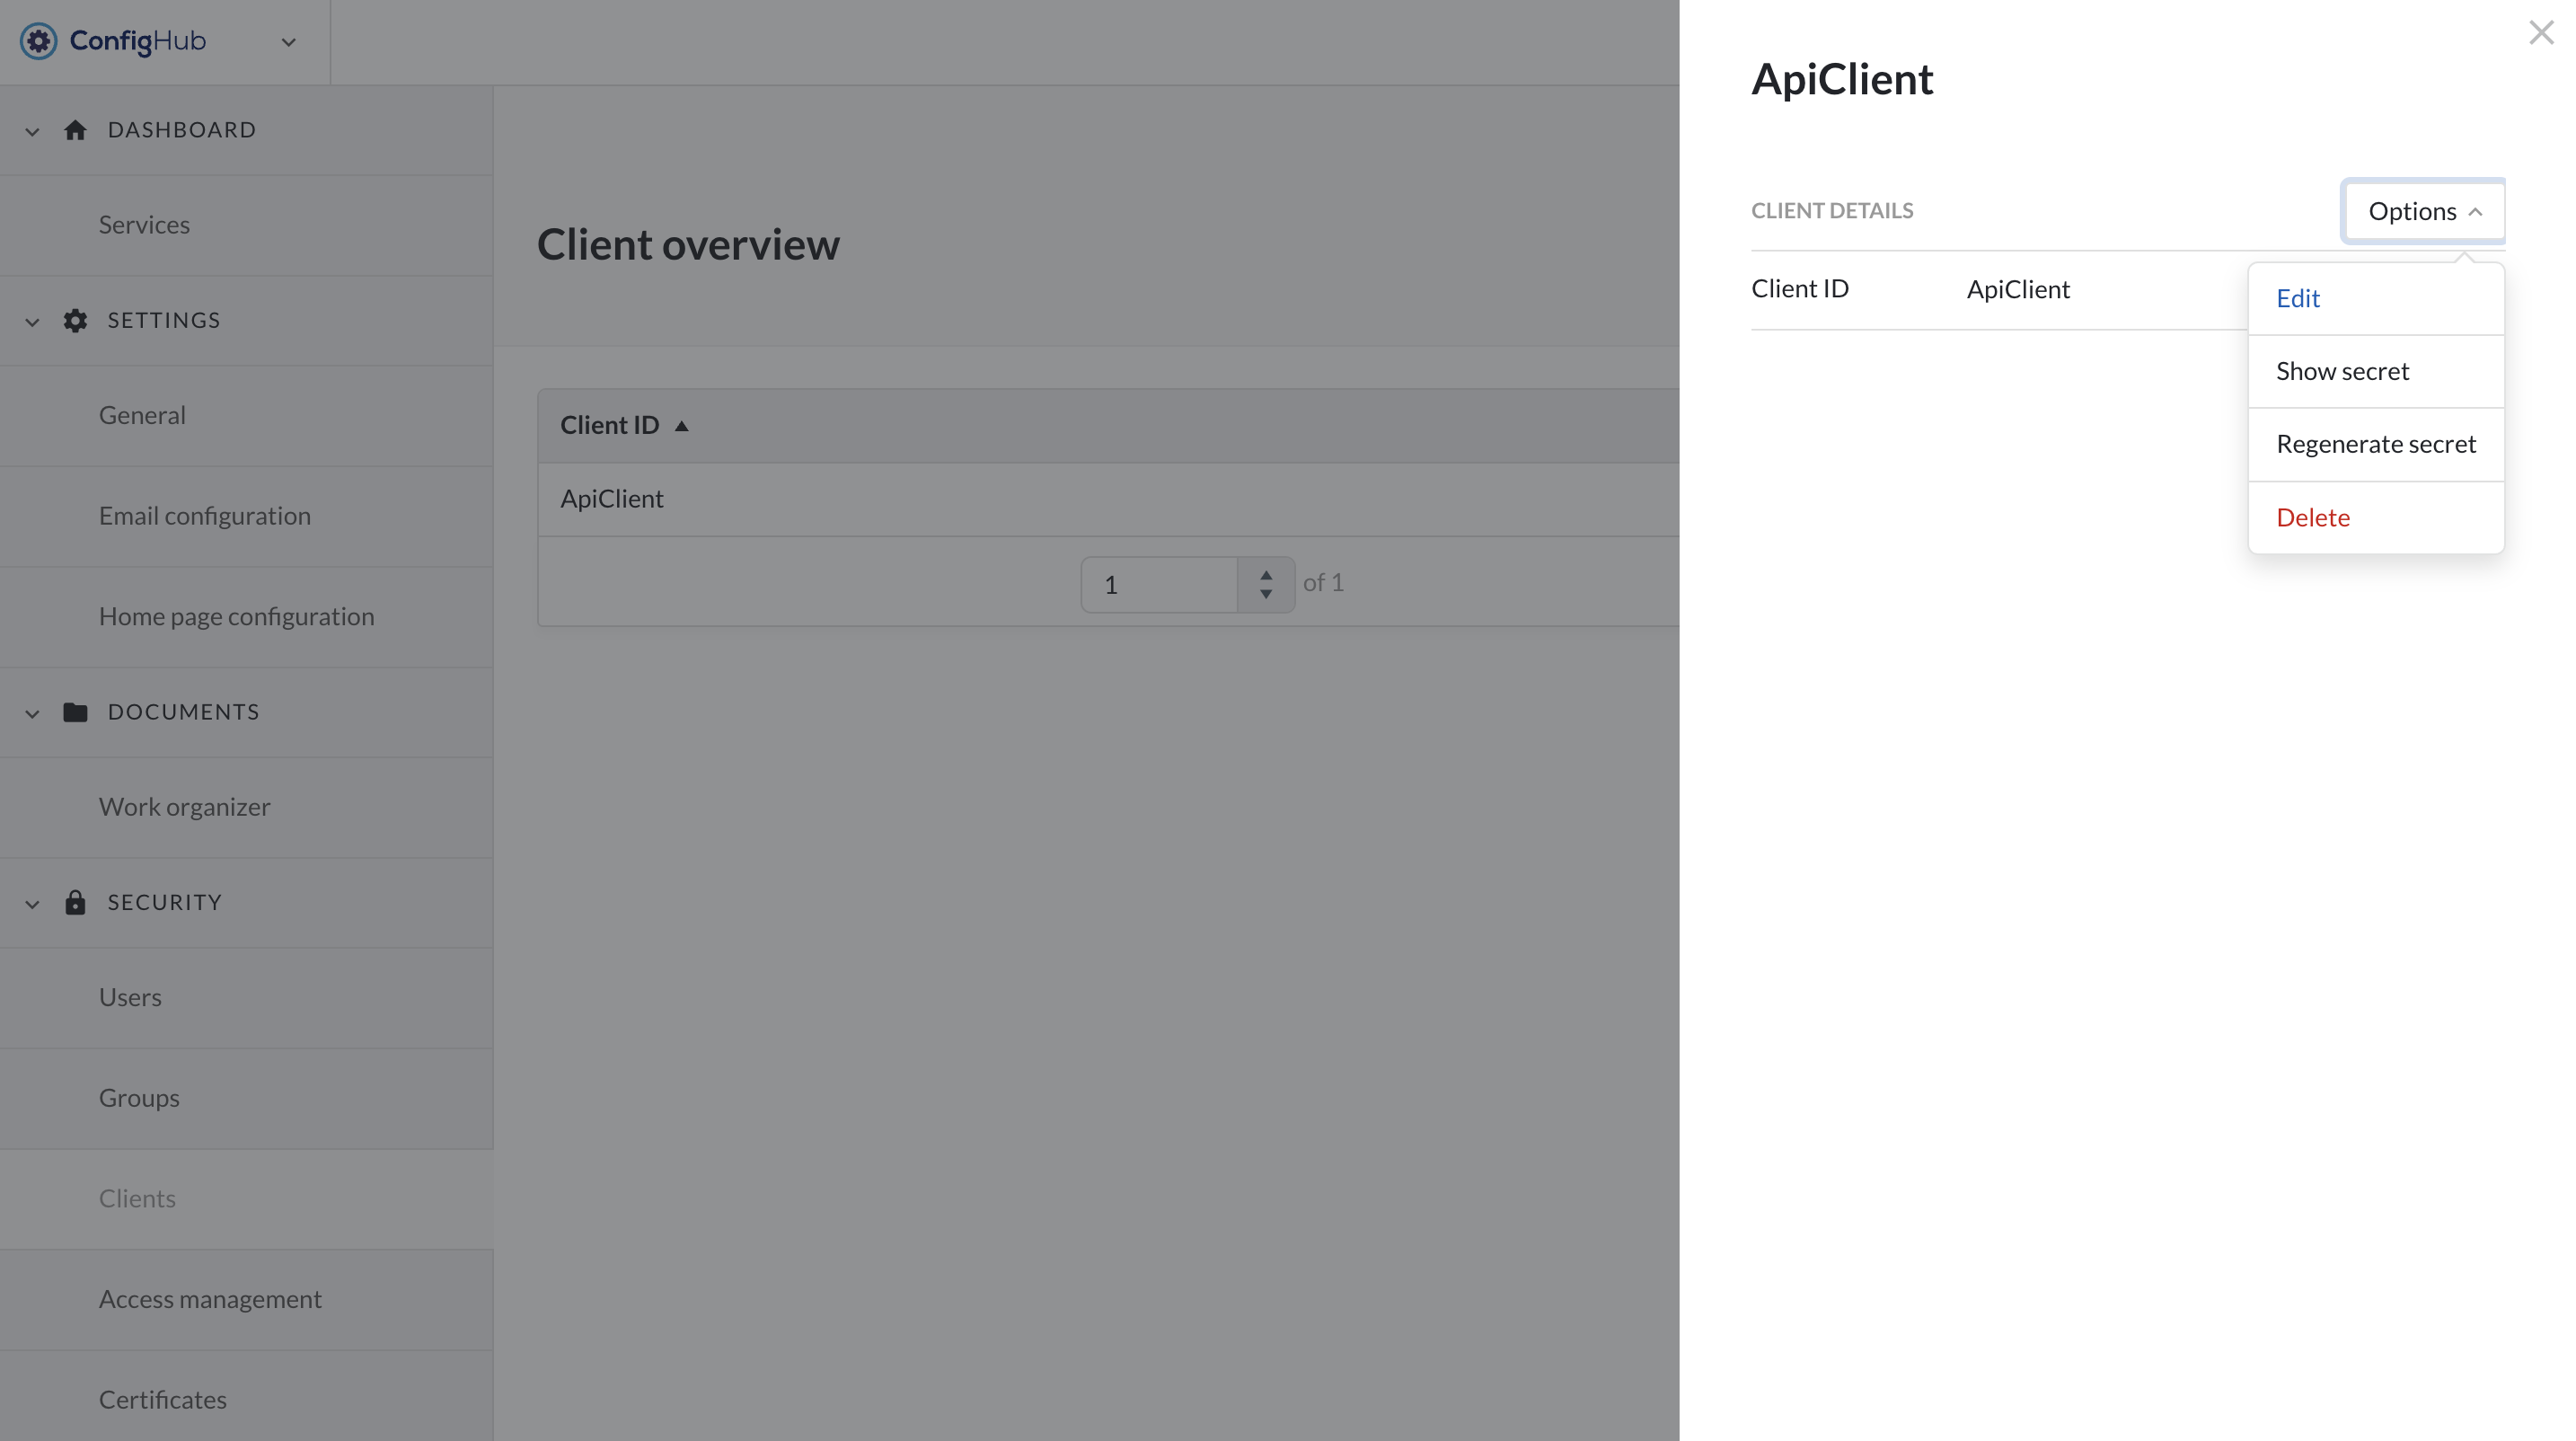
Show the secret of the client
Generate a new secret
Delete the client
Note
Regenerating a secret will invalidate your old secret and tokens. This action cannot be undone.
Clients need to be added to a domain/entity in the Access management menu just as users/groups to allow access to the data.
Fetch Token
A token can be fetched via curl or any other means. An example is shown below.
Note
A new token needs to be fetched when the token expires after 5 minutes.
Template:
curl --request POST \
  --url 'https://YOUR_DOMAIN/oauth/token' \
  --header 'content-type: application/x-www-form-urlencoded' \
  --data grant_type=client_credentials \
  --data client_id=YOUR_CLIENT_ID \
  --data client_secret=YOUR_CLIENT_SECRET
Example:
curl --request POST \
     --url 'https://trendminer.example.net/auth/realms/trendminer/protocol/openid-connect/token' \
     --header 'content-type: application/x-www-form-urlencoded' \
     --data grant_type=client_credentials \
     --data client_id=external-client \
     --data client_secret=35c07824-5e11-40f5-88f0-0b578b940b43
Response token:
{
 "access_token":
"eyJhbGciOiJSUzI1NiIsInR5cCIgOiAiSldUIiwia2lkIiA6ICJwcXZ1UXBpQkpiOGpRMVZQcU9PMDdFNDFCb25IRGxNZ01YY0NockZJbkhFIn0.eyJleHAiOjE2MzYwMjkzNDYsImlhdCI6MTYzNjAyOTA0NiwianRpIjoiMWQzNWUyNGQtMGQ4Zi00MWI1LThkYzgtZTYzZmIxZDk3MTEzIiwiaXNzIjoiaHR0cHM6Ly90bS1waXBlbGluZS1wbGVhc3VyZTMxLnRyZW5kbWluZXIubmV0L2F1dGgvcmVhbG1zL3RyZW5kbWluZXIiLCJhdWQiOiJhY2NvdW50Iiwic3ViIjoiMTRlODRmODUtZjc5YS00YjIyLTg4MzktYWM5OWRkOWQzY2U1IiwidHlwIjoiQmVhcmVyIiwiYXpwIjoiZXh0ZXJuYWwtY2xpZW50IiwiYWNyIjoiMSIsInJlYWxtX2FjY2VzcyI6eyJyb2xlcyI6WyJkZWZhdWx0LXJvbGVzLXRyZW5kbWluZXIiLCJvZmZsaW5lX2FjY2VzcyIsInVtYV9hdXRob3JpemF0aW9uIiwidXNlciJdfSwicmVzb3VyY2VfYWNjZXNzIjp7ImV4dGVybmFsLWNsaWVudCI6eyJyb2xlcyI6WyJ1bWFfcHJvdGVjdGlvbiJdfSwiYWNjb3VudCI6eyJyb2xlcyI6WyJtYW5hZ2UtYWNjb3VudCIsIm1hbmFnZS1hY2NvdW50LWxpbmtzIiwidmlldy1wcm9maWxlIl19fSwic2NvcGUiOiJlbWFpbCBwcm9maWxlIiwiY2xpZW50SWQiOiJleHRlcm5hbC1jbGllbnQiLCJjbGllbnRIb3N0IjoiMTAuMzIuMTM1LjE1IiwiZW1haWxfdmVyaWZpZWQiOmZhbHNlLCJjcmVhdGVkRGF0ZSI6MTYzNjAyODY2NTMxMCwicm9sZXMiOlsiZGVmYXVsdC1yb2xlcy10cmVuZG1pbmVyIiwib2ZmbGluZV9hY2Nlc3MiLCJ1bWFfYXV0aG9yaXphdGlvbiIsInVzZXIiXSwicHJlZmVycmVkX3VzZXJuYW1lIjoic2VydmljZS1hY2NvdW50LWV4dGVybmFsLWNsaWVudCIsImNsaWVudEFkZHJlc3MiOiIxMC4zMi4xMzUuMTUifQ.GtGGgH7wqeqbEJuLfuGamps2nTqxHLDtz5plQ5IewZN6RTKnPTxh3oWlBshr_3lBVYaQHkjw0aXZc7K8dxfttXwQGQnxn6ijt_j2NFdqPVqlwODFWhwqGTtvTQXYESlghqz_8-k NHky9uFgd5lvZxdy6FGnOJcG6PmeeRa9lwZc_6hpwNGCEeH_9TKPM2WaiIs0f9sFoMlOSqOGZrqPrbxjzsCr0leVxptvLwSIw6RMOlDZ9IonBglpoL6mhpzTPtvZSGXQ-BL0Lcef2G_xY3A__etLM5U5bH44Ey-vwMGCYJ0ZWo7GsSPCOQYdwcGJOUoZ0Yvy0l2kNuazI1WC2g",
 "expires_in": 300,
 "refresh_expires_in": 0,
 "token_type": "Bearer",
 "not-before-policy": 1571391000,
 "scope": "email profile"
Access Management
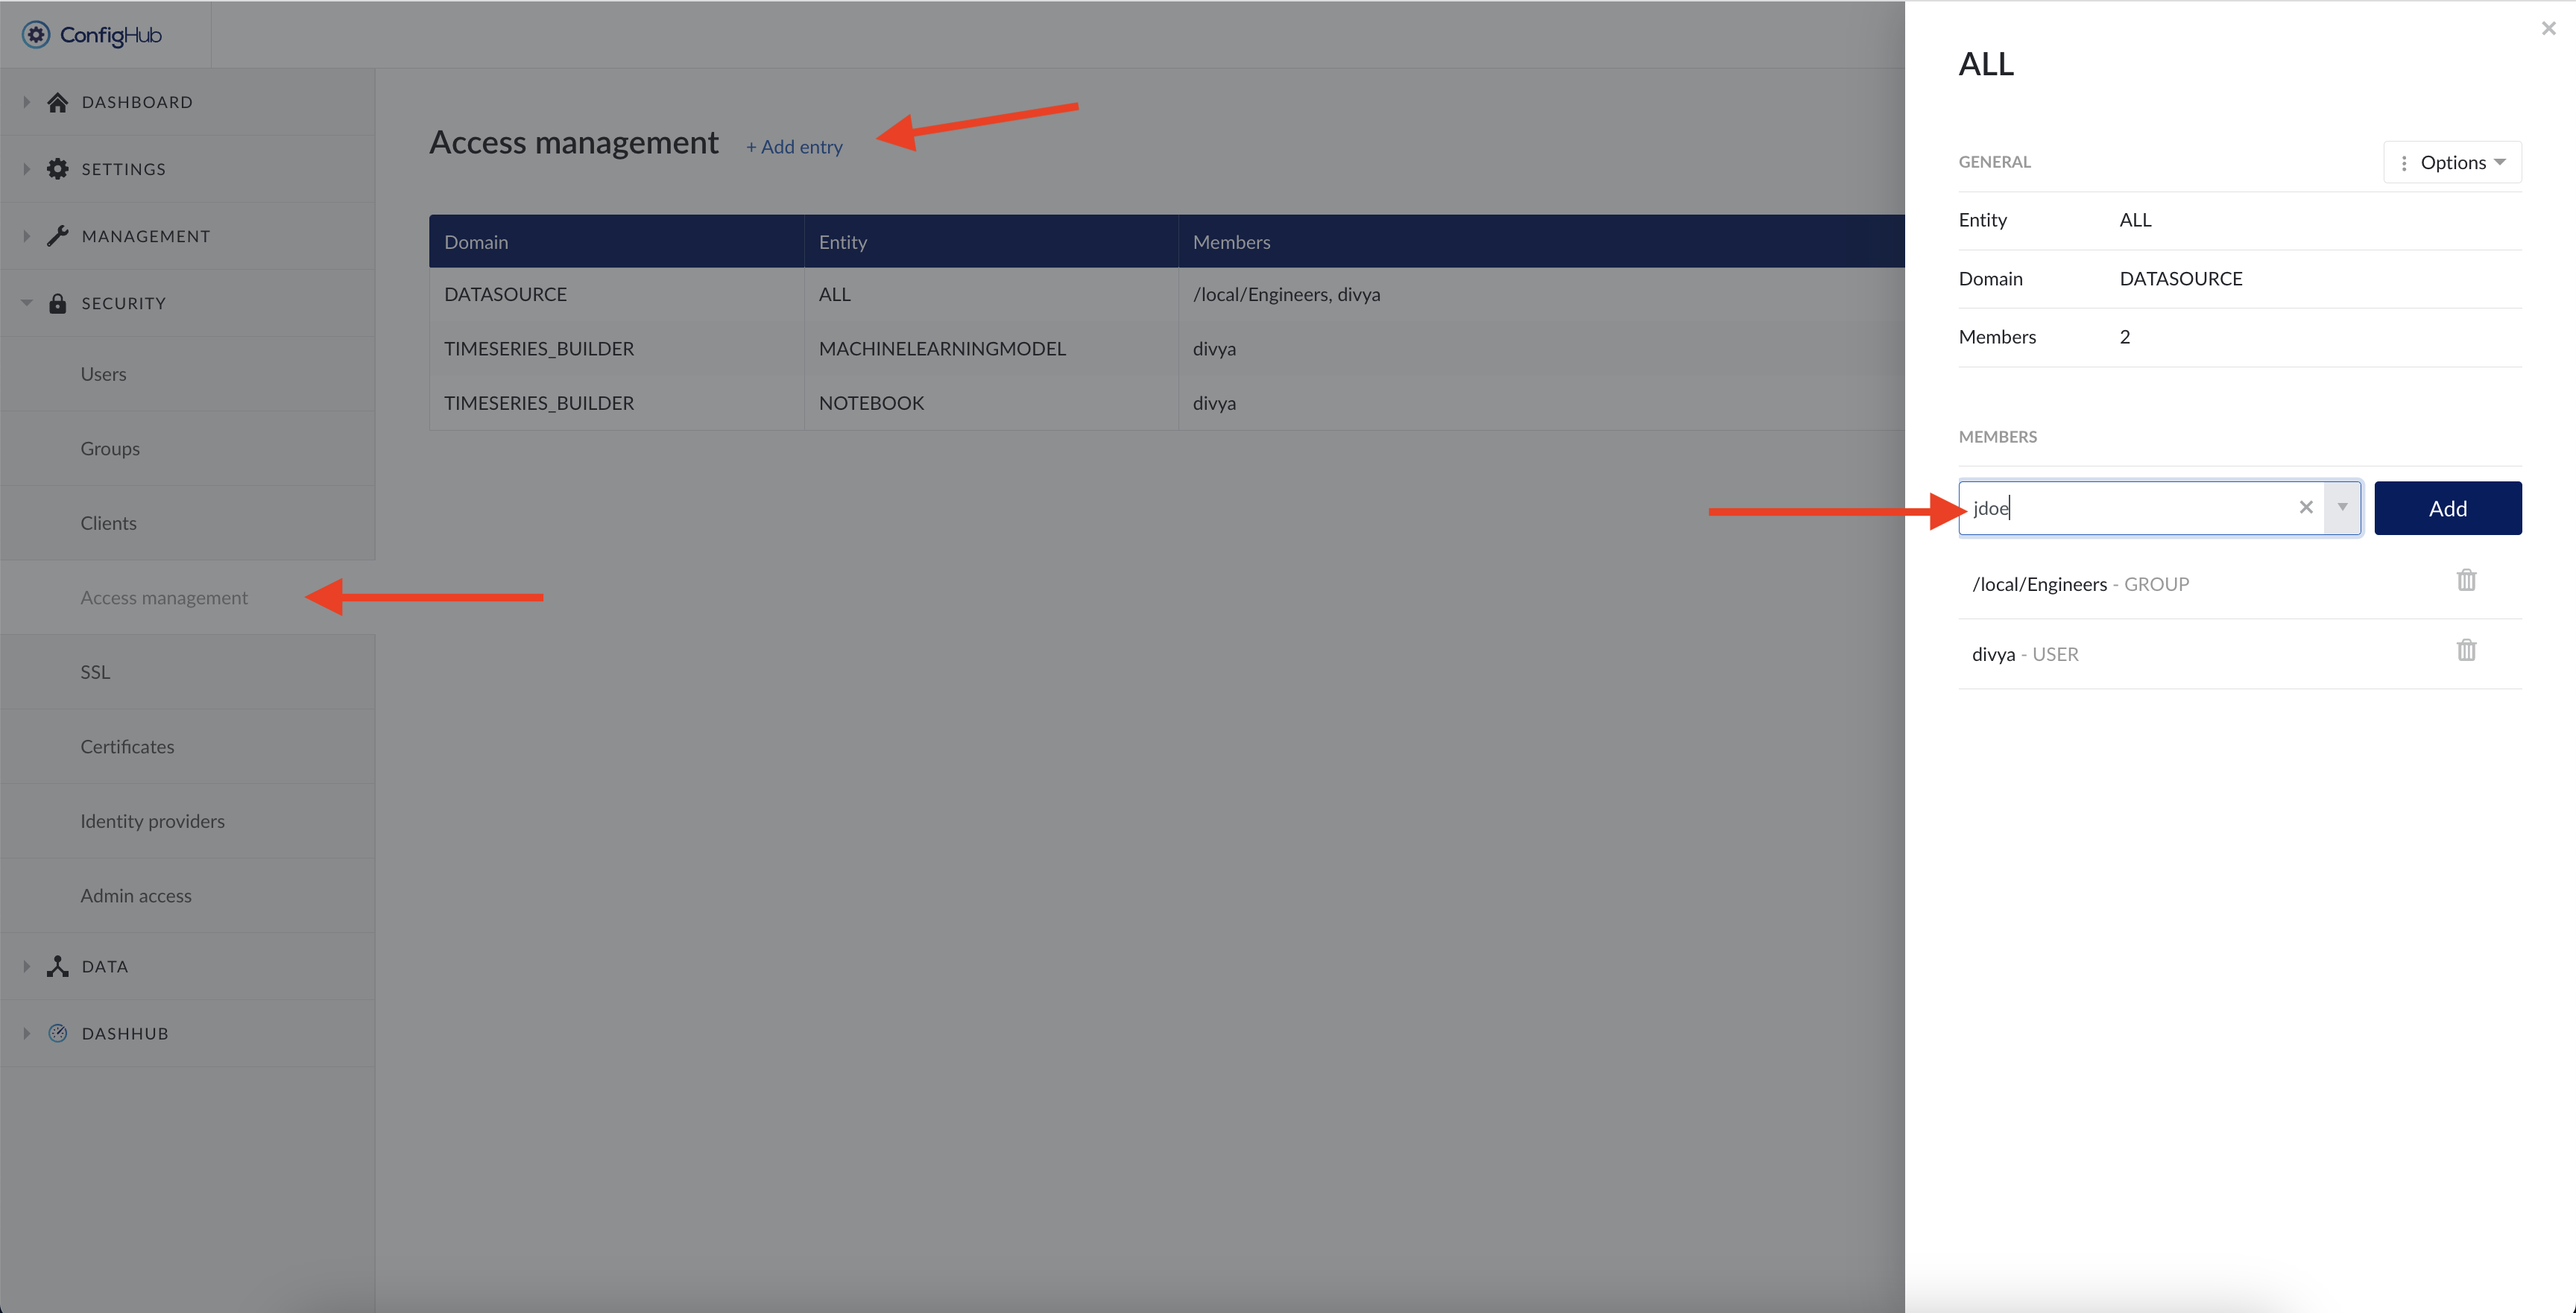
The Access Management menu allows you to manage access permissions centrally per domain. Opening the menu returns an overview of all set access permissions.
Important
Only access for time series data sources and Machine Learning functionality (notebooks and machine learning model tags) is managed in ConfigHub.
Permissions on assets and context data is managed in ContextHub. Consult the user documentation for more information on context and asset permissions.
To create a new access permission, click the “Add entry” button situated at the top of the page and fill in the necessary details in the pop-up:
Domain:
"DATASOURCE": for time series data source access permissions
"TIMESERIES_BUILDER": for notebooks, machine learning model and custom calculations access permissions
Entity:
Using the DATASOURCE domain: Enter the name of the data source, as configured in ConfigHub -> Data sources or use "ALL" to indicate the collection of all data sources.
Notice
Only alphanumerical characters and '-' or '_' are allowed in data source access permissions. In case you have a data source name using special characters, please rename the data source before assigning an access permission to it.
Using TIMESERIES_BUILDER domain, add one or more of the following "Entity" values:
MACHINELEARNINGMODEL: access to Machine learning model tags in the TrendHub tag builder.
NOTEBOOK: access to MLHub
CUSTOM_CALCULATIONS: access to the custom calculations in the TrendHub tag builder.
Members: Users, groups or clients you want to grant access permission for the domain
No subgroup inheritance
The system only checks if a user is directly in the user group assigned the permission. It does not consider membership in subgroups of that user group (subgroups do not inherit permissions from the parent group).
SSL
As of version 2024.R1.0 this screen is moved to Edge Manager.
Certificates
Notice
The certificates screen is not available for AWS SaaS customers.
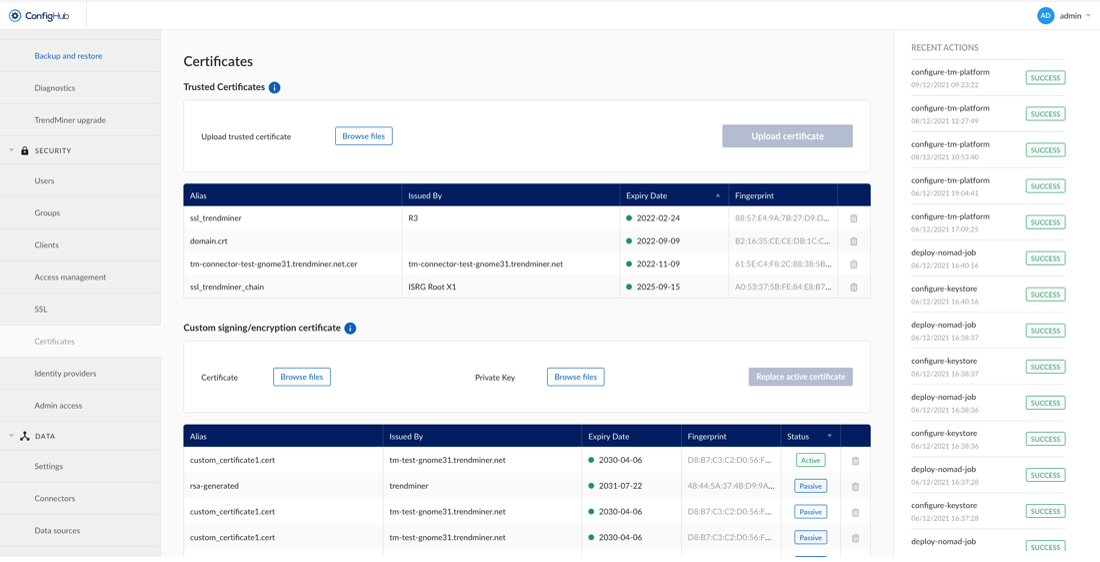
If TrendMiner needs to communicate with SSL enabled services (Plant Integrations, LDAP, ...) that are using self signed certificates or certificates issued by an internal CA, it's not possible to verify the trust chain of these certificates.
To be able to verify the trust chain please upload the root CA and optionally one or multiple intermediate CA certificates. The same is needed when using SAML with certificates issued by an internal CA.
Data
Settings
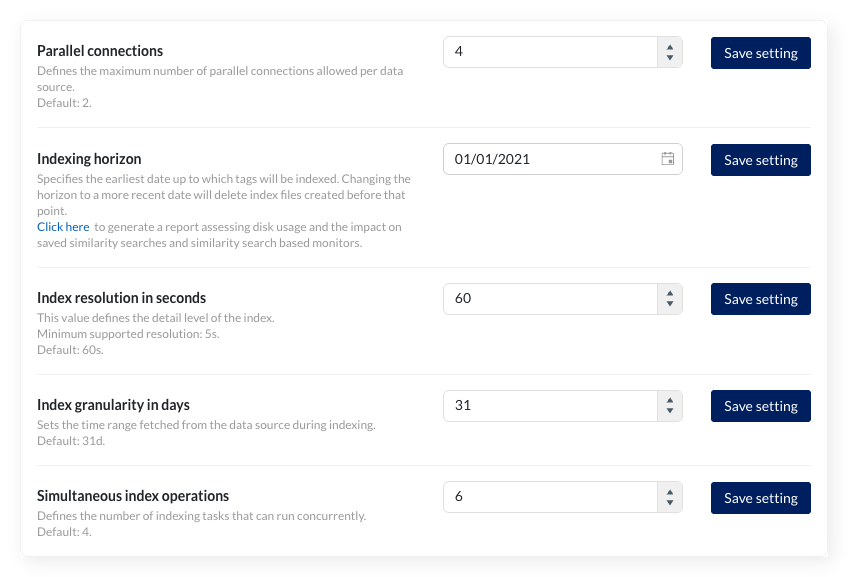
TrendMiner uses certain connection settings to optimize the performance of the historian connection. By default, 2 parallel connections are used. In most cases, the value for the “Historian Parallelism” setting should equal the number of cores on your historian server.
The setting is a global setting, but parallel connections can also be set per datasource (in the Data -> Data sources menu) as an override. Changing the global default will not update the existing overrides. They will keep the current value set as override.
Note
Consult TrendMiner support at support@trendminer.com if you are experiencing performance issues or believe it would be appropriate to change this setting.
The indexing horizon sets the earliest date from which tags are indexed. Tag data before this date is unavailable for TrendMiner analysis.
Default values:
Fresh installations since 2026.R1: January 1st of three years ago (e.g., January 1, 2023 for installations in 2026)
Existing installations: Retain their configured horizon (legacy default was January 1, 2015)
Extending the horizon (setting an earlier date)
When setting the horizon to an earlier date (e.g., from 2020 to 2015), tags automatically complete indexing up to the new horizon once used within the application.
Reducing the horizon (setting a more recent date)
Setting the horizon to a more recent date (e.g., from 2015 to 2020) deletes all index data before the new date to free disk space. Administrators receive a notification when deletion completes.
Validation requirements:
The horizon must be at least 1 month in the past
The date must be the first of a month
Generating index storage and horizon update report
Reducing the indexing horizon mainly saves disk space. However, this affects various features. Refer to this article to see how features depend on the index horizon. Similarity searches with query periods before the new horizon stop working, and their monitors are system-disabled.
You can generate a report up front to simulate the disk space saved and which similarity search items would be affected by clicking the link in the description. This report helps assess impact without changing the horizon.
The export runs in the background. A notification appears when the file is ready to download
Note
You can always reverse this by extending the horizon. All affected items will be corrected once the index data is available again.
The index resolution defines the level of detail of the index. For a resolution of 1 minute (the default) the index contains up to 4 points per minute.
Valid index resolutions are:
Minimum: 5 (five seconds)
Maximum: 86400 (one day)
The index resolution should be able to evenly divide the total seconds in a day and therefore should be a factor of 86400
Caution
If required, an index resolution of 1 second can be configured, though this is not officially supported and might lead to performance issues
Warning
Changing the index resolution will delete all existing tag indexes.
Warning
As you can only search for time periods with a minimal duration of 2 times the index resolution searches can become invalid by lowering the index resolution (e.g. from 30 seconds to 1 minute). As a result search-based monitors can go to a system-disabled state (meaning these monitors will no longer trigger alerts).
The index granularity defines the time periods which are fetched from the datasource to build the index during the indexing process. The smaller the time periods, the more calls have to be made to the datasource, causing greater overheads and slower indexing. The larger the granularity, the greater the risk on connection time-outs and the higher the memory consumption.
The default granularity is 1 month ("1M").
Valid index granularities include, for example, "1D" (1 day) or "5D" (5 days). Changing the granularity will not impact tags which are already indexed.
This value sets the number of simultaneous index operations. As of 2026.R1, the default number of indexing threads for new installations is 4 (previously 2). Existing installations keep their configured value.
Check the following article for more information on how to properly configure this setting: How to determine the best "simultaneous index operations" configuration?
Please contact TrendMiner support before changing this setting.
Agents
Notice
The "Agents" menu item in ConfigHub is only available to AWS SaaS customers (<mycompany>.trendminer.io domains)
This tutorial will explain how to setup the TrendMiner Connect Agent.
This agent is used for the communication between TrendMiner SAAS solution and the on-prem PlantIntegration server in a secure way, without the need to open incoming ports on the public facing Firewall at your datacenters.
As plant integration server is only running on windows, the tutorial will explain how to make it work on windows only.
Table of Contents
Prerequisites
Have a look at the simplified view below on the network communication flows
You use a supported windows version. See below on supported OS versions
You need to have administrator access to the windows machine that is running the plant integration server (or on the plant integration server itself)
You need to be able to upload files to the server or ability to download files from a public file server. (e.g. using RDP copy past, or others)
Make sure your anti-virus software does not block/delete the programs included in the installer Agent zip file (tm-connect.exe, tm-connect-wrapper.exe, frpc.exe, ...).
More info on why anti-virus software might flag and quarantine the TM Connect Agent can be found here: TM Connect Agent is flagged and quarantined by antivirus
TCP ports 7000 and 443 need to be open for outgoing connections to the internet.
Important
Since the TrendMiner Agent needs to be able to connect to the appliance's dynamic IPs it is not possible to limit the list of allowed IP addresses and all outgoing connections on port 7000 and 443 need to be allowed.
Download the Agent installer file from the TrendMiner download site.
Preconfigure the Connect Agent
To be able to communicate with the plant-integration server in your datacenter, you need to setup the parameters needed for creating the agent configuration file, needed later in this tutorial.
To request the agent configuration file, you need to request this to our support team, and specify the agent name.
Login to Trendminer and open confighub (e.g. https://site.mycompany.trendminer.io/confighub)
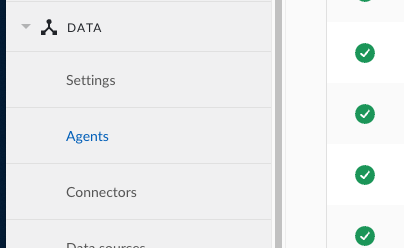
click on Agents under the DATA sections of the menu at the left side:
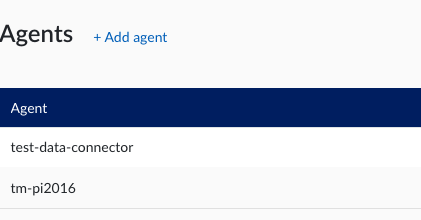
You will now see all configured agents or tenant connections you have activated. In below example there are 2 listed.
Important
In case an Agent config is updated, you need to download a new config.zip file, and install it according to this tutorial.
Click on “+ Add agent”
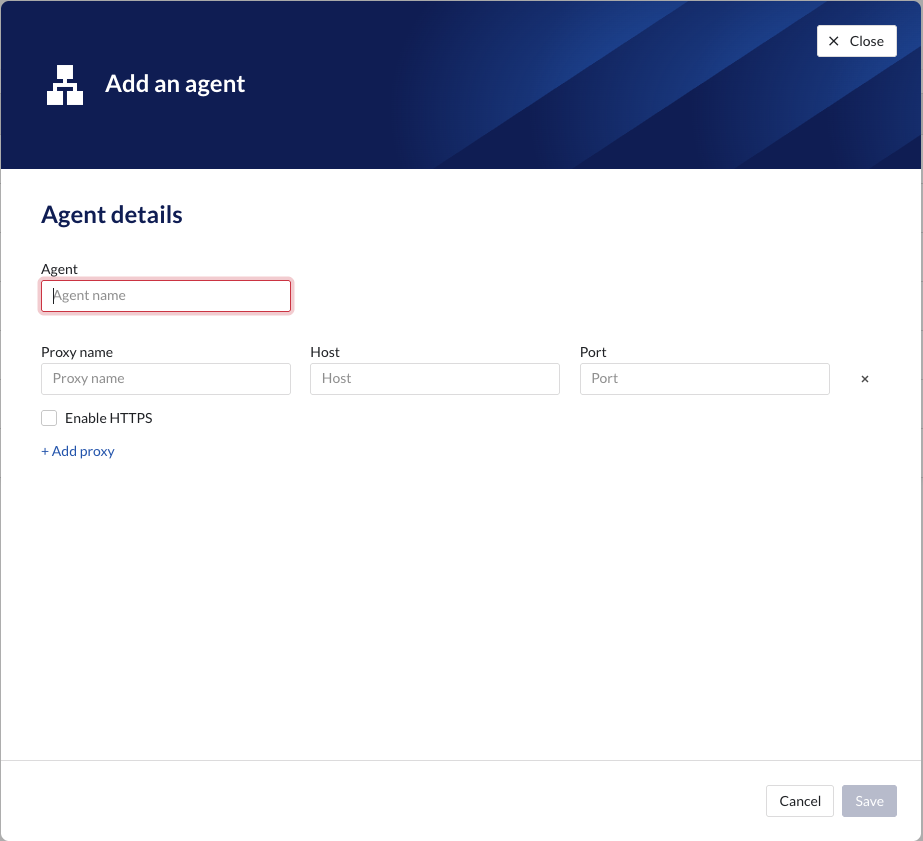
In this screen you need to specify the parameters required to access the plant-integration server(s) or other external datasources
This is a overview of the parameters and their values/limits:
Agent: it's the name of the agent. The name should be a valid DNS name. This is used when setting up the connector itself.
Proxy Name: This is the name that will be used when creating the connector. If the agent is running on the same server then the plant integration server, it's advised to use the same name. If not, you could specify the hostname of the server running the plant-integration.
Host: please specify IP or hostname of the server hosting PlantIntegration or the external datasource.
Port: please specify the port where the plant integration or other external datasource will be reachable on.
Enable HTTPS: in case you want to have the connection towards the server done over HTTPS please check this option
Setup your IIS server
Authentication on Plant Integration sites in IIS should be disabled (the connect tunnel already uses mTLS for authenticating requests)
Plant integrations sites in IIS can be configured to use HTTP or HTTPS (connect agent will also encrypt all traffic going out using TLS)
Configure IIS to only accept traffic from 127.0.0.1, so only processes running on the same server can connect. This can be configured as follows:
Open IIS Manager.
In the Connections pane, expand your server and select the target website.
In the Actions pane, click Bindings.
Edit the existing binding (or add a new one) and set the IP address to 127.0.0.1 instead of “All Unassigned”.
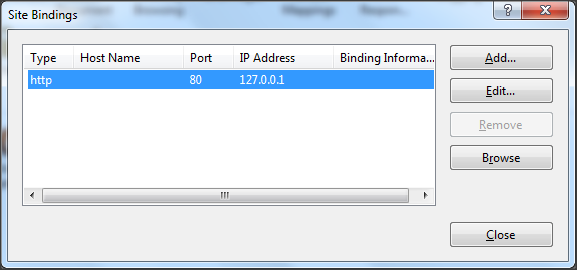
Click OK to save.
As an alternative, configure the connector server to only allow connections from specific IPs:

if needed use hostnames to run multiple plant integration servers. they all should listen only on 127.0.0.1
Ones the agent configuration is done, you need to download the config.zip file from the user interface by clicking on this button:
 |
Warning
Any time you update the agent configuration, you will need a new config.zip file downloaded, and reinstall the agent as described in this guide.
Installation of the Agent
Login to the Windows host in question
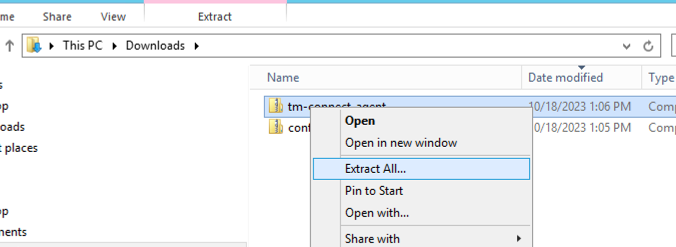
Download the config.zip and tm-connect-agent.zip and place it in easy to access folder, e.g. downloads
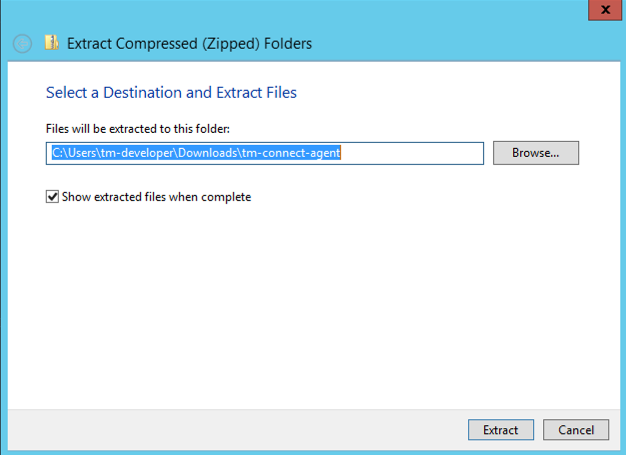
Extract tm-connect-agent.zip by right clicking on the zip file and clicking on “Extract All”
Click on Extract
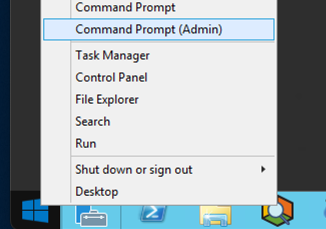
Open a command prompt as administrator
Change your directory to the directory where you have unzipped the files from tm-config-agent.zip
Run the following command to install the agent, with the received config.zip file
tm-connect.exe install -f ..\config.zip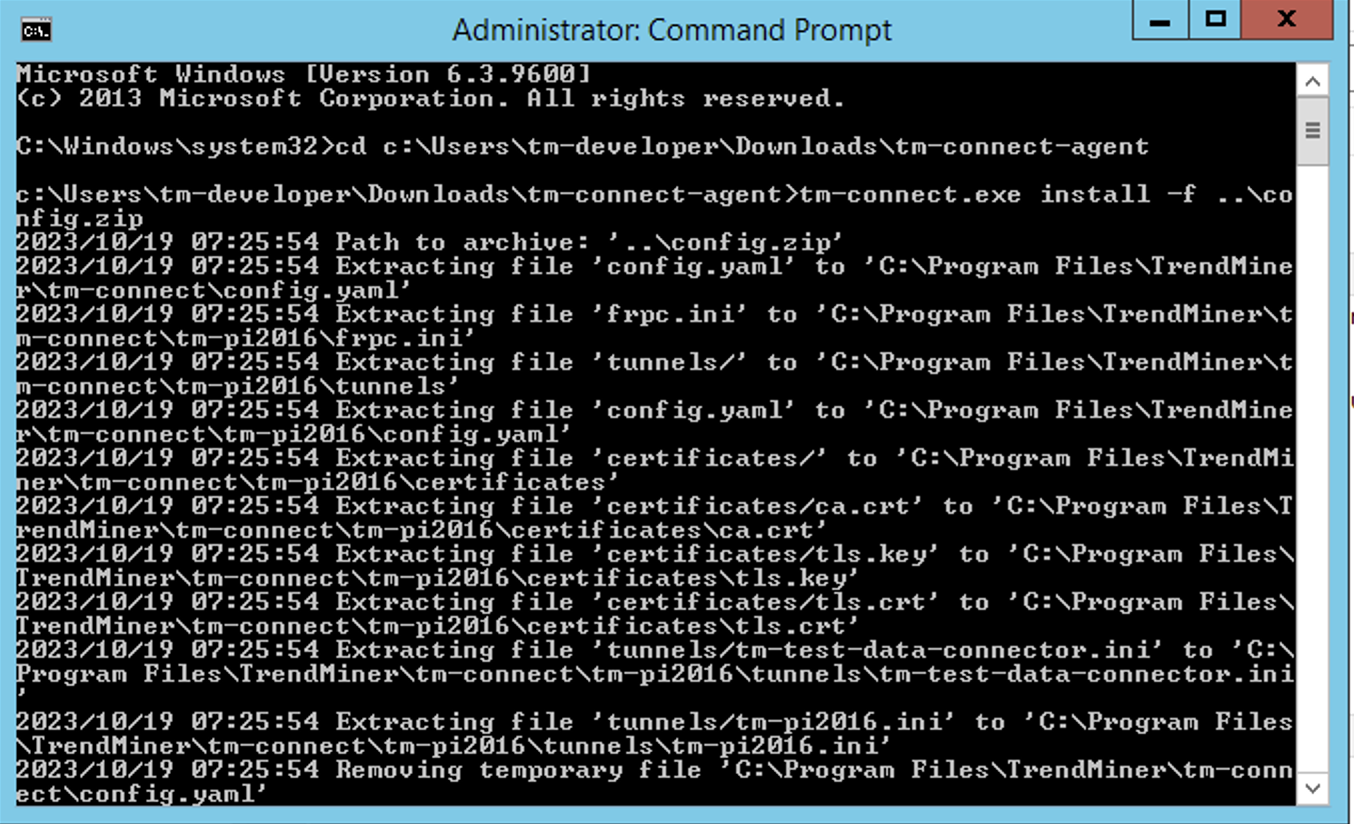
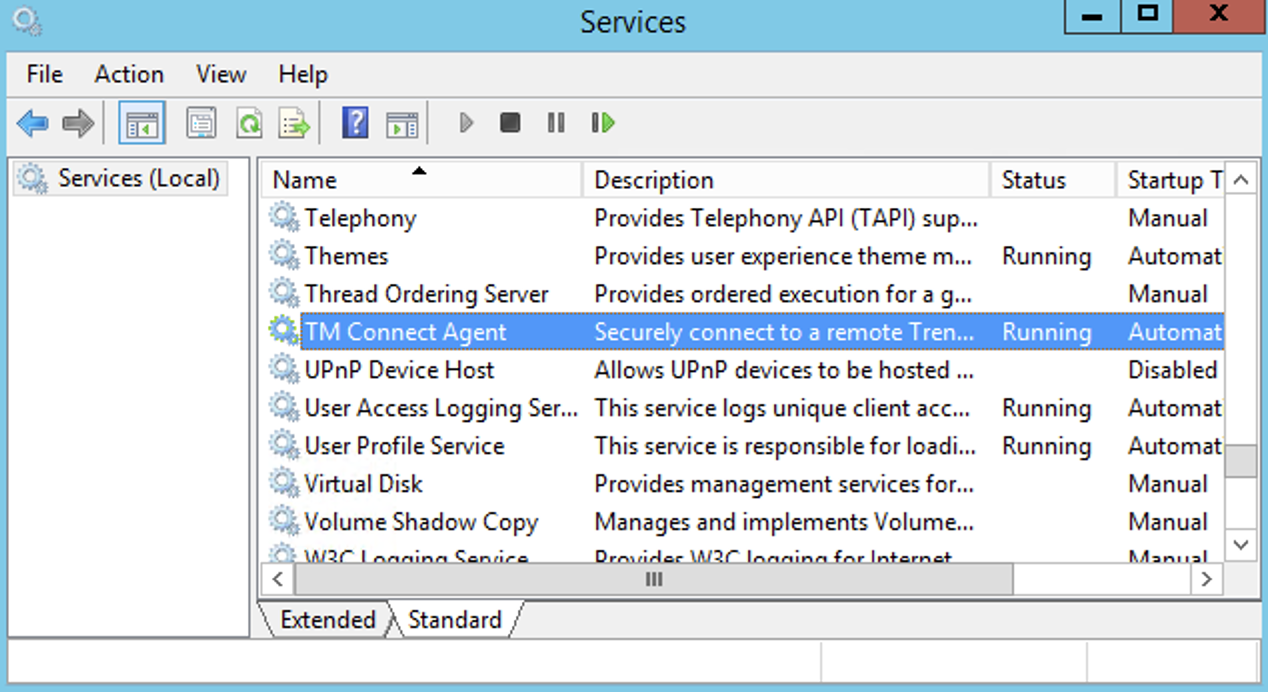
Ones everything is successfully installed, you will see the service running when you check running services (services.msc).
Uninstalling an Agent
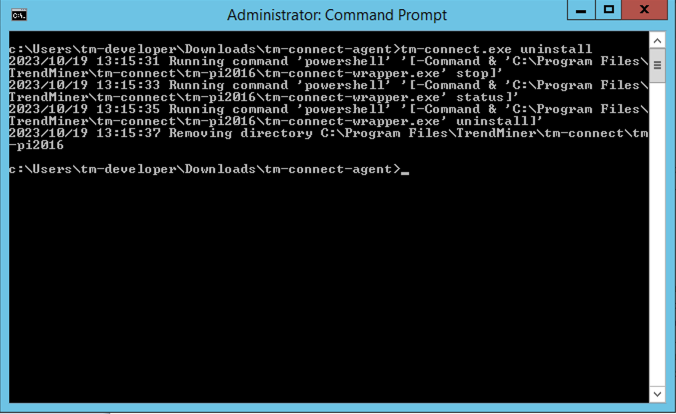
Same procedure as a above except use the following command to uninstall the agent:
tm-connect uninstall
Reinstall of the Connect Agent
Reinstall can be done by following the uninstall and install procedure again, and changing the config.zip file in case a new one is generated.
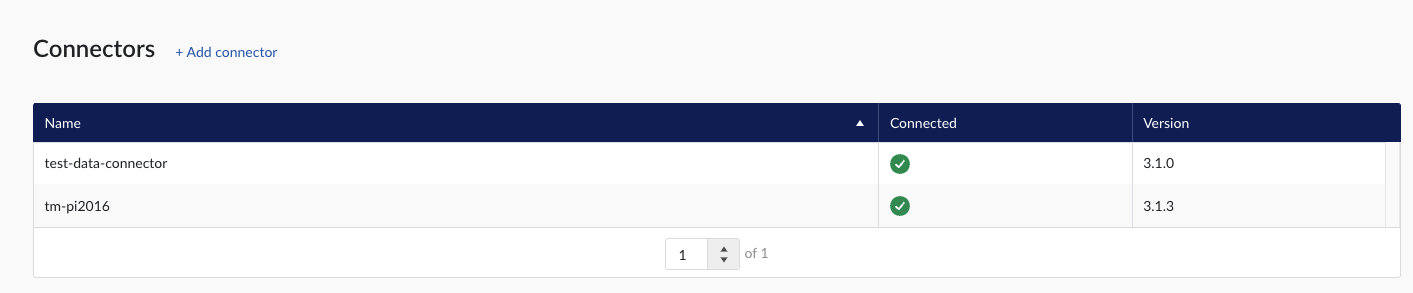
Validate the connection
Login to TrendMiner and open ConfigHub (e.g. https://site.mycompany.trendminer.io/confighub)
Navigate to Connectors, and validate the connection is properly running.
How to Send troubleshooting information to TrendMiner Support
In cases the connection is not working, or there are some communication issues, the diagnostic information available in the tool that allows to uninstall/install the agent, might be very useful for support.
To execute this, open a command prompt as Administrator and execute the command
c:\tm-connect-agent\tmconnect.exe diagnostics
The tool will generate a zip file. Please send this zipfile to your TrendMinder Support representative.
Supported Windows Versions
Windows Server 2016 (EOL - Jan. 11th 2027)
Windows Server 2019 (EOL - Jan. 9th 2029)
Windows Server 2022 (EOL - Oct. 14th 2031)
Windows Server 2025 (EOL - Oct, 10th 2034)
Simplified view of TM Connect communication flow (connection setup)
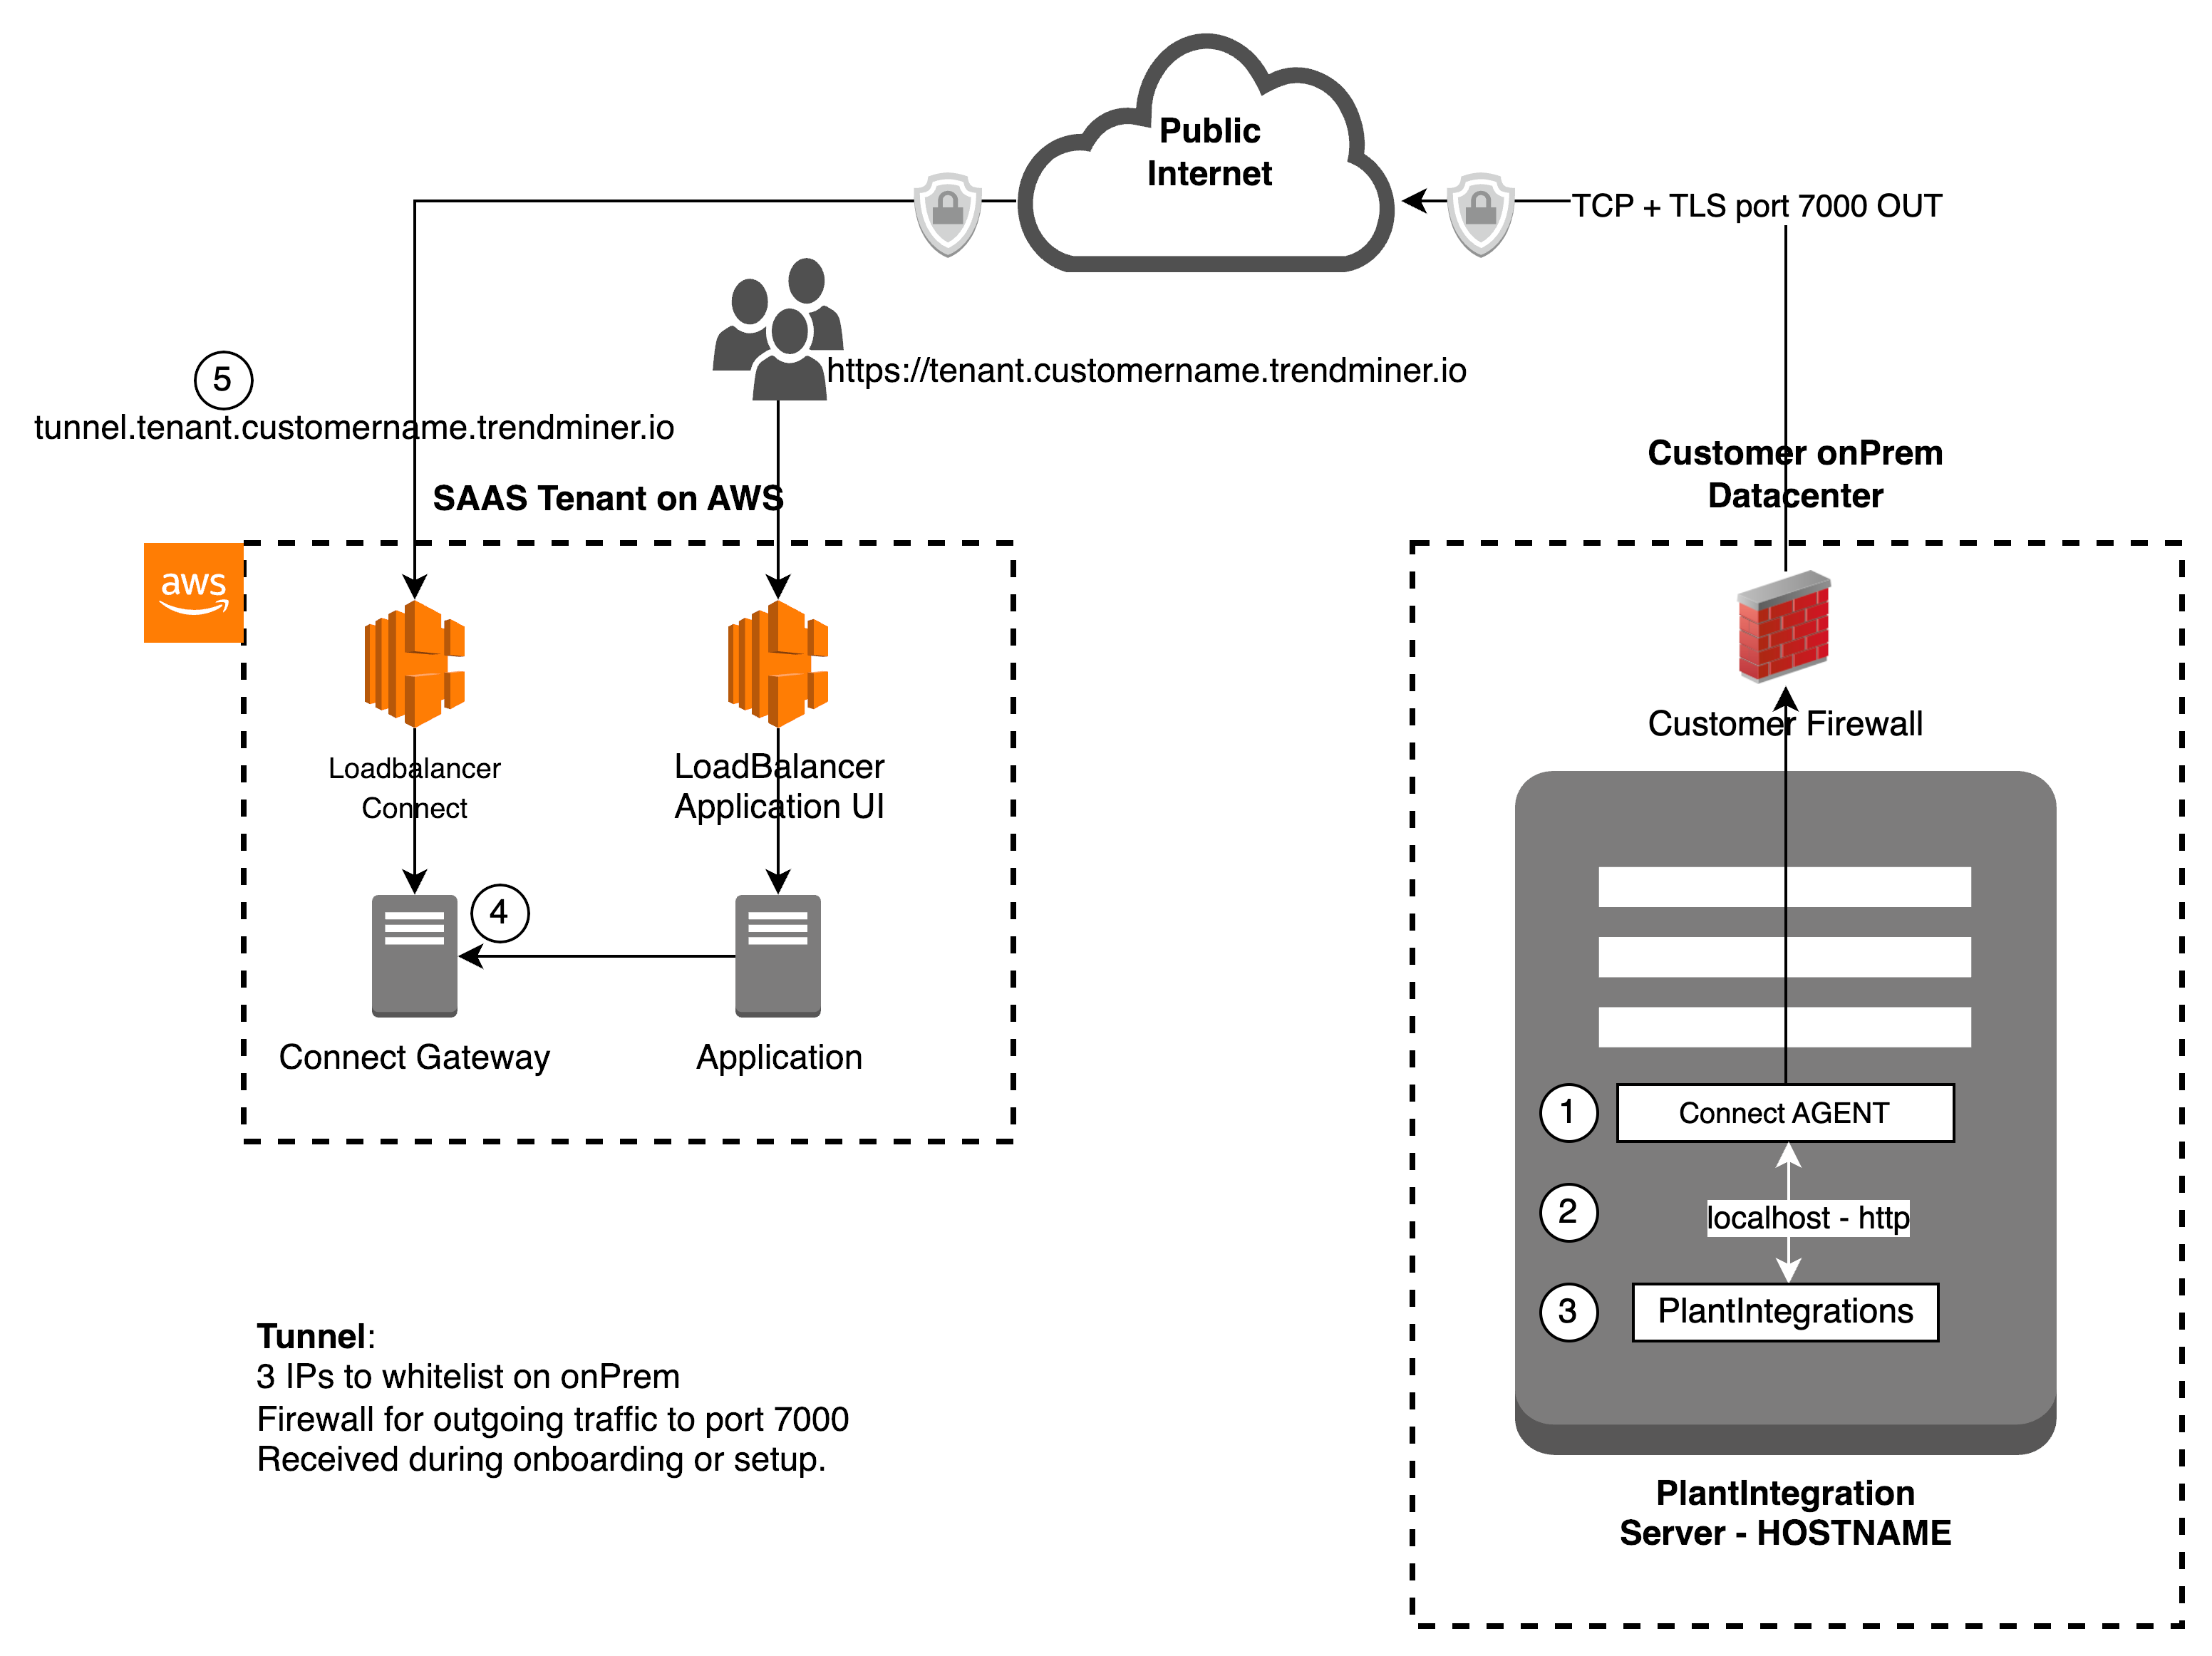 |
(1) Connect Agent service running on Windows server, and can be accessed by (3) plant integration service over a local port (2)
(1) Connect Agent initiates the connection to (4) Connect gateway to setup a bidirectional secure encrypted tunnel using (5) the url tunnel.tenant.customername.trendminer.io on port 7000
Important
Security Advice
To have a better security for your plant integration server, its advised to close all incoming ports on the PlantIntegrations local Windows firewall.
Connectors
Add a new connector by clicking the (+ Add connector) label next to the title and fill connector details in the corresponding fields:
Name: free to choose name. The only restriction is that each connector name should be unique.
Host: hostname of the connector.
Username and Password: should only be filled in when they are configured on the connector installation.
As soon as a new connector is successfully added, it will start syncing all the data sources which are configured to the connector.
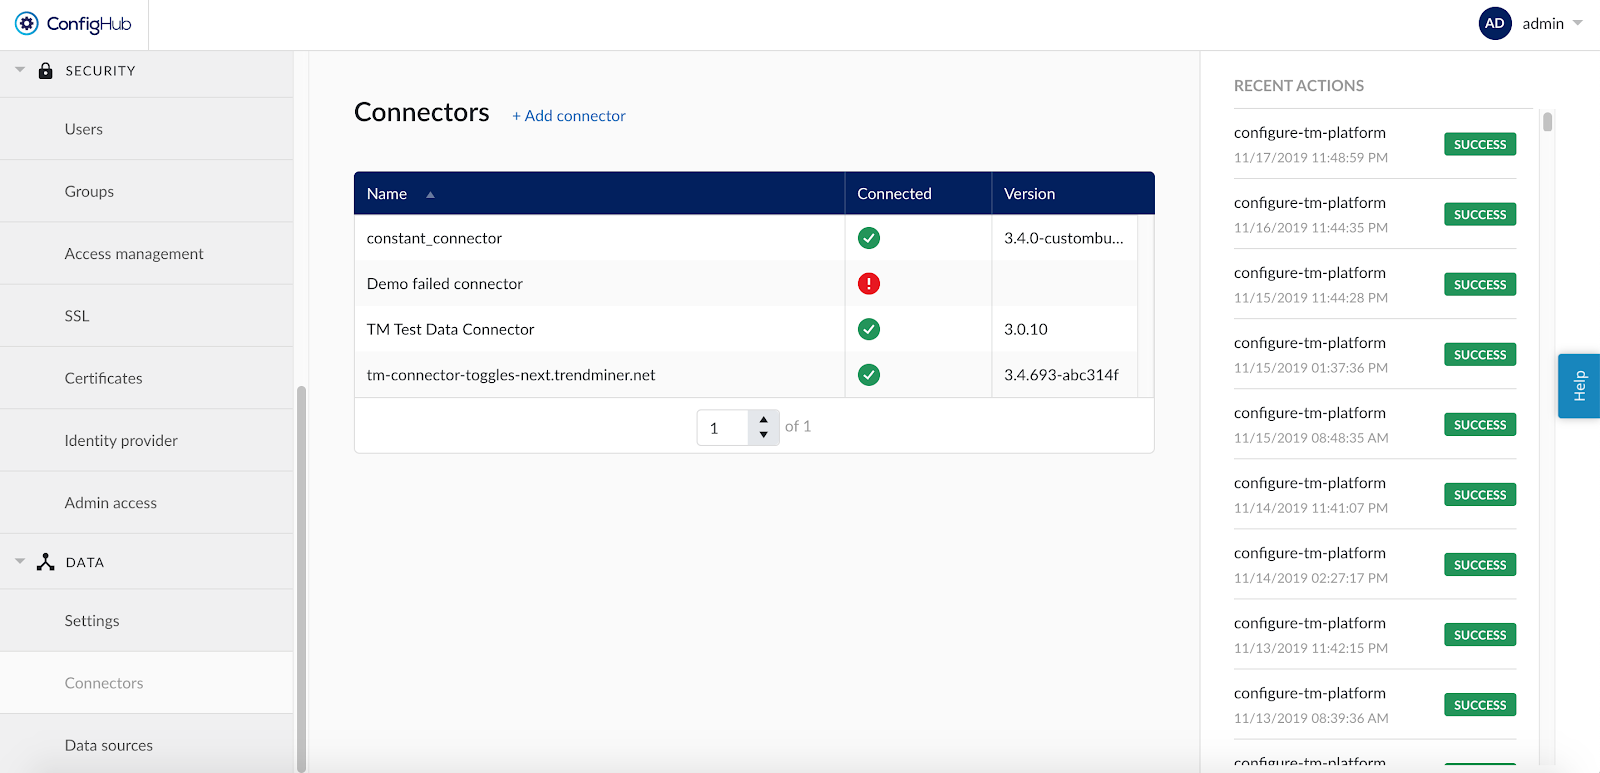
If the connector cannot be synced, it will show a red exclamation mark in the connector list. To learn more about the cause of the failure, open the connector details side panel by clicking on the connector name. The error feedback will be shown under 'Last sync'.
For successfully connected connectors the 'Last sync' field in the connector details will show the last sync date and time and status ''Successful". The last sync date and time will be updated when a manual sync is triggered or when TrendMiner synchronises the tag cache for that connector, typically during a nightly tag cache refresh.
Important
A green checkmark in the connector list indicates that TrendMiner is connected successfully to the connector, but it does not indicate if there are syncing issues between the connector and the data source. The health status for connected data sources should be consulted in the 'Data sources' menu. Also note that the status will not automatically update after the page is loaded. Refresh the page or choose the 'Test connection' option to update the connection status of a connector.
The version of each connector is listed in the Connectors overview table. This information is important in case a newer connector version supports new features or improvements for a specific data source.
To edit the details of a connector click on its name to open the details side panel and then click on 'Options' and select 'Edit' in the dropdown menu.
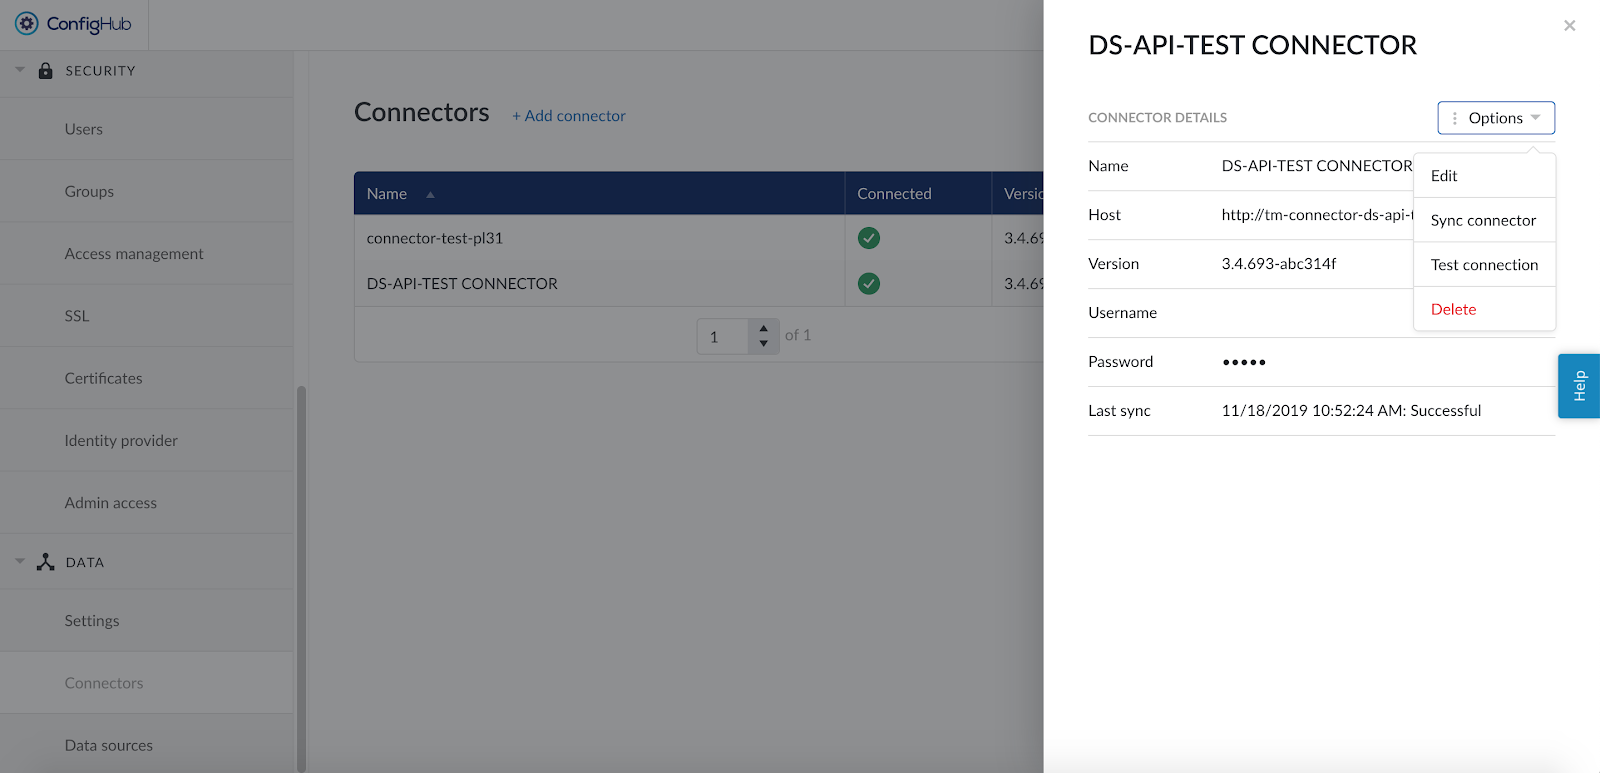
Changing the name of the connector will not affect the tags from the connected data sources but changing the host, username or password to an incorrect value will render the tags from the connected data sources inaccessible.
Other available options are:
Sync connector: this will trigger a manual (re-)sync of all data sources which are configured on this connector. Choose this option to update all tags from all connected data sources at once.
Test connection: this option will test the connection to the connector without triggering a sync and will update the health status of the connector.
Delete: this option will remove the connector from the configuration and remove all data sources which are using this connector, until the data sources are reconnected via a correctly configured connector.
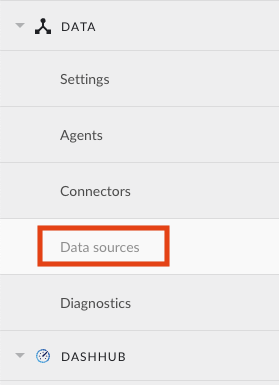
Data sources
When clicking on the Data sources menu option, the data sources overview is shown :
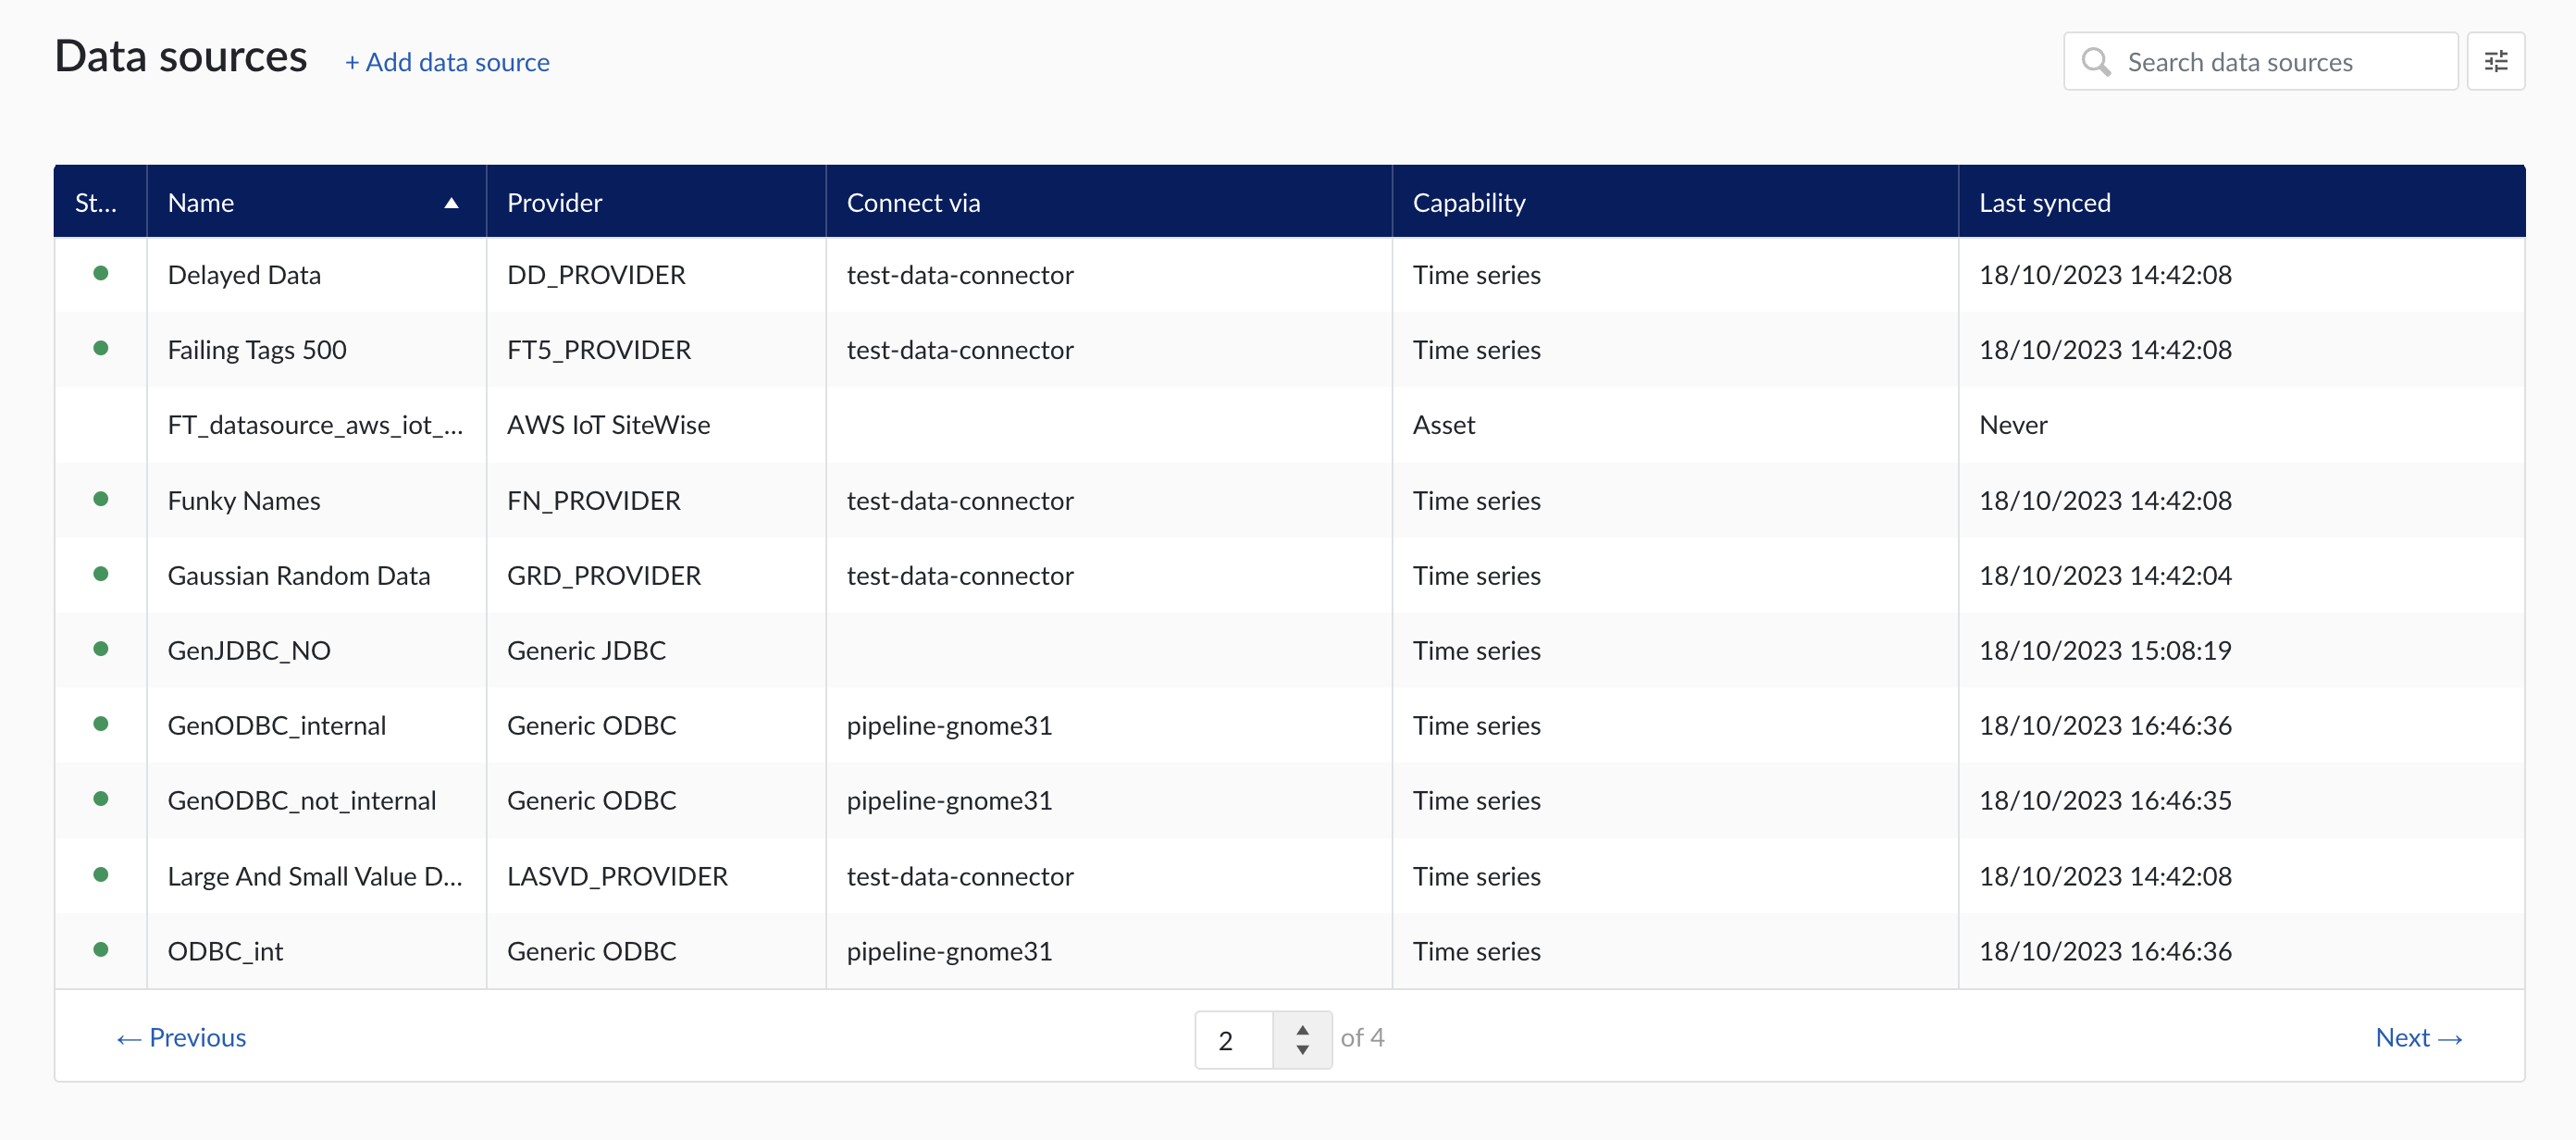
Data sources overview
Add a new data source by clicking the (+ Add data source) label next to the title. An "Add a data source" modal will appear.
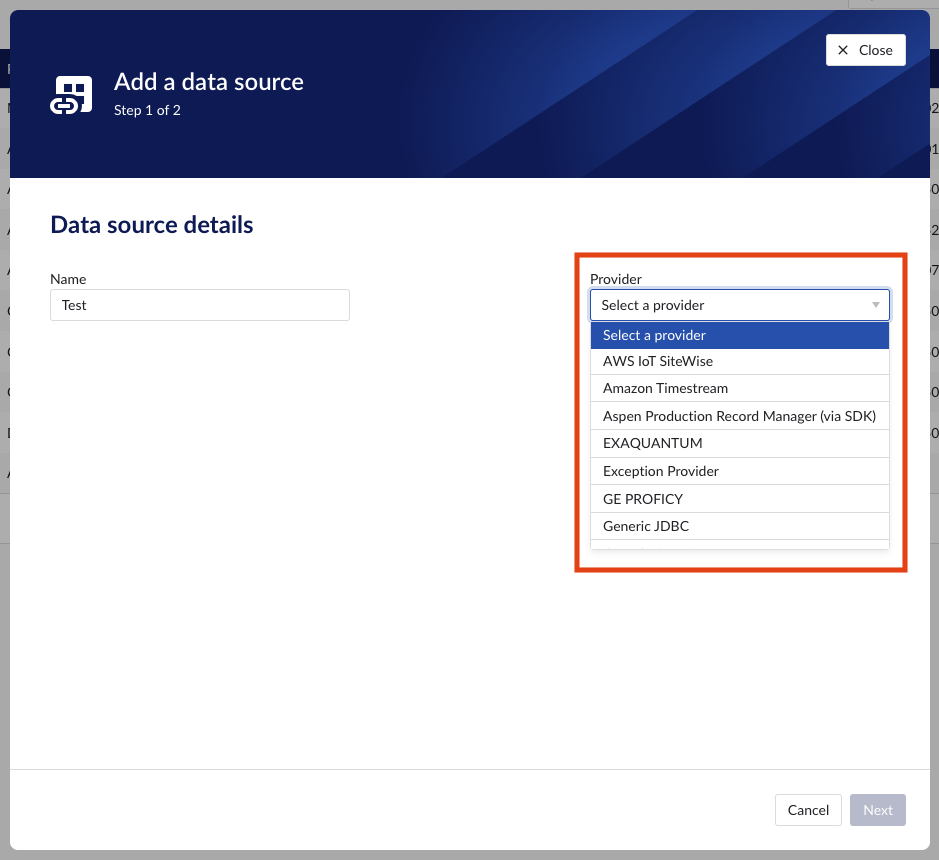
Data source details
Populate the fields on the Data source details step:
Name: you are free to choose data source names but they are mandatory, case insensitive and unique. The name of a data source identifies the data source. We strongly advise to only use alphanumerical and '-' or '_' in data source names as other characters are not supported in the access management so using special characters in a data source name might give issues when you want to assign access permission to the data source later on.
Provider: TrendMiner provides some out of the box connectivity to data sources via specific vendor implementations (e.g. OSIsoft PI, Honeywell PHD,...) and via more generic alternatives (e.g. Generic JDBC, ODBC, OleDB, ...). The provider 'TM connector' enables the connection of data sources via a connector to connector setup. To connect a data source via multiple connectors, extra configuration is needed via the TrendMiner Connector API.
Connect via: this dropdown is used to select a connector which is used to connect to the data source. The dropdown is displayed based on the selected provider: some data sources need to be connected via a connector (e.g. OSIsoft PI, Generic ODBC, Wonderware, ...), while others don't need any connector (e.g. Amazon Timestream, Generic JDBC, AWS IoT SiteWise, ...). To add a data source that needs a connector, the connector needs to be added first.
Capabilities: Capabilities depend on provider implementation. Some datasources have only one capability (e.g. Amazon Timestream has Time series capability only), others have all 3 capabilities (e.g. AWS IoT SiteWise). Selecting the capabilities for the data source with the given checkboxes will open additional properties to enter, grouped in following sections:
Connection details - lists properties related to the configuration of the connection that will be established with datasource
Time series details – lists properties relevant for the time series data
Asset details - lists properties relevant for asset data
Context details - lists properties relevant for context data
Important
Duplicate tag names are not supported. If 2 tags with exactly the same name are synced to TrendMiner, analytics, calculations and indexing on/for these tags might fail. Use data source prefixes to avoid possible duplicate tag name issues.
Note
Depending on the provider you select, the connection details required for completion may differ.
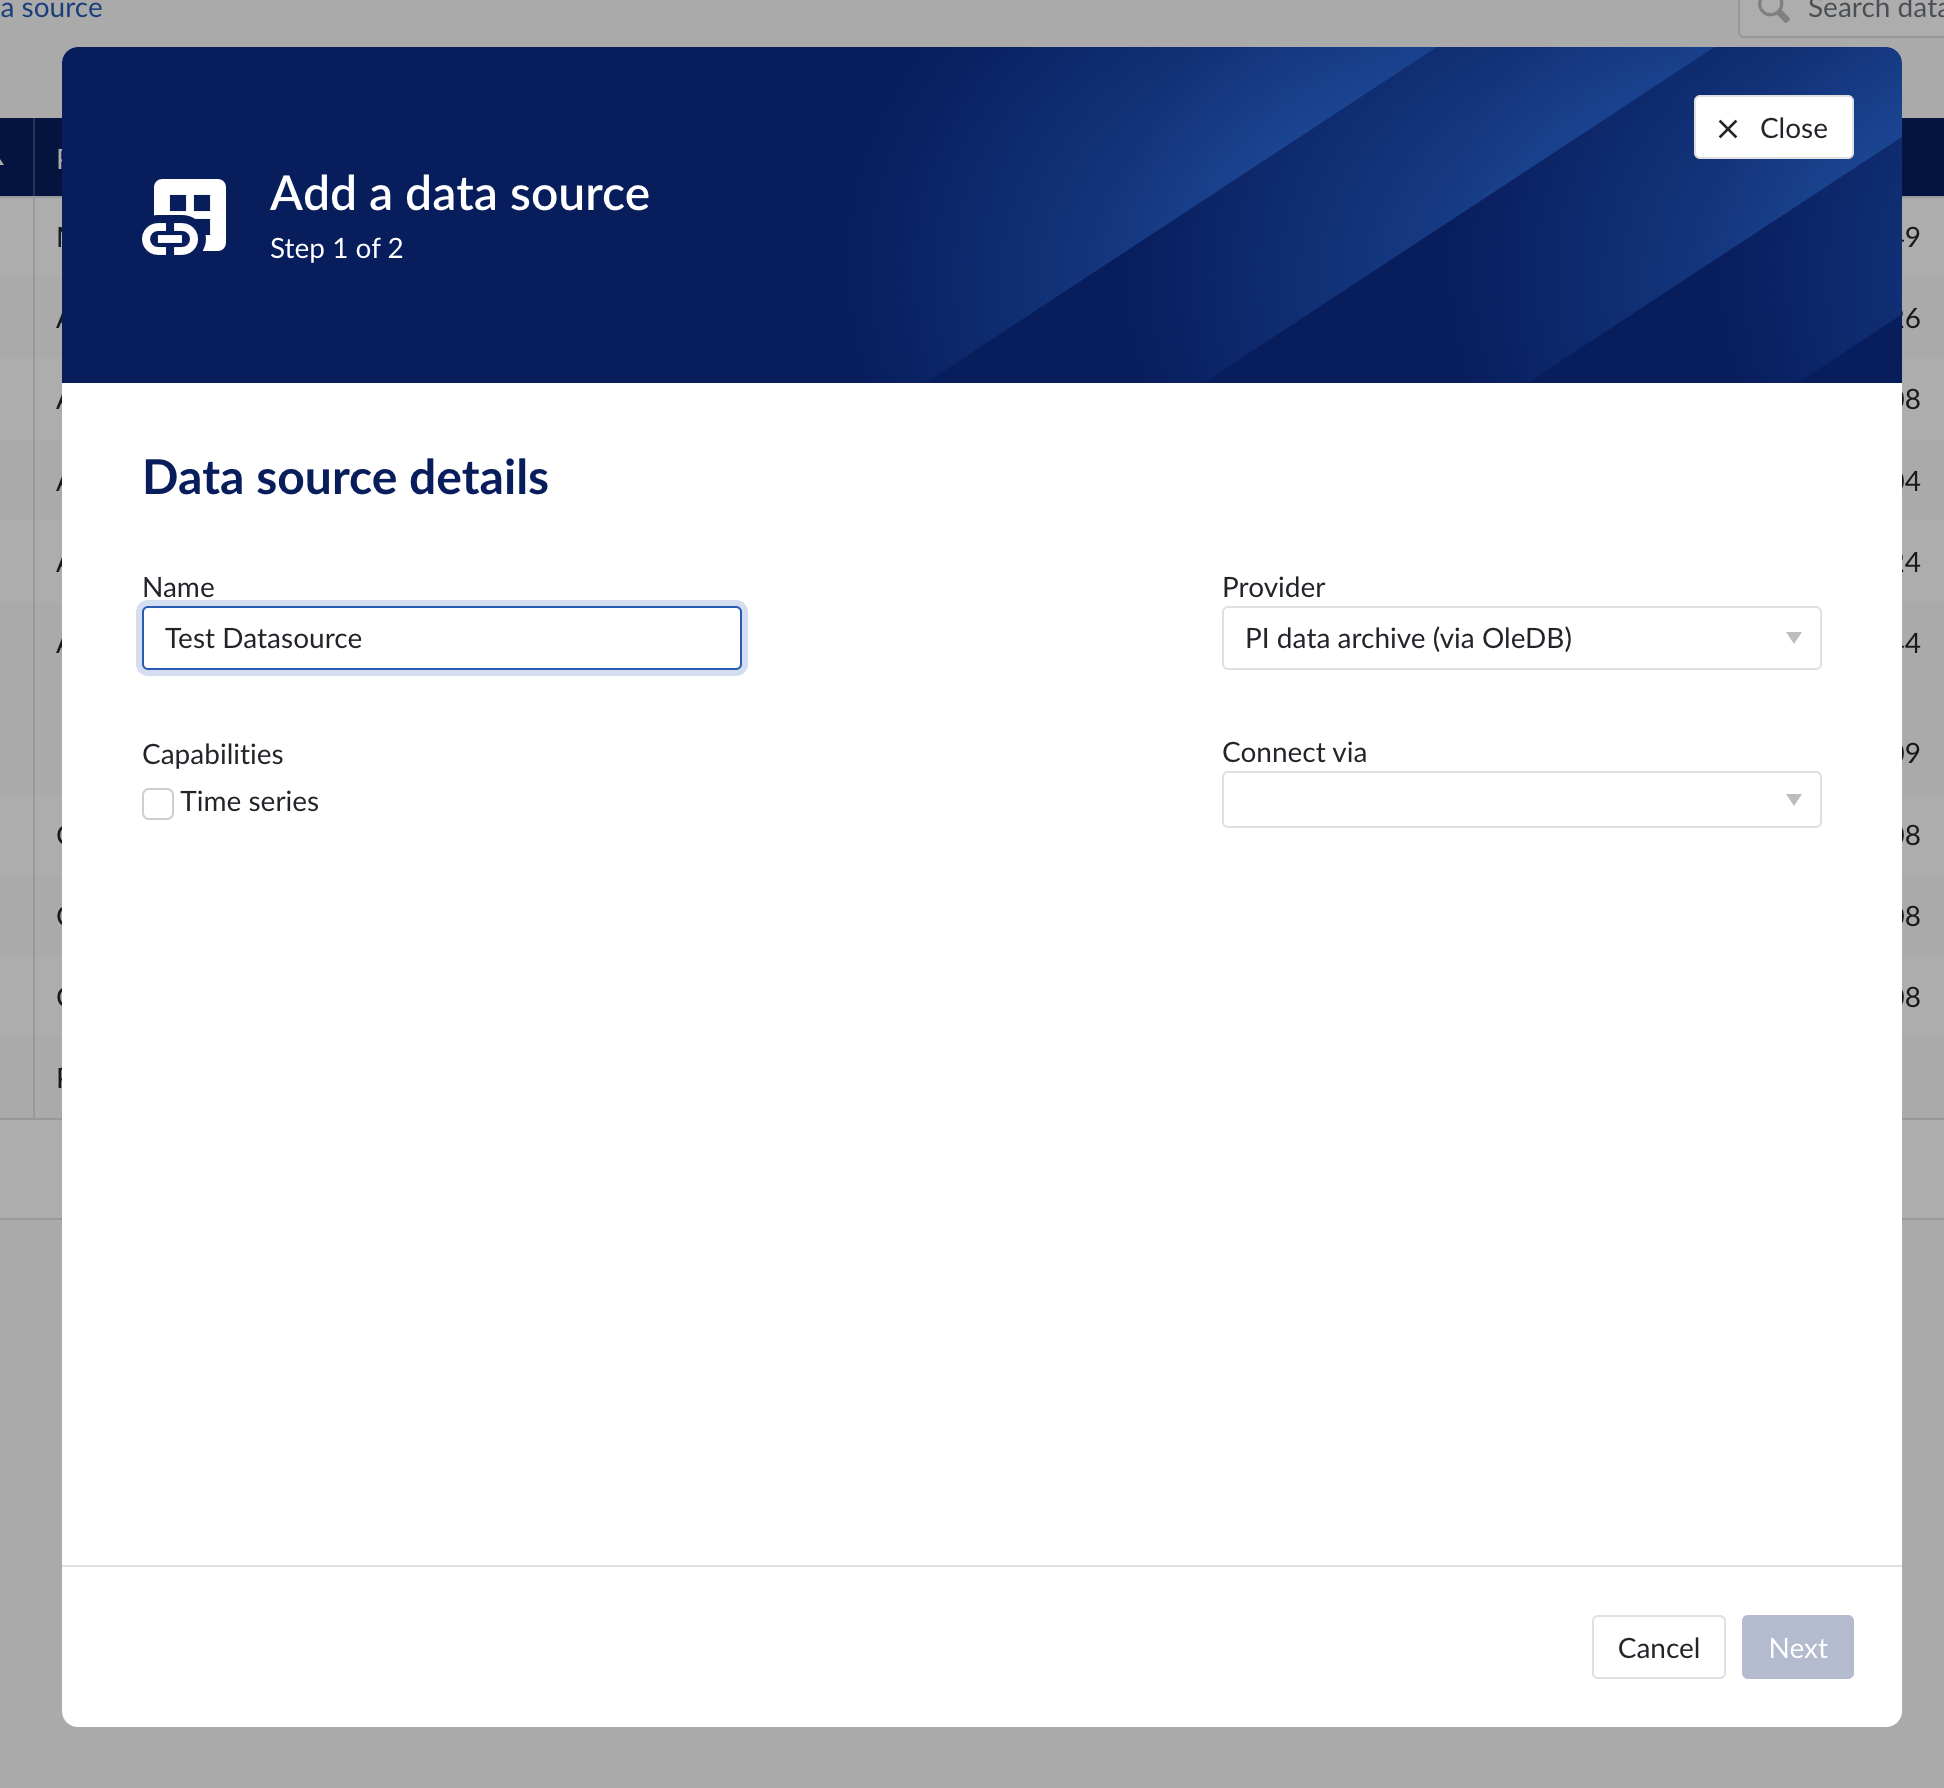
Data source details step in the creation wizard
Connection details
Populate the fields on the Connection details step:
Parallel connections (if any): Each data source has 2 queues: one interactive - plot calls, one non-interactive - index calls, batch calls etc. Parallel connections determine how many connections each queue has to the connector. By default there are 2 parallel connections to the connector.
Host: the host name of the data source, e.g. myhistorian.mycompany.com
Username: username of the account configured in the data source.
Password: password of the account configured in the data source.
Once all mandatory fields are filled in, 'Test connection' button becomes enabled. By clicking on the button, user can verify the connection to the datasource.
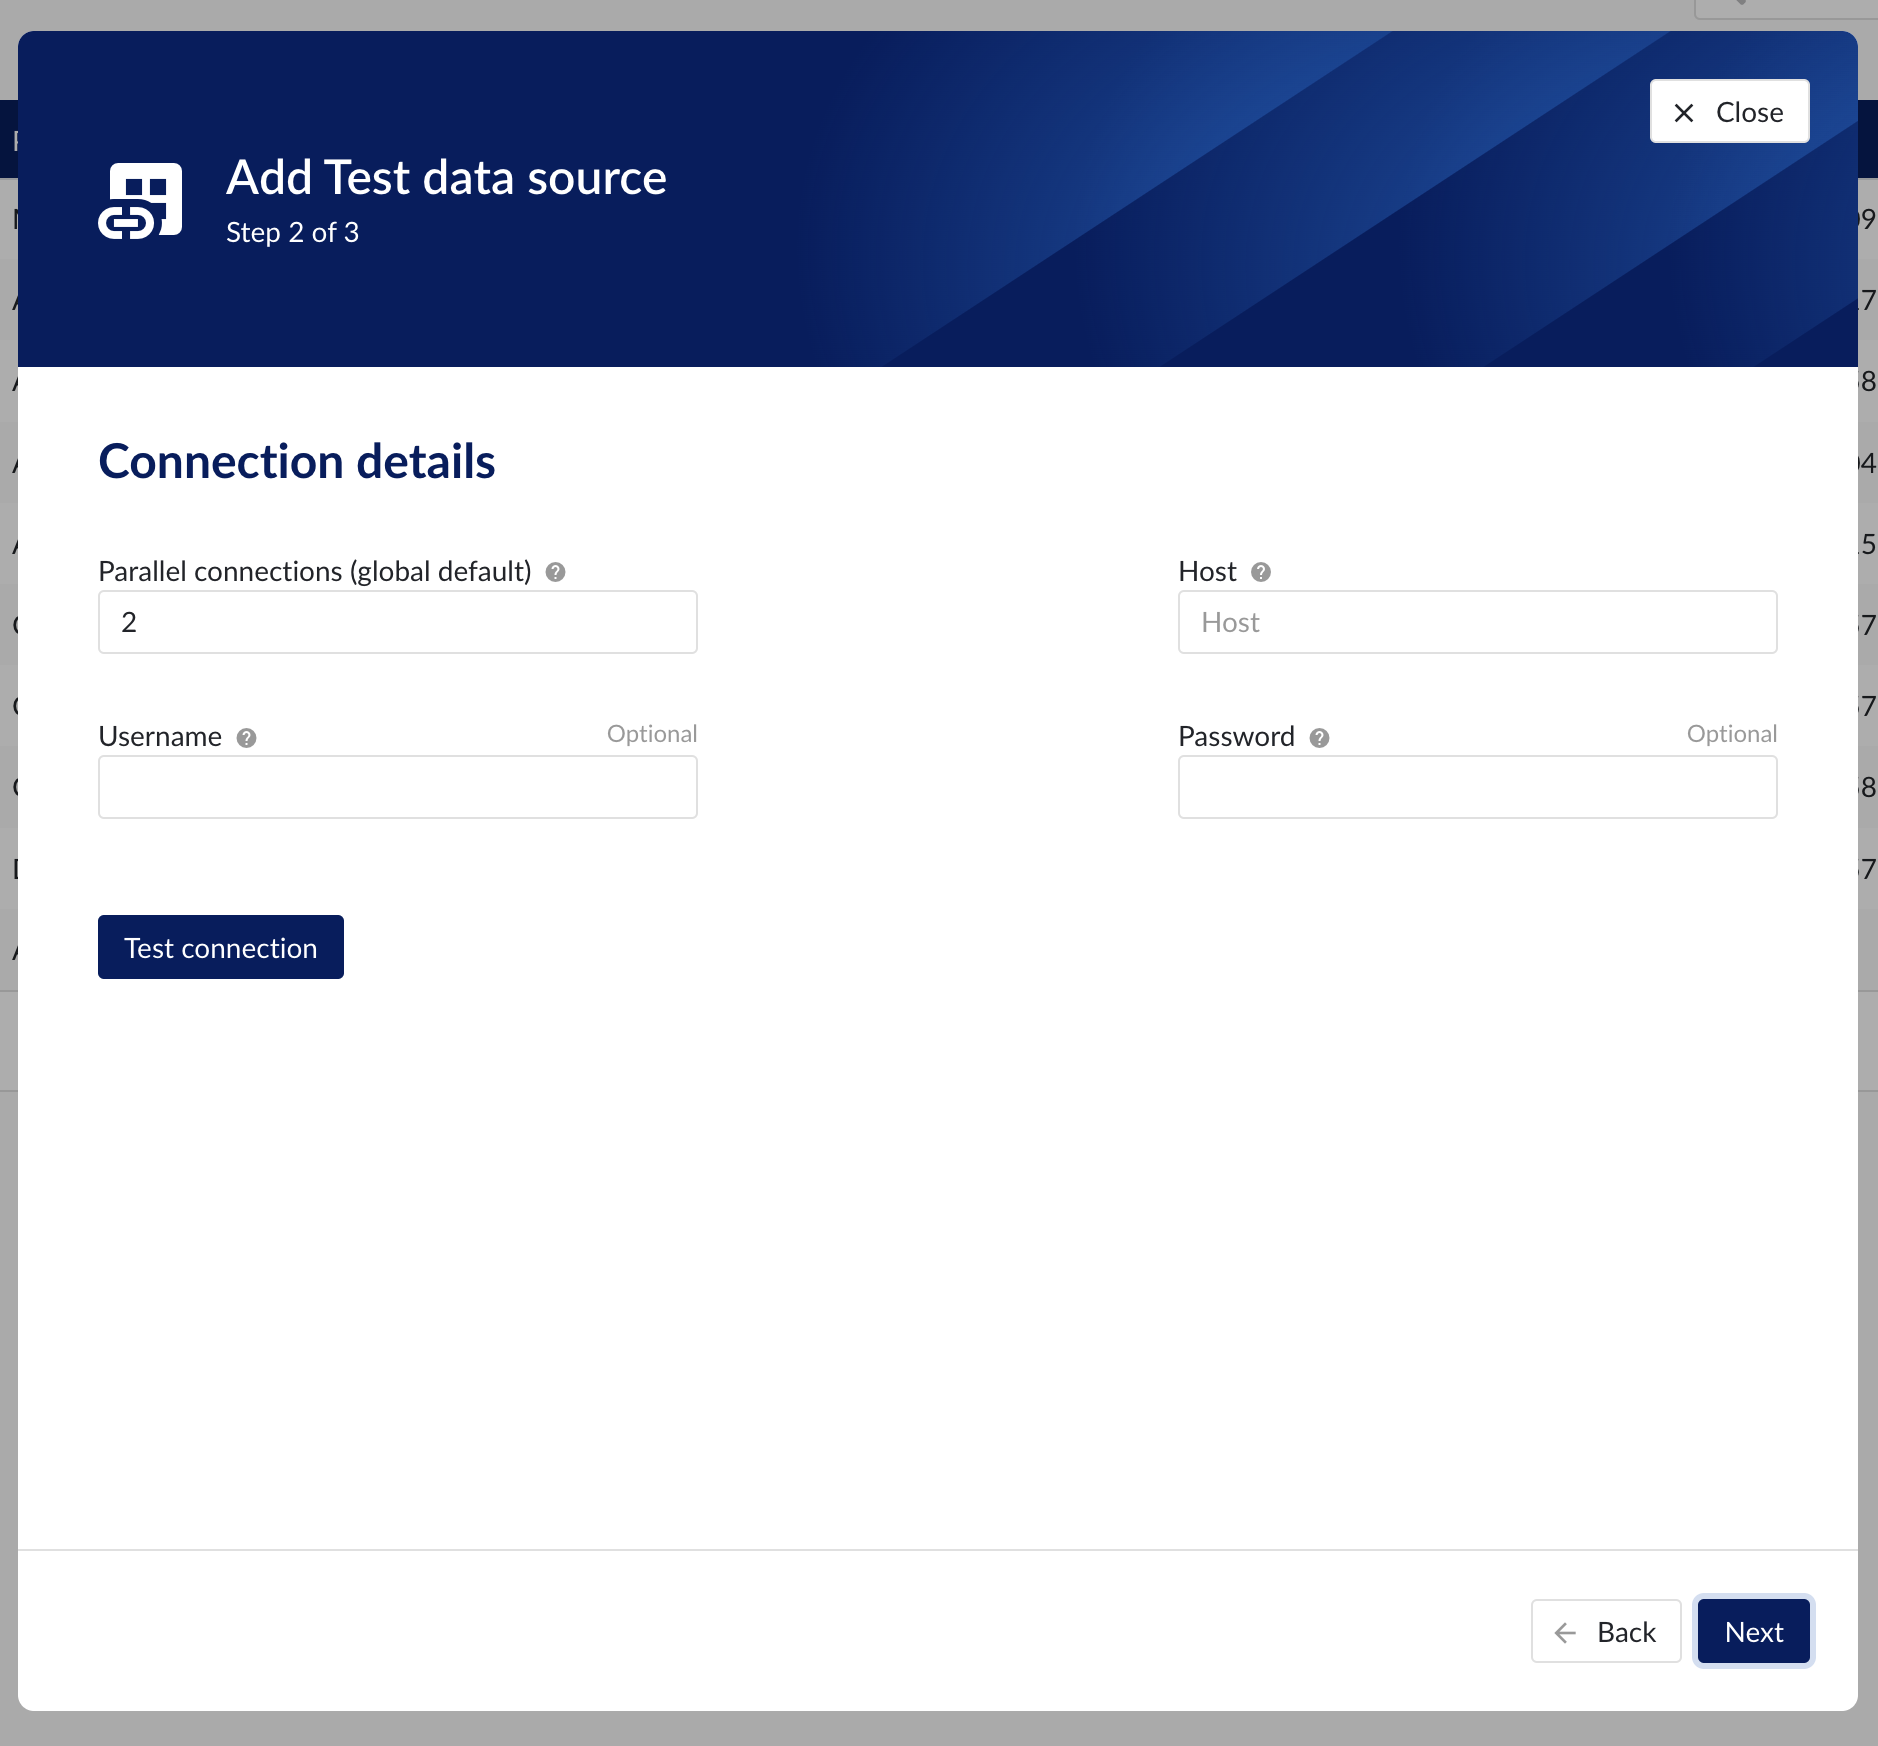
Connection details step in the datasource creation wizard
Time series details
Populate the fields on the Time series details step:
Prefix: you are free to choose prefixes. They are case insensitive but unique strings and have a maximum length of 5 characters. When synchronising a data source, all tag names of that data source will be prepended with the prefix to ensure tag name uniqueness in TrendMiner. Prefixes are optional but we highly recommend the provision of a prefix when connecting a data source to avoid duplicate tag names.
Tag filter: regular expression to be entered. Only tags with names that match this regular expression will be retained when creating tags (using the tag list query).
Examples:
Tag filter
Result
LINE.[1]+
Will make tags with 'LINE.1' in the name available but will exclude tags with 'LINE.3' in the tag name.
^(?:(?!BA:TEMP).).*$
Only excludes tag STARTING with BA:TEMP (so still keep test_BA:TEMP.1)
^\[pref\]PI.*$
Only syncs tags from a data source with prefix 'pref' and which start with 'PI'
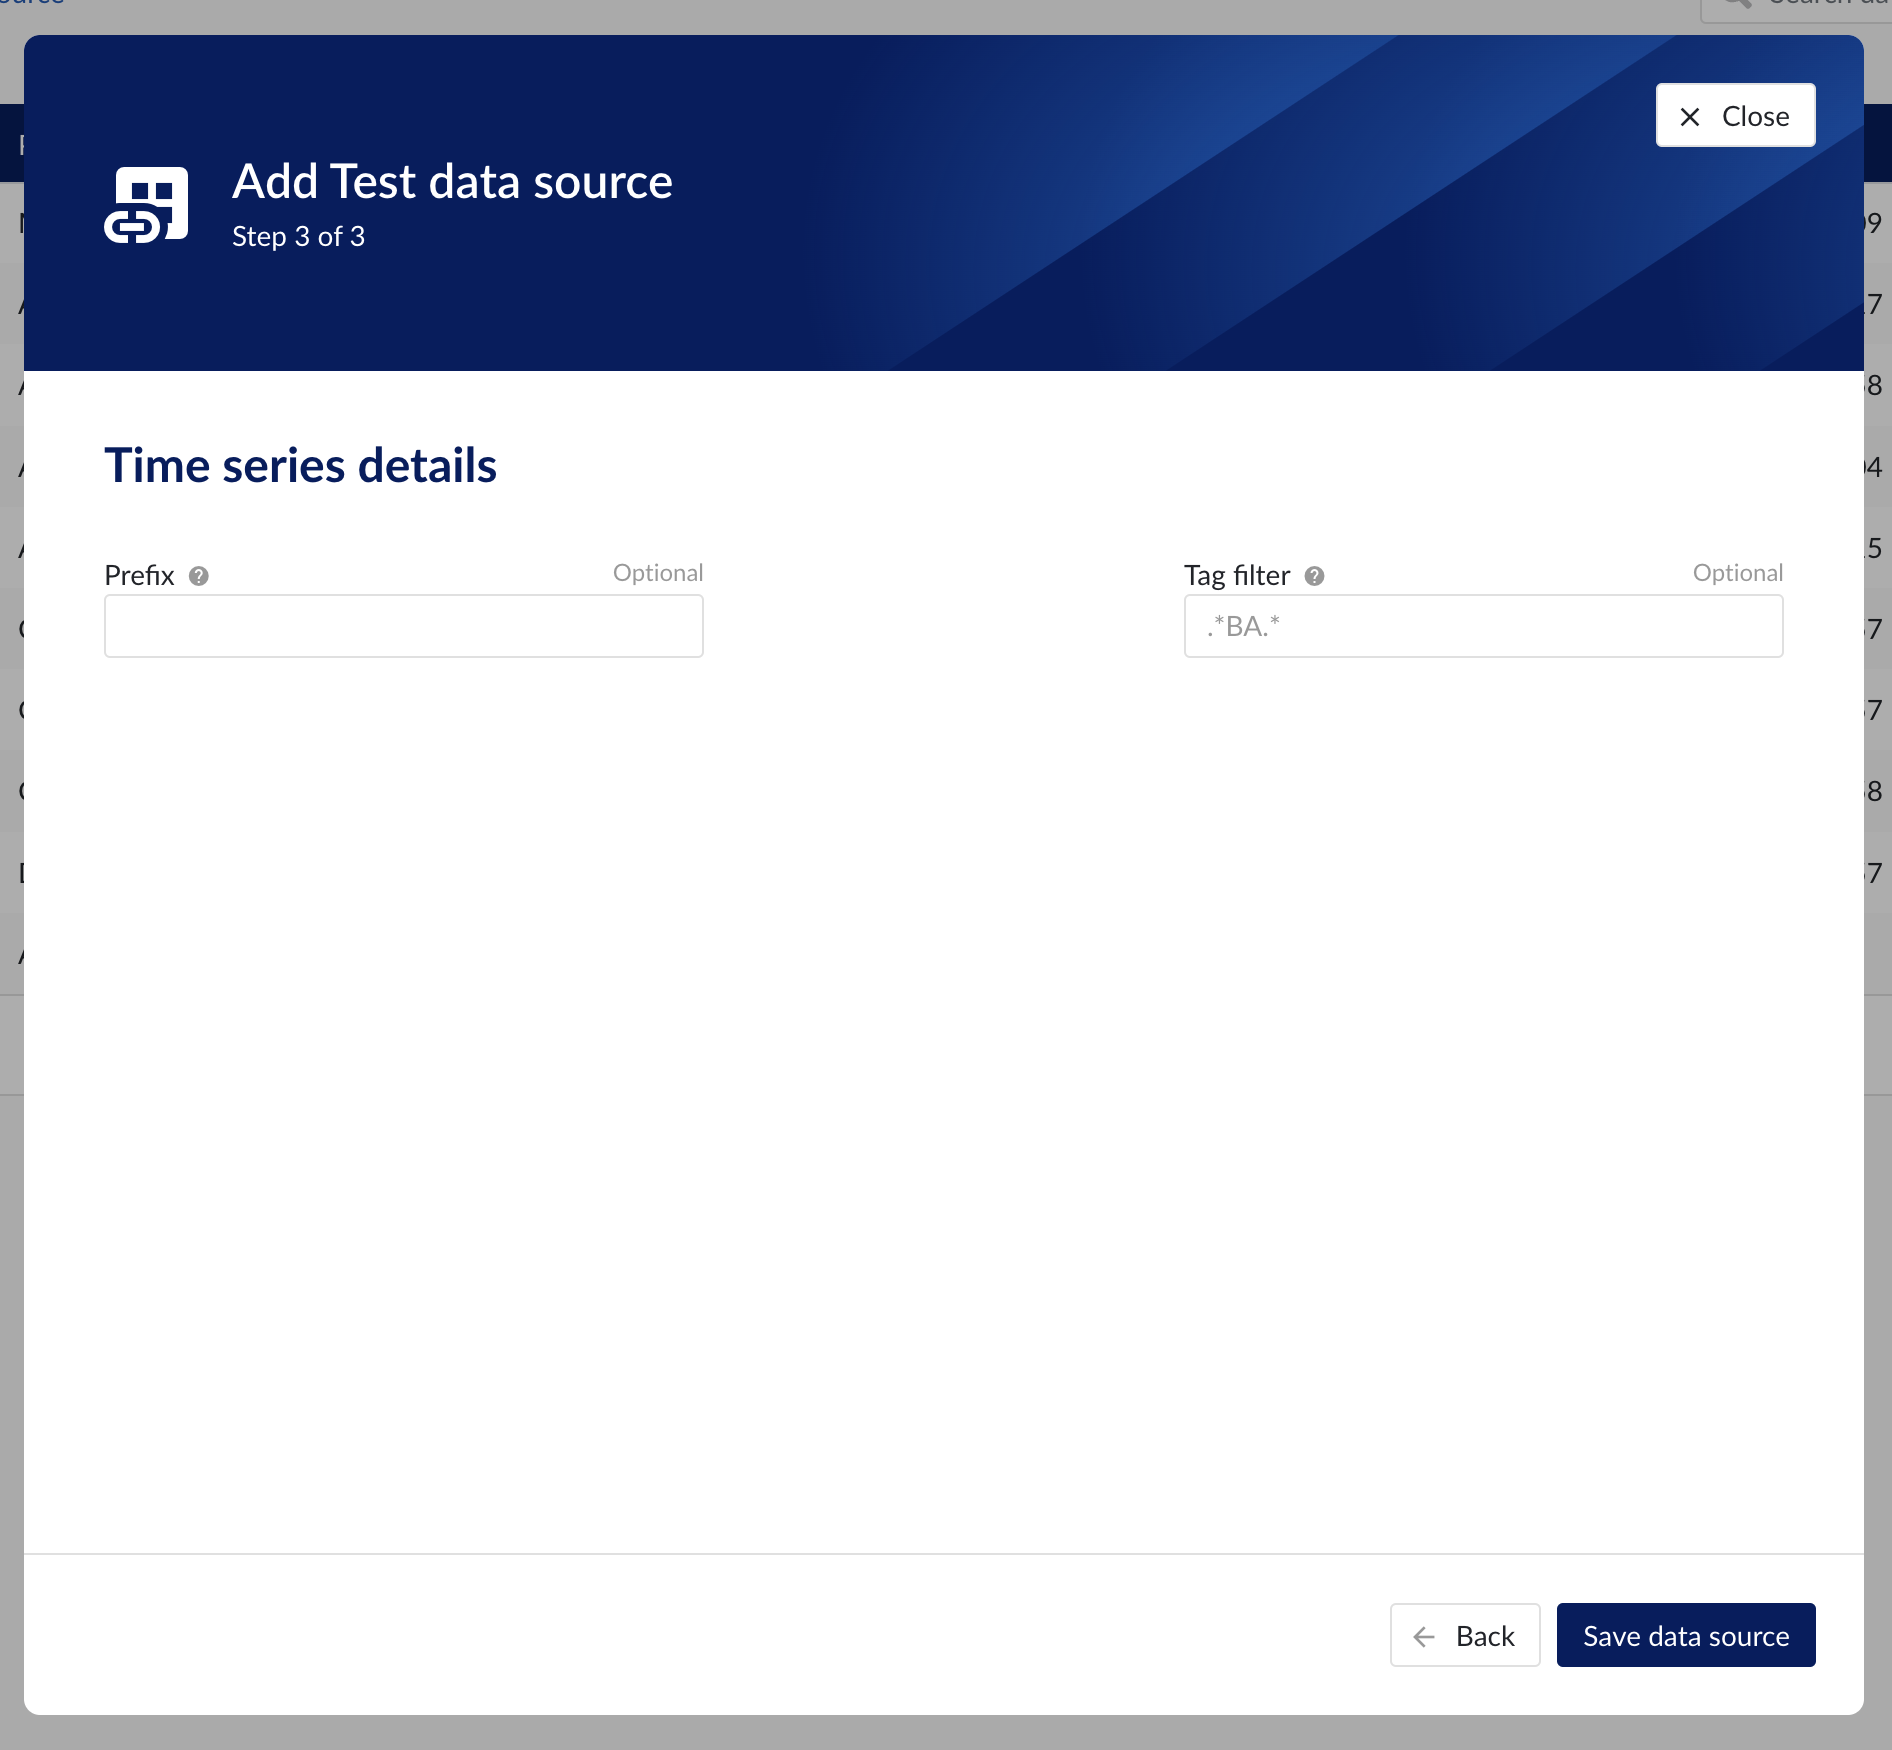
Time series details step in the datasource creation wizard
Asset details
The process of creating asset data source, is somewhat similar to the creation of time series data source, but fewer fields are required to fill in.
Database: name of the database to connect to.
Important
It is not permitted to add the same connection multiple times with asset capabilities enabled on both instances!
Asset tree permissions need to be managed in the asset permission section (ContextHub).
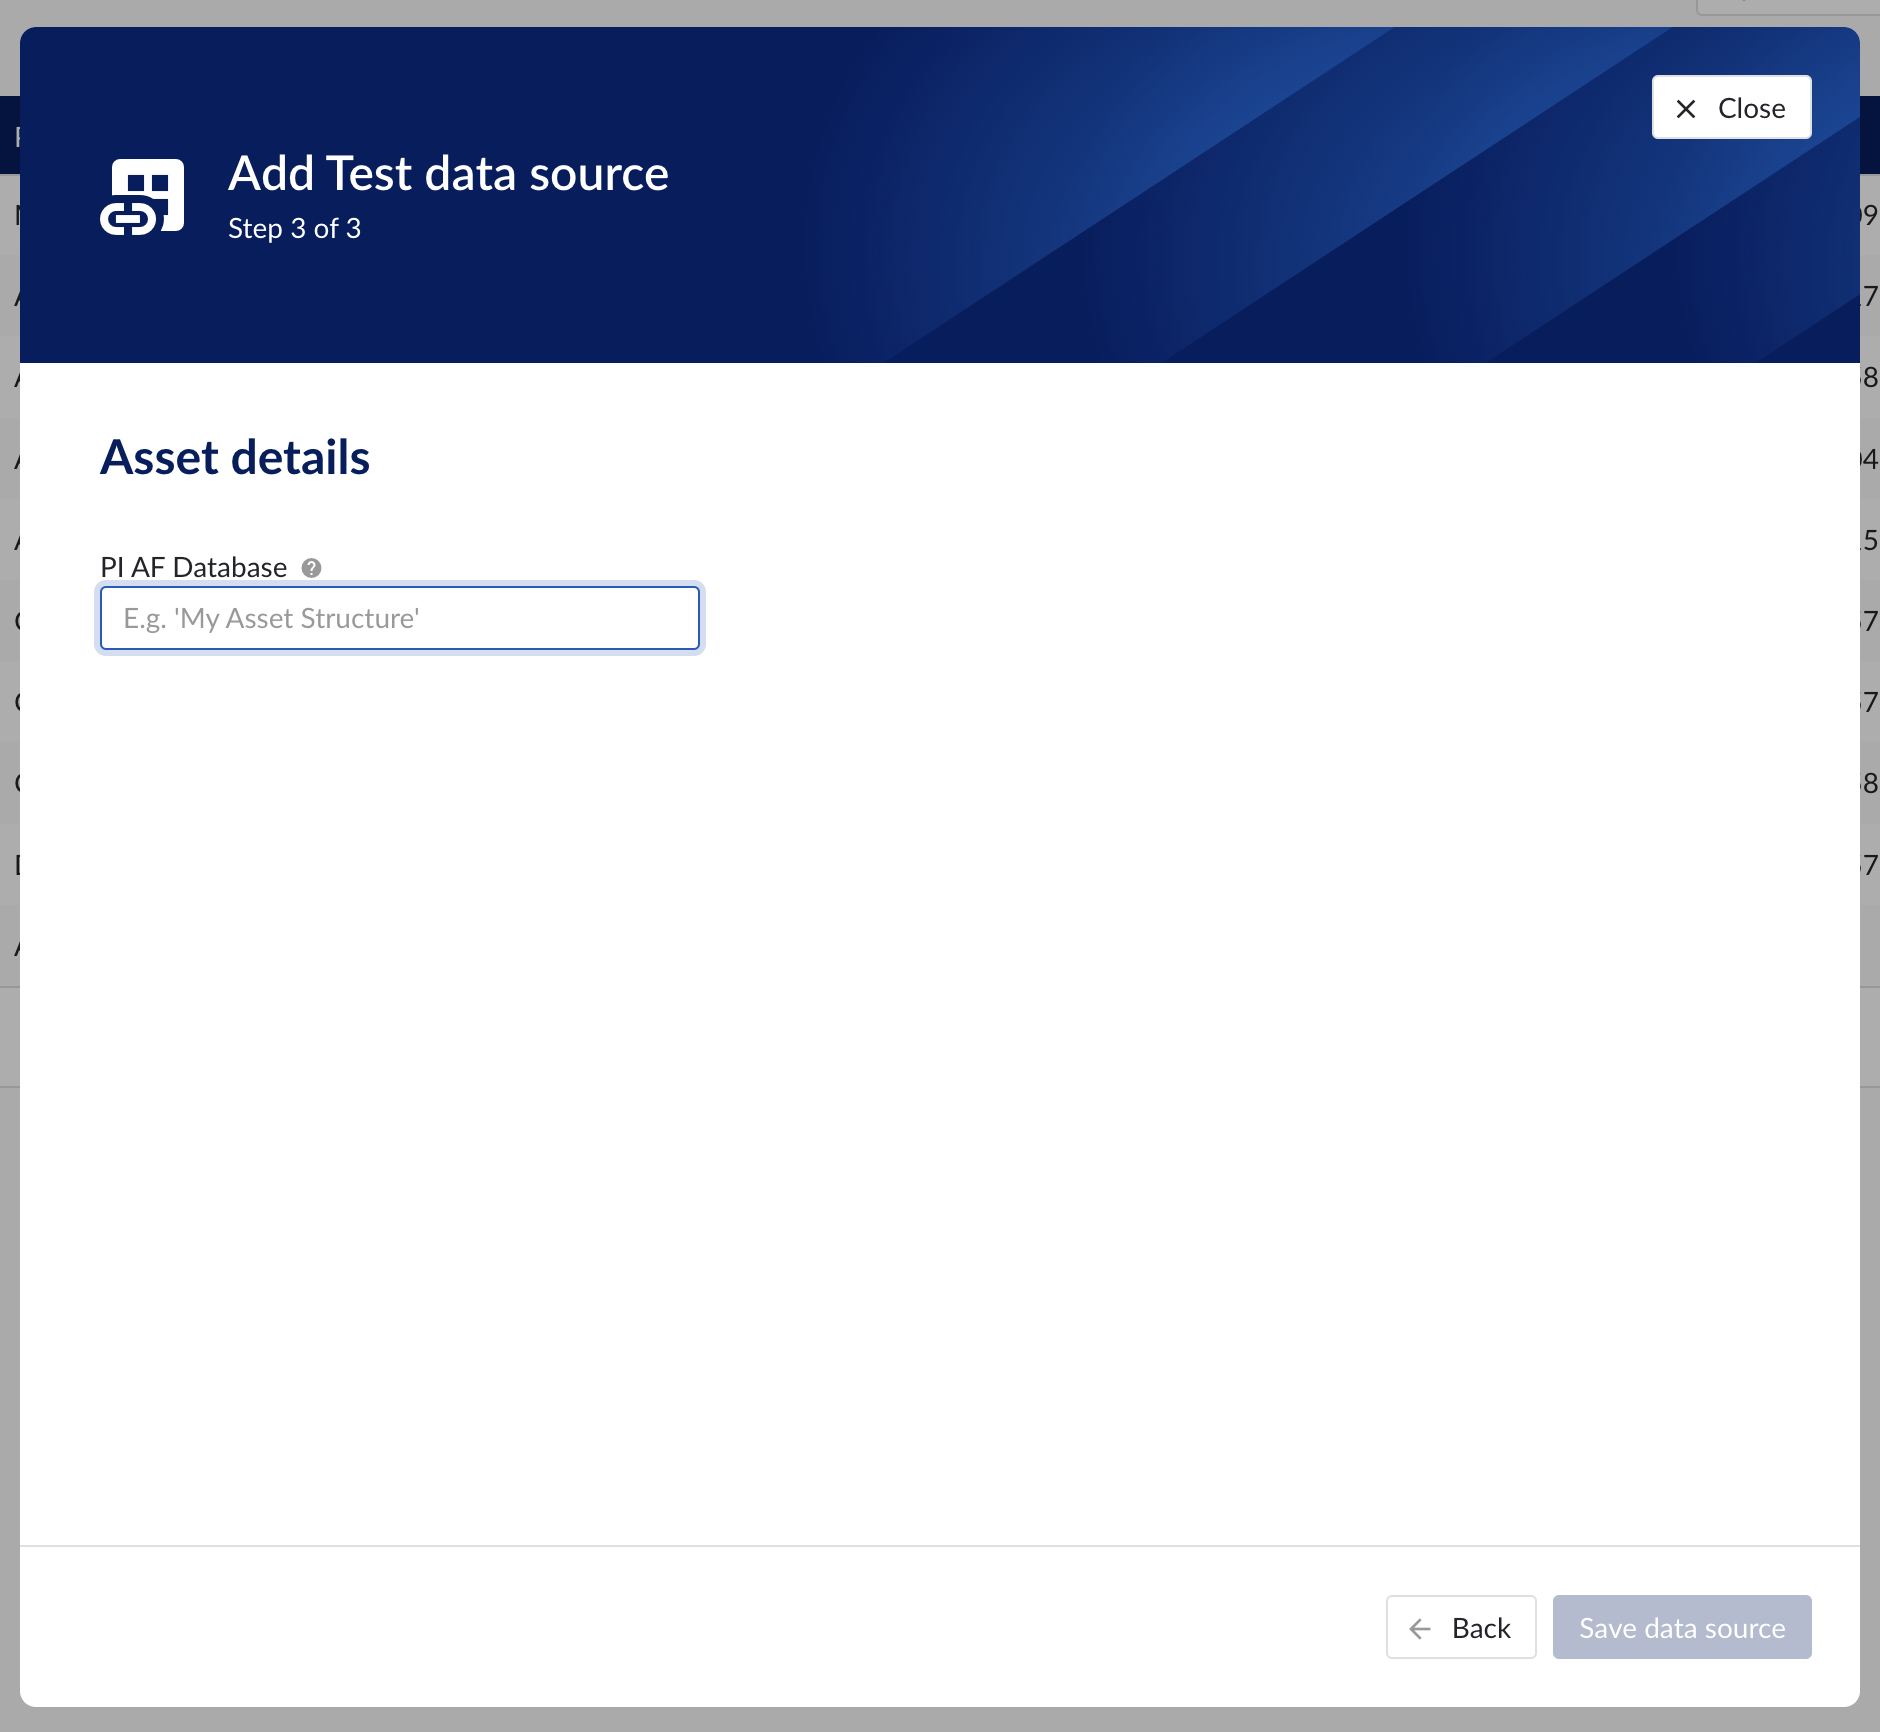
Asset details step in the datasource creation wizard
Context data
Context data sources are managed the same way as asset data sources. When a data source is context capable, the context capability checkbox can be checked, after which the correct database for context data needs to be specified.
Notice
Note
Context data synchronised from a data source in OSISoft PI will be related to asset data in TrendMiner based on the "referenced elements" on the PI event frames. The system will always attempt to relate the context item to the asset corresponding to the primary referenced element in PI (if it exists). Otherwise it will default to the first referenced element for which a corresponding asset is known in TrendMiner.
Important
It is not permitted to add the same connection multiple times with context capabilities enabled on both instances! This will result in the creation of duplicate context items.
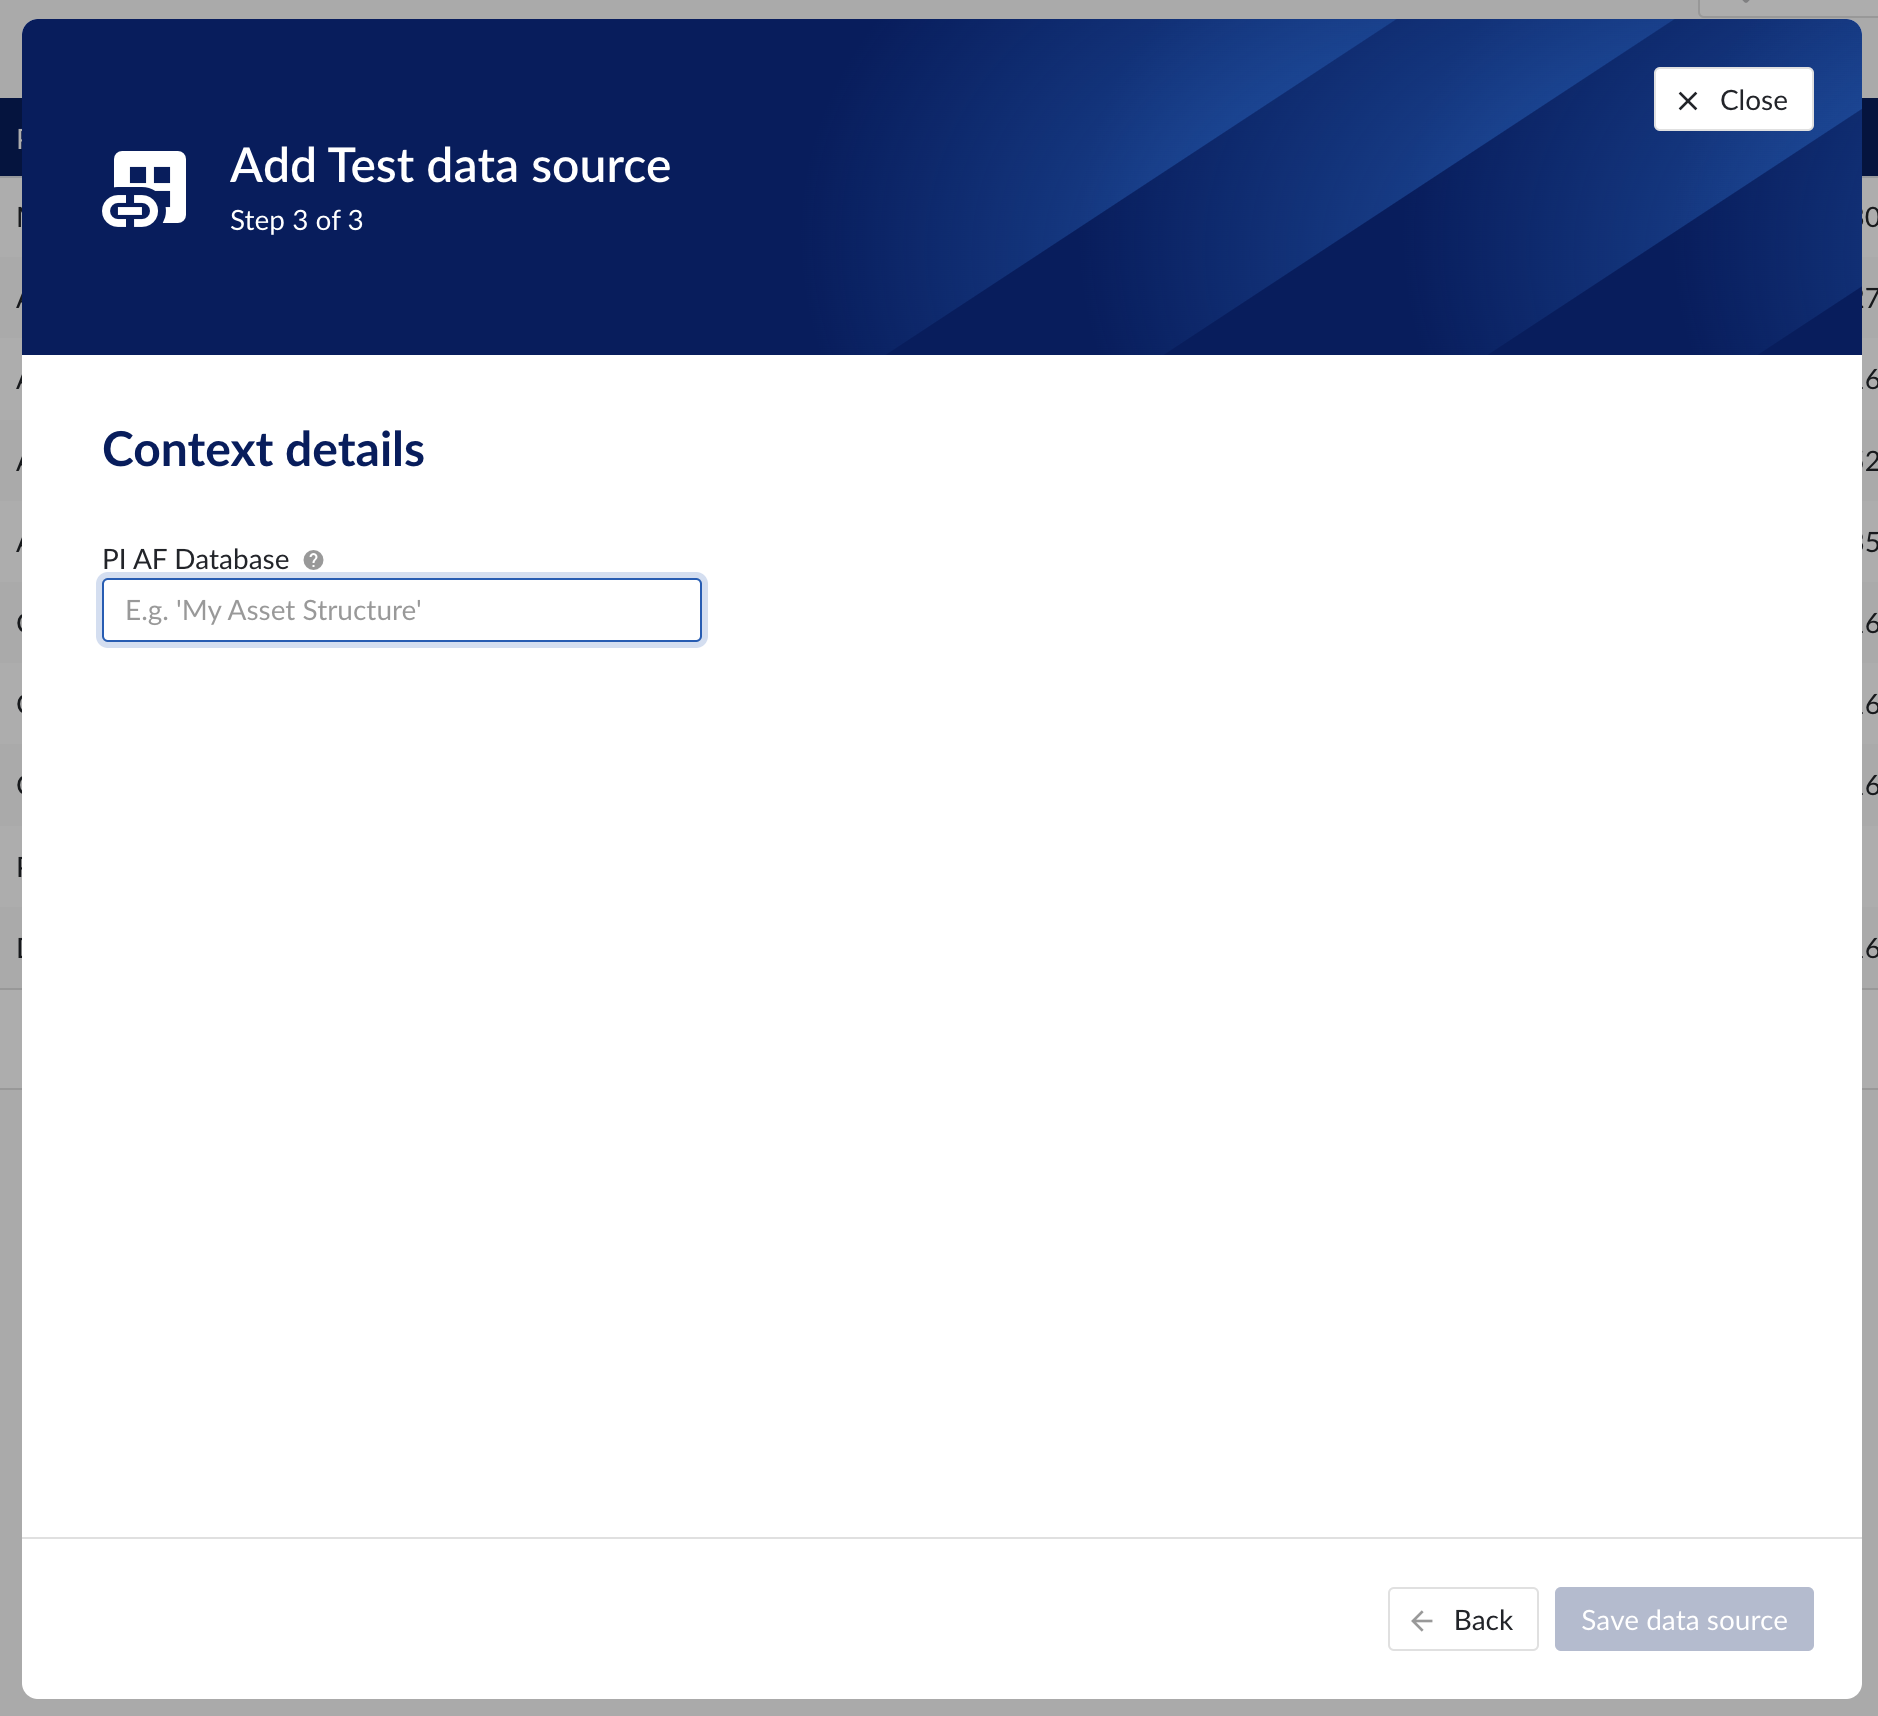
Context details step in the datasource creation wizard
Data source menu
As soon as a new data source (with time series capability) is successfully added, it will start syncing all the tags from the data source, and can be found in the Data source overview.
To manually synchronize the data source, simply:
Click on the data source of your choice within the data source overview table. Datasource details will open below the datasources overview table.
Click on Time series tab.
Click on "Refresh tag cache" button.

If a data source cannot be synced, the error feedback will be shown under 'Last synced' field.
For data sources which are successfully connected the 'Last synced' field in the data source details will show the last synced date and time and status 'Successful'. The last sync date and time will be updated when a manual sync is triggered or when TrendMiner synchronizes the tag cache for that data source, which happens automatically every 24 hours since the last refresh or service restart.
To edit the details of a data source, click on its name to open the datasource details tile below the overview table and then click on 'Edit' button. Datasource edit modal will appear.
It is prohibited to edit the prefix of an existing data source because it would break existing views, formulas, etc. All other fields can be updated after which the data source is synced again.
Other options available are:
Test connection (on Connection tab): this option will test the connection to the data source without triggering a sync and update the health status of the data source.
Delete: this option will remove the data source and all tags from this data source until it is connected again via a correctly configured connector.
When a data source is deleted, all tags from that data source will become unavailable immediately, as well as breaking views and calculations which depend on these tags. It is possible to restore these tags and dependent views and formulas by adding the data source again, using the exact same name and prefix via the same or alternate connector.
For more detailed information on how to add or configure a specific data source, open the detailed instructions which are linked on the connectivity overview pages.
How to connect to time series data sources?
Install a connector. If your connector is already connected, this step can be skipped.
In ConfigHub select the tab "Connectors".
Click "+ Add connector" and fill in the details of the connector.
In ConfigHub select the tab "Data sources".
Click "+ Add data source". Datasource creation modal will appear.

Fill out 'Data source details' step:
Name the data source.
Select the provider you would like to use. If the provider of your choice is not listed, this implies none of the connected connectors supports this data source type and you have to add a connector which does, or check your implementation in case you implemented your own custom connector.
A list of providers which TrendMiner supports out of the box can be found here.
Select the connector you want to use for connecting the data source via 'Connect via' dropdown (if the provider of your choice requires a connector). If the connector of your choice is not listed, this implies this connector does not support this provider and you have to select a different connector or check your implementation in case you implemented your own custom connector.
Make sure to select the "Time series" capability checkbox. If this checkbox is not visible, it means this provider does not support time series data. You can check which connectivity options TrendMiner supports out of the box here.

Each data source with time series capability has some basic configuration options like "Host", "Username", "Password", "Parallel connections" etc. More information about these parameters can be found in our user documentation.
Besides the basic configuration each data source can have some historian specific configuration and installation requirements which can be found via the links on the connectivity overview pages.
How to create a webhook?
Introduction
TrendMiner's webhook system enables external services to receive real-time updates when specific events occur within our platform. This document outlines how the webhook mechanism works, how to configure it, and what to expect during its lifecycle.
Our webhook system is built on an event-driven architecture. When an internal event is triggered, a webhook is dispatched to subscribed external endpoints via a POST request.
Notice
This feature is available on demand only: contact your CSM for more info.
Supported webhook types
Currently, webhooks are triggered by Context Item events only. These include:
Event type | Trigger description |
Context Item created | A webhook is sent when a new context item is created. |
Context Item updated | A webhook is sent when an existing context item is modified. |
Context Item deleted | A webhook is sent when a context item is removed. |
Note
It is possible to save a webhook definition without selecting any triggers. In this case, the webhook remains inactive until at least one trigger is selected.
Payload format
Webhook payloads are sent as JSON. Each item in the webhook payload includes a deep link to the corresponding context item. Payload structure may vary slightly depending on the Context Item type. Example for an UPDATE event:
{
  "contextItem": {
    "type": {
      "name": "TM_Monitor",
      "identifier": "aa9a192c-a20f-4672-9da4-f325ff1b9456"
    },
    "events": [
      {
        "state": "START",
        "occurred": "2025-09-04T11:10:22Z",
        "identifier": "de5b1868-7b45-4809-45tr-d6838151baf3"
      },
      {
        "state": "STOP",
        "occurred": "2025-09-04T11:10:32Z",
        "identifier": "2da1d2b2-fe78-4a4c-d4s8-c8f6a5709c34"
      }
    ],
    "fields": {
      "VALUE_TRIGGERED": "43",
      "tm_monitor_id": "1592",
      "tm_search_type": "valuebased",
      "TM_CONTEXTHUB_DEEP_LINK": "https://yourdomain.trendminer.net/contexthub/#/view/new/grid?contextItemId=000000-000",
    },
    "components": [
      {
        "type": "ASSET",
        "identifier": "748474kj-1bb6-46e9-ds98-73da0a6a6b21"
      }
    ],
    "identifier": "9425acb2-6ea5-4b22-9f34-2d0d567368af",
    "createdDate": "2025-09-04T11:10:36.296218Z",
    "description": "TM monitor to track temperature spikes",
    "endEventDate": "2025-09-04T11:10:32Z",
    "totalDuration": "10.0",
    "lastEventState": "STOP",
    "startEventDate": "2025-09-04T11:10:22Z",
    "lastModifiedDate": "2025-09-04T11:25:29.589398226Z"
  },
  "triggerType": "CONTEXT_ITEM_UPDATED_WEBHOOK_TRIGGER"
}
Registering a webhook
Go to ConfigHub > Data > Webhooks
Click Add webhook

Enter webhook details and select authentication method.
Note
Each webhook must have a unique target URL. This prevents conflicts and ensures that data is delivered to the correct destination without duplication or unintended behavior.
Toggle ‘Enable webhook’ to start sending data to the external system once the webhook is saved.
Webhooks can be disabled at any time without removing their configuration. When disabled:
The webhook configuration remains intact and can be re-enabled later.
The events will be generated and queued to be delivered to the webhook’s endpoint later, once the webhook is re-enabled.
Disabling is useful for:
Maintenance windows
Endpoint migrations
Temporary suspension of integrations

Select the webhook triggers and context item types.
Once a webhook trigger is selected (e.g., Context Item created, updated, or deleted), a context item type filter section becomes visible. This section allows users to assign one or more context item types to the webhook. Only context items matching both the selected webhook trigger type and context type will be pushed to the external system.
Behavior & Rules
The context item type filter applies to the entire group of context item-related triggers.
It is mandatory to select at least one context item type to proceed.

Note
A maximum of 20 webhooks can be configured per environment. If the limit is reached, you’ll need to delete existing unused or outdated webhooks before adding new ones.
Error handling and diagnostics
When a webhook delivery fails - either due to repeated retry attempts or an immediate client-side exception - TrendMiner will take the following actions to ensure traceability and prevent further disruption:
Offload the failed event: The event is offloaded to the NOT DELIVERED CONTEXT ITEMS table for inspection and troubleshooting.
Disable webhook delivery: The affected webhook definition is automatically disabled to prevent additional failed attempts.
Notify administrators: Admin users receive an in-app notification and an email alert (an email is being sent to all admin users that are part of
tm-confighub-notificationsgroup), prompting investigation and corrective action.
Retry logic
To improve reliability, failed webhook delivery supports retry attempts for up to 8 hours when an endpoint is temporarily unavailable. If all retries fail:
The event is marked as failed. As a result, the webhook definition is automatically disabled.
Manual intervention is required to either retry or purge the failed event.
Once the issue is resolved, webhook delivery will automatically resume.
How retry mechanism works
The system retries failed webhook deliveries using an exponential backoff strategy.
This prevents overwhelming the endpoint while ensuring retries continue for a reasonable duration.
Retry parameters
Setting | Value |
|---|---|
Initial Delay | 1 minute (60 seconds) |
Maximum Delay | 15 minutes (900 seconds) |
Maximum Retry Period | 8 hours (28,800 seconds) |
What it means:
The first retry happens 1 minute after the initial failure.
Each subsequent retry delay grows exponentially (multiplied by the backoff factor), capped at 15 minutes.
Retries stop after 8 hours from the first failure.
Managing failed webhooks
Admin users can review and manage failed webhook events via ConfigHub → Diagnostics → Context Write. Available actions:
Retry: resend the event after resolving the issue (e.g., restoring system availability).
Purge: permanently remove the failed event and all records from the queue for the affected web hook (e.g., due to misconfigured fields or unresolvable errors).
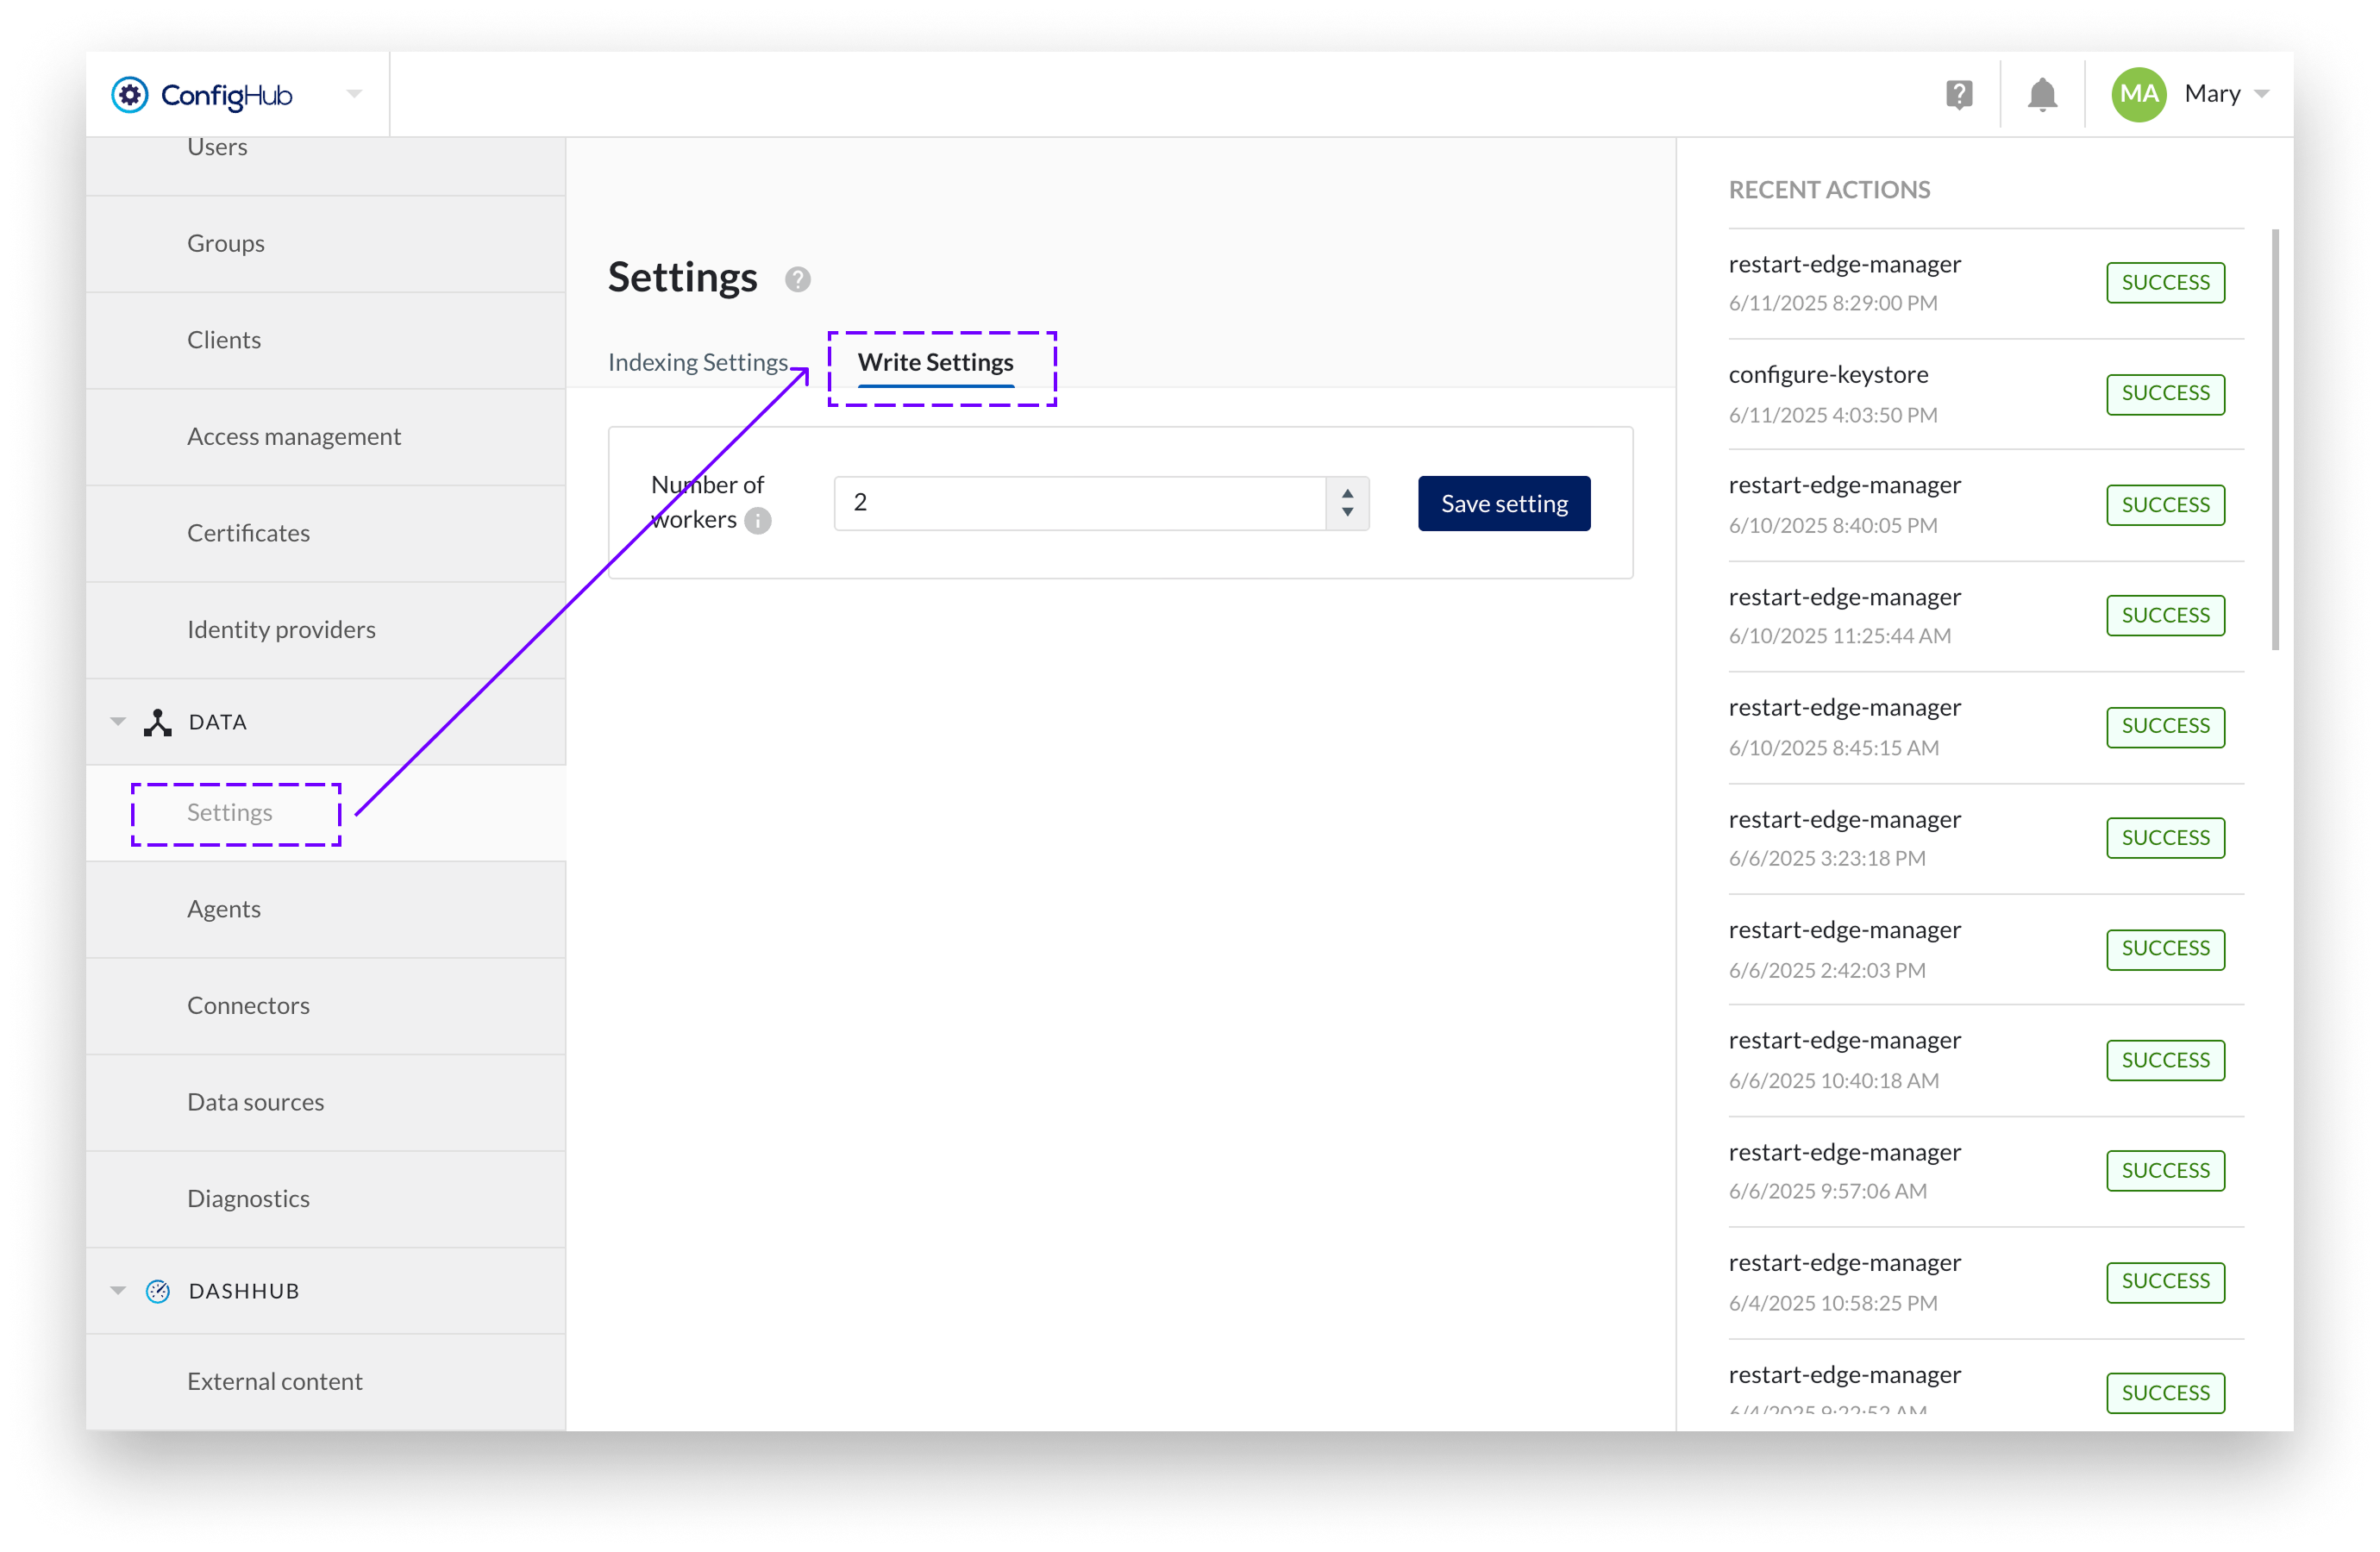
Performance tuning
In the Data → Settings → Write Settings, administrators can configure the number of parallel processing workers. This setting controls how many events are processed simultaneously, allowing optimization based on system capacity and webhook endpoint performance.
Diagnostics
This section allows administrators to monitor the synchronization status of context-capable data sources. Both live and historical sync can be enabled under data sources, and their status can be viewed in detail here.
TrendMiner uses several sync types to keep context items aligned with their source system:
Live synchronization
Live synchronization keeps context items up to date by polling the data source every 20 seconds for event frames that have been created or modified. Each interval retrieves up to 200 event frames, with a maximum of 800 per interval. If more than 800 event frames are detected in a single interval, the processing is automatically handed off to an excessive interval sync to avoid delaying the next cycle.
Excessive interval sync
Excessive interval sync handles large batches of event frames that exceed the live sync threshold. It runs in parallel with live sync so that high-volume intervals do not block the regular polling cycle.
Historical synchronization
Historical synchronization allows administrators to resynchronize event frames from a specific period in the past. It runs in parallel with live sync and excessive interval sync and must be triggered manually from ConfigHub.
Cleanup processes
Cleanup processes run automatically in the background to maintain data quality. They check open context items, remove items that no longer exist in the source system, and resolve items that could not be fully processed during a previous sync.
All sync types are driven by the last modified date of event frames in the source system, not by their start or end date. An event frame is only picked up if its last modified date falls within the sync interval. This applies to both newly created and recently modified event frames, as creation also sets the last modified date.
Additionally, automatic cleanup processes, such as the nightly cleanup and resync of context items, run in the background.
For every context-capable data source with live synchronization enabled, TrendMiner polls the data source every 20 seconds for event frames whose last modified date falls within the current interval. Event frames are processed in the order they are received. Each data source with live sync enabled runs on a dedicated thread, so multiple data sources sync independently and in parallel.
The application keeps track of synchronization progress. If the sync is interrupted due to a connection issue, it will continue from where it left off once the issue is resolved.
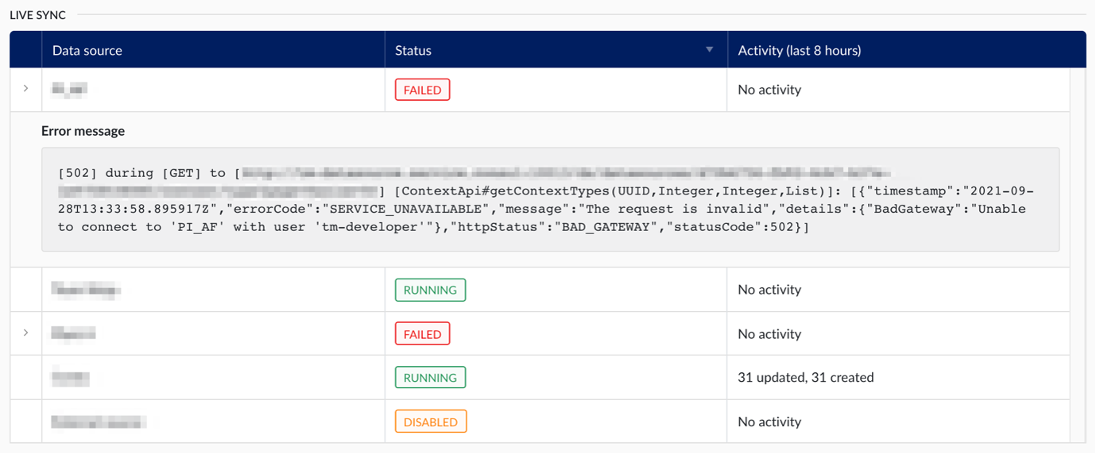
If the live sync encounters a hard exception, for example when the data source cannot be reached, it receives the Failed status. The exception message can be viewed by clicking the arrow in the left-most column of the table.
Failures on individual event frames do not affect the overall sync status. These items are skipped and tracked separately in the Failed Context Items section.
When the live sync detects more than 800 event frames in a single interval, that interval is automatically handed off to the excessive interval sync. This keeps the live sync running on schedule while the large batch is processed separately in parallel.
The number of threads available for excessive interval sync scales with the number of enabled data sources:
Enabled data sources | Max threads |
|---|---|
1-2 | 2 |
3-4 | 3 |
5-6 | 4 |
7 or more | 5 |

The table keeps track of a full historical overview of all excessive interval synchronizations that have occurred. For each one, the following information is made available:
Data source: The data source for which the need for an excessive interval sync was detected.
Interval: The time interval during which the need for an excessive interval sync arose.
Progress: The progress column combines the status of the synchronization with a progress bar. The following statuses are possible:
Queued: In case too many excessive interval synchronizations are already running, additional ones will be queued until resources are available to pick it up.
Failed: The excessive interval sync encountered a hard exception, resulting in some or all event frames not being processed. The interval synchronization can be retried by clicking the retry icon in the right-most column of the table (only visible for failed rows). The exception encountered can be shown by clicking the arrow in the left-most column.
Done: The excessive interval sync has completed successfully. All event frames were either processed successfully or have been added to the list of failed context items.
A historical sync resynchronizes all event frames whose last modified date falls within a specified period in the past. It can be requested on-demand by selecting a data source in the table and configuring a start and end date.
Only one historical sync can run at a time across all data sources. If a historical sync is already running when a new one is triggered, the new sync will be queued with the status Waiting until the running sync completes.
Note
The sync interval is based on the last modified date of event frames, not on their start or end date. If event frames are missing after a historical sync, check whether their last modified date in the source system falls within the configured interval. If not, either run a new historical sync covering the correct period, or modify the items in the source system, which updates their last modified date and causes live sync to pick them up automatically.
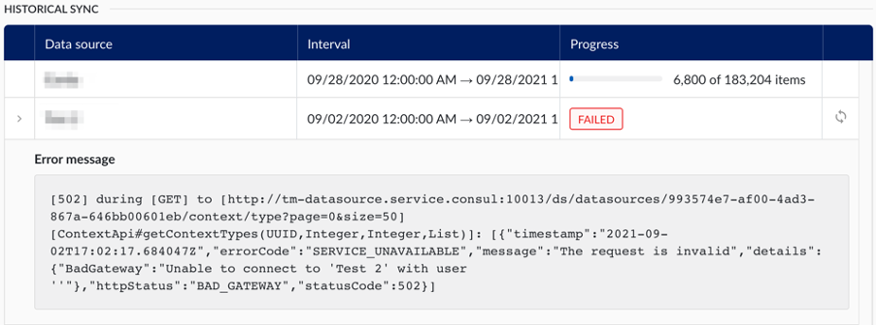
The table keeps track of a full historical overview of all historical synchronizations that have occurred. The information available in the table is the same as for the excessive interval sync, including the possibility to retry failed synchronizations.
Cleanup processes maintain the quality of synchronized context items. They check whether open items are still present and up to date in the source system, and resolve items that could not be fully processed during a previous sync.
The cleanup processes share a thread pool with excessive interval sync. The number of available threads scales with the number of enabled data sources (see Excessive Interval Sync above).
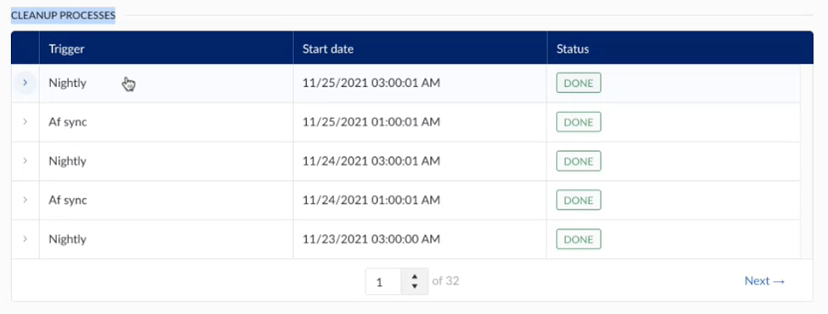
Nightly sync
The automatic nightly resync of open items appears as an active job on the diagnostics screen once it starts. Every night, the system checks for context items that have been open for more than 24 hours, meaning they have a start date but no end time, indicating they are still open.
Items open longer than 24 hours may suggest the start event was successful, but an issue occurred during the closing event, preventing the context item from closing properly.
During the nightly cleanup, context items that should be closed will be updated. If they are not closed, they will remain open until an end event is received from the source.
Note
Nightly syncs run automatically by default. If needed, you can trigger a manual cleanup from the data source settings in ConfigHub. For more details, refer to the "Data Source" section above.
AF sync (Asset Framework)
A cleanup process for context items is triggered when either an AF sync, started from asset-capable data sources in ConfigHub, or an AF import, initiated by TrendMiner admins in ContextHub, completes successfully.
When assets are added or removed from the source AF, the AF sync identifies the differences and updates the TrendMiner AF accordingly. This triggers an automatic resync of context items without an associated component, which will appear as a scheduled job in the diagnostics screen.
Note
To add an AF sync, look to the "Asset data" section above.
In case an event frame fails to process correctly, and the corresponding context item cannot be created or updated, it will be added to the table of failed context items.
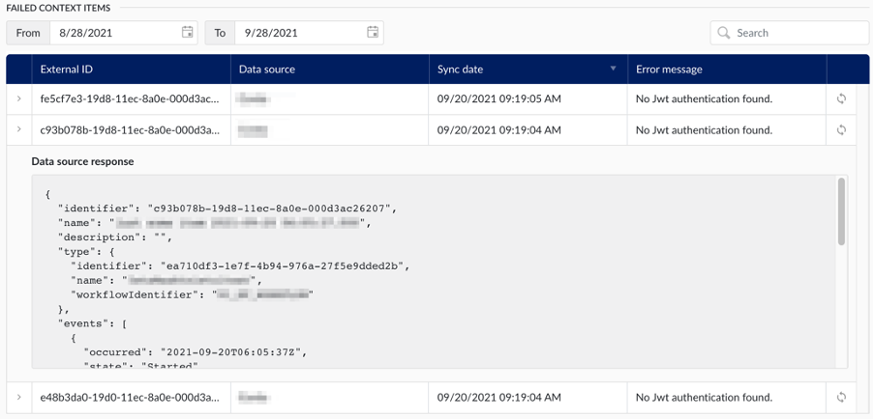
The table keeps track of a full historical overview of all such failures, and for each one the following information is made available:
External ID: The ID of the corresponding event frame, in the source system.
Data source: The data source in which the event frame resides.
Sync date: The time on which the synchronization last occurred (and failed).
Error message: The error message encountered at the time of failure.
Additionally, the table offers has two additional features:
View data source response: By clicking on the arrow in the left-most column, the administrator can view the payload that was received from the data source.
Re-process event frame: By clicking the retry icon in the right-most column, the application will try to reprocess the event frame, potentially resolving the failure.
The “asset framework sync” section of diagnostics page in the data section of ConfigHub allows administrators to effectively monitor the synchronization status of asset capable data sources.
The history table keeps track of the full history of asset framework synchronizations.
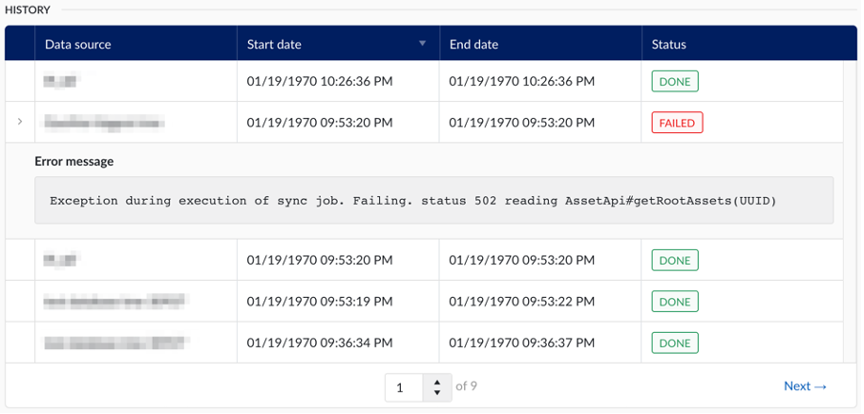
The following information is available to the administrator:
Data source: The data source from which the asset structure was synchronized.
Start date: The date and time on which the synchronization was started.
End date: The date and time on which the synchronization concluded.
Status: The final status of the synchronization
For failed synchronizations, an error message can be viewed by clicking on the arrow in the left-most column of the table.
DashHub External content
The external content tile in DashHub allows you to embed images, videos, or content from external tools and websites such as Power BI, Tableau, PI Vision, P&IDs, 3D CAD models, and more into dashboards.
As a system administrator, you can control which external content is allowed to be embedded through the External Content configuration page in External Content. From this page, you can define and manage the list of allowed domains that DashHub users can use in external content tiles.
Validation rules for allowed domains
Domain
Wildcards are supported only for subdomains, not for the top-level domain (TLD) or root domain.
Allowed: https://*.trendminer.com/
Not allowed: https://trendminer.*/
The wildcard must appear at the beginning of the domain and be followed by a dot. For example, *.example.com is valid, but *example.com is rejected. This ensures the wildcard cannot create broader matches than intended.
Path restrictions
You can restrict embedding to a specific path within a domain.
https://trendminer.com/policies/* allows all URLs within the /policies path.
https://trendminer.com/policies*/ is not allowed because wildcards are only supported at the end of the path, not within it.
Specific page restrictions
You can restrict embedding to a single, specific page.
https://trendminer.com/policies/privacypolicy.html allows only the defined page.
https://trendminer.com/policies/privacypoli*.html is not allowed because wildcards cannot be used in specific page definitions.
Query parameters
When you whitelist a domain or path, URLs with query parameters are also supported.
For example, if https://example.com/videos is allowed, then https://example.com/videos?id=123 will also be allowed.
This means you do not need to whitelist every possible variation of query parameters individually.
Warning
To improve security and prevent misuse of external content configurations, additional validation rules have been introduced for allowed domains in External Content. These changes address potential vulnerabilities identified during a security penetration test and ensure that only properly defined, secure URLs can be used for embedding external content in DashHub.
If any existing domain entries do not comply with the new validation rules, a warning banner appears at the top of the External Content configuration page.
This banner indicates that one or more of the configured domains include patterns or formats that are no longer permitted. These entries remain visible in the list but are considered invalid until corrected.
How to fix invalid entries
Review each invalid domain entry External content.
Open the entry and update the domain or path so that it complies with the current validation rules
Save the corrected entry. Once all invalid domains have been fixed or removed, the warning banner disappears automatically.
Why this change was made
This functionality was introduced as a security enhancement following a penetration test. The previous domain validation allowed wildcard and pattern combinations that could be subverted to embed content from unintended or unsafe domains.
By enforcing stricter validation and introducing clear error feedback, DashHub now ensures that only trusted and explicitly defined sources can be used for external content.
Dashboard edit mode
When editing a dashboard, the External URL field in the external content tile checks that the entered URL follows the required validation rules. If the URL is invalid, an error message appears, and the tile cannot be saved until it is corrected.
URL Embedding
URL Embedding lets you define the trusted domains that are allowed to display DashHub dashboards through an iframe. Only the domains you specify here are permitted, ensuring that DashHub content appears exclusively in approved external environments.
You can authorize up to five domains to use dashboards in embed mode.
It may take a couple of minutes for the configuration to become effective.
The validation rules for allowed domains are the same as those used for External content tiles.
Warning
TrendMiner is not responsible for exposing dashboard content in third-party software where the dashboard is embedded. Please ensure you only add trusted domains to the list of allowed embedding URLs.
URL Embedding is designed to provide access only to DashHub dashboards within an embedded context. The embed URL you receive is specifically generated to load a dashboard in embed mode, ensuring a clean, focused, and controlled experience inside third-party environments.
Manipulating the URL, for example by removing the embed query parameter, can lead to unexpected or unintended behavior. The embedded experience is not intended to provide full access to TrendMiner from within another application. Users of embedded dashboards are expected to remain within the embedded context. Any interactive links or actions in the dashboard open the corresponding TrendMiner functionality in a new browser tab, where the user can continue their analysis in the full, supported environment.
Using the embed URL outside its intended form is at the user’s own responsibility and is not considered a supported integration path. Doing so may bypass design safeguards and prevent TrendMiner from functioning as intended.
When a dashboard is viewed in embed mode, you can optionally control the global timeframe directly through the embed URL. By adding a valid startDate and endDate query parameter, the embedded dashboard will use this timeframe instead of the one saved in the dashboard.
Both parameters must be provided and must use a valid ISO-8601 date format (for example: 2025-09-16T14:05:17.590Z). If both values are valid, the embedded dashboard loads using the specified start and end date, and all tiles that follow the global timeframe (such as ContextHub and TrendHub tiles) will display data for that period.
If either startDate or endDate is missing or invalid, the parameters are ignored entirely and the dashboard uses its original configured timeframe.
e.g. https://example.com/dashhub/dashboard/123?embed=true&startDate=2025-09-16T14:05:17.590Z&endDate=2025-09-18T14:05:17.590Z