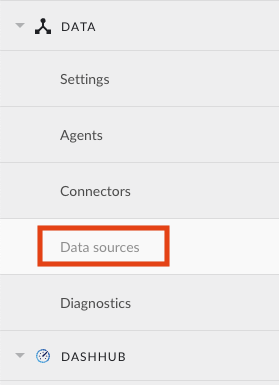
Data sources
When clicking on the Data sources menu option, the data sources overview is shown :
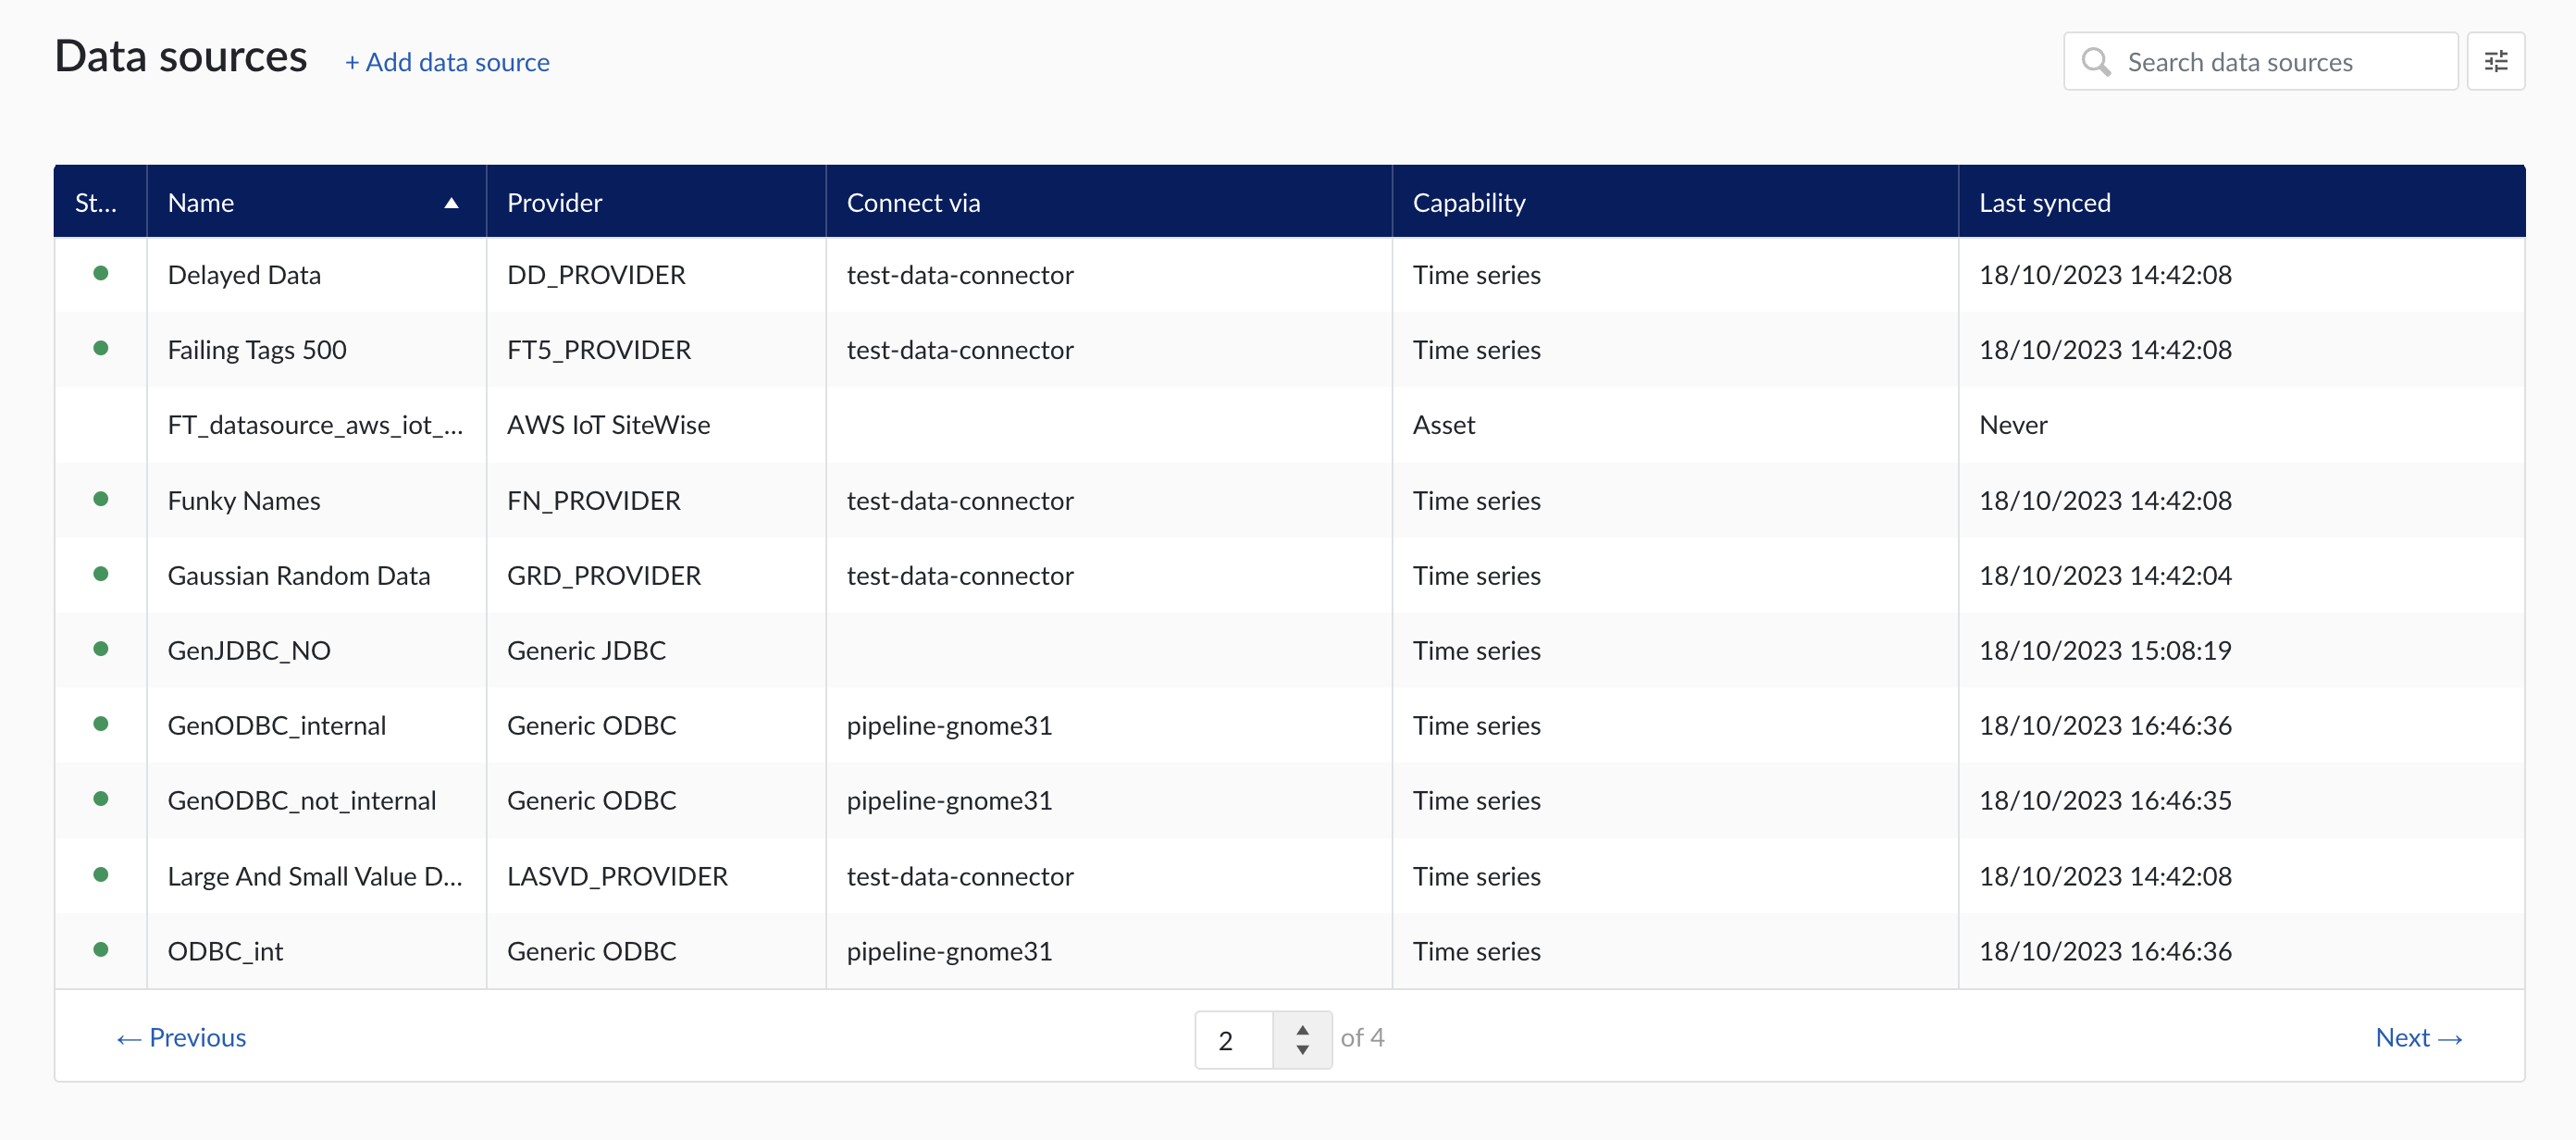
Data sources overview
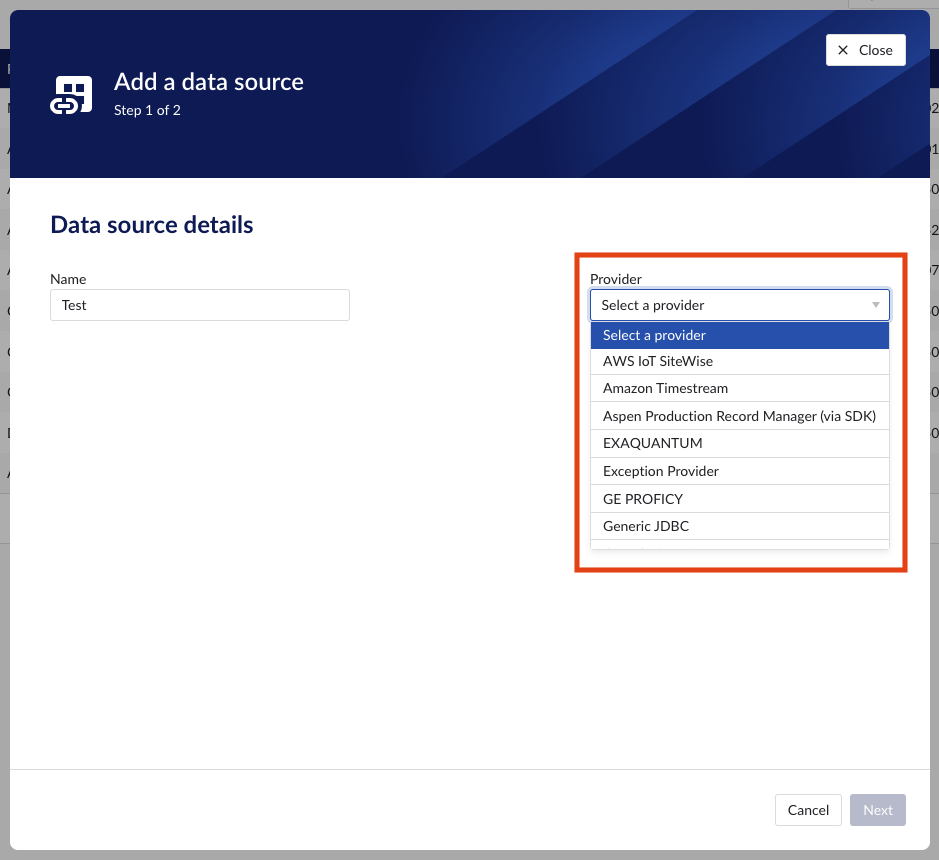
Add a new data source by clicking the (+ Add data source) label next to the title. An "Add a data source" modal will appear.
Data source details
Populate the fields on the Data source details step:
Name: you are free to choose data source names but they are mandatory, case insensitive and unique. The name of a data source identifies the data source. We strongly advise to only use alphanumerical and '-' or '_' in data source names as other characters are not supported in the access management so using special characters in a data source name might give issues when you want to assign access permission to the data source later on.
Provider: TrendMiner provides some out of the box connectivity to data sources via specific vendor implementations (e.g. OSIsoft PI, Honeywell PHD,...) and via more generic alternatives (e.g. Generic JDBC, ODBC, OleDB, ...). The provider 'TM connector' enables the connection of data sources via a connector to connector setup. To connect a data source via multiple connectors, extra configuration is needed via the TrendMiner Connector API.
Connect via: this dropdown is used to select a connector which is used to connect to the data source. The dropdown is displayed based on the selected provider: some data sources need to be connected via a connector (e.g. OSIsoft PI, Generic ODBC, Wonderware, ...), while others don't need any connector (e.g. Amazon Timestream, Generic JDBC, AWS IoT SiteWise, ...). To add a data source that needs a connector, the connector needs to be added first.
Capabilities: Capabilities depend on provider implementation. Some datasources have only one capability (e.g. Amazon Timestream has Time series capability only), others have all 3 capabilities (e.g. AWS IoT SiteWise). Selecting the capabilities for the data source with the given checkboxes will open additional properties to enter, grouped in following sections:
Connection details - lists properties related to the configuration of the connection that will be established with datasource
Time series details – lists properties relevant for the time series data
Asset details - lists properties relevant for asset data
Context details - lists properties relevant for context data
Important
Duplicate tag names are not supported. If 2 tags with exactly the same name are synced to TrendMiner, analytics, calculations and indexing on/for these tags might fail. Use data source prefixes to avoid possible duplicate tag name issues.
Note
Depending on the provider you select, the connection details required for completion may differ.
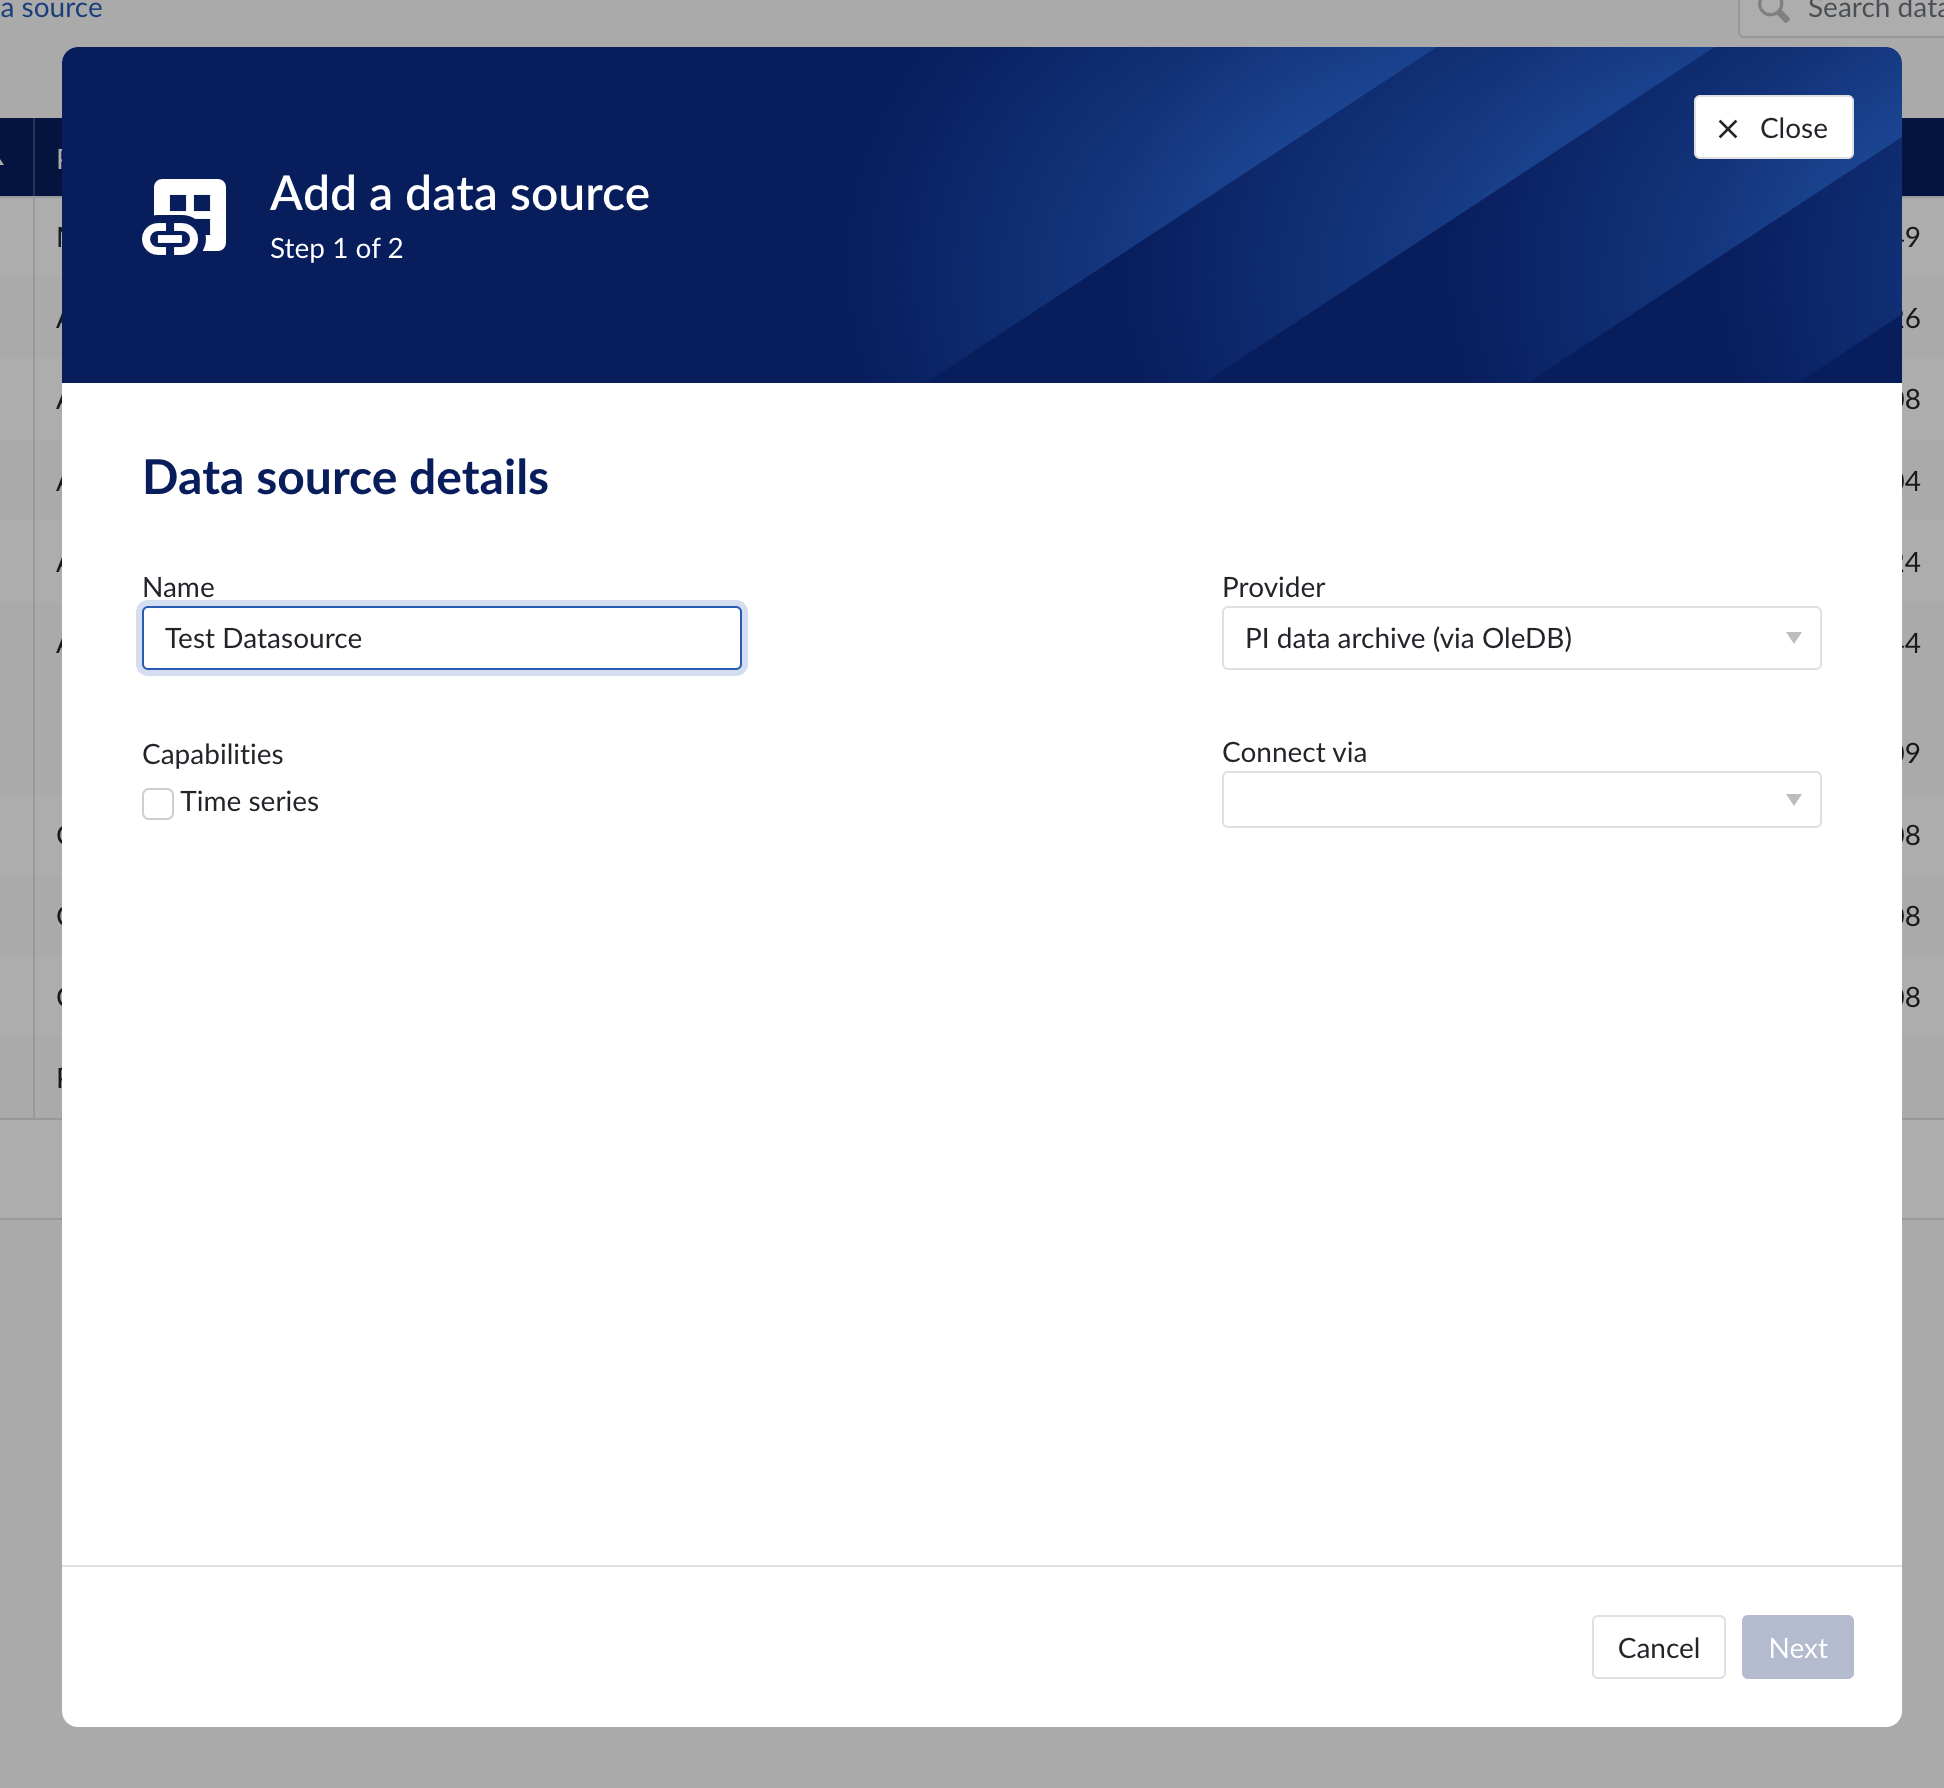
Data source details step in the creation wizard
Connection details
Populate the fields on the Connection details step:
Parallel connections (if any): Each data source has 2 queues: one interactive - plot calls, one non-interactive - index calls, batch calls etc. Parallel connections determine how many connections each queue has to the connector. By default there are 2 parallel connections to the connector.
Host: the host name of the data source, e.g. myhistorian.mycompany.com
Username: username of the account configured in the data source.
Password: password of the account configured in the data source.
Once all mandatory fields are filled in, 'Test connection' button becomes enabled. By clicking on the button, user can verify the connection to the datasource.
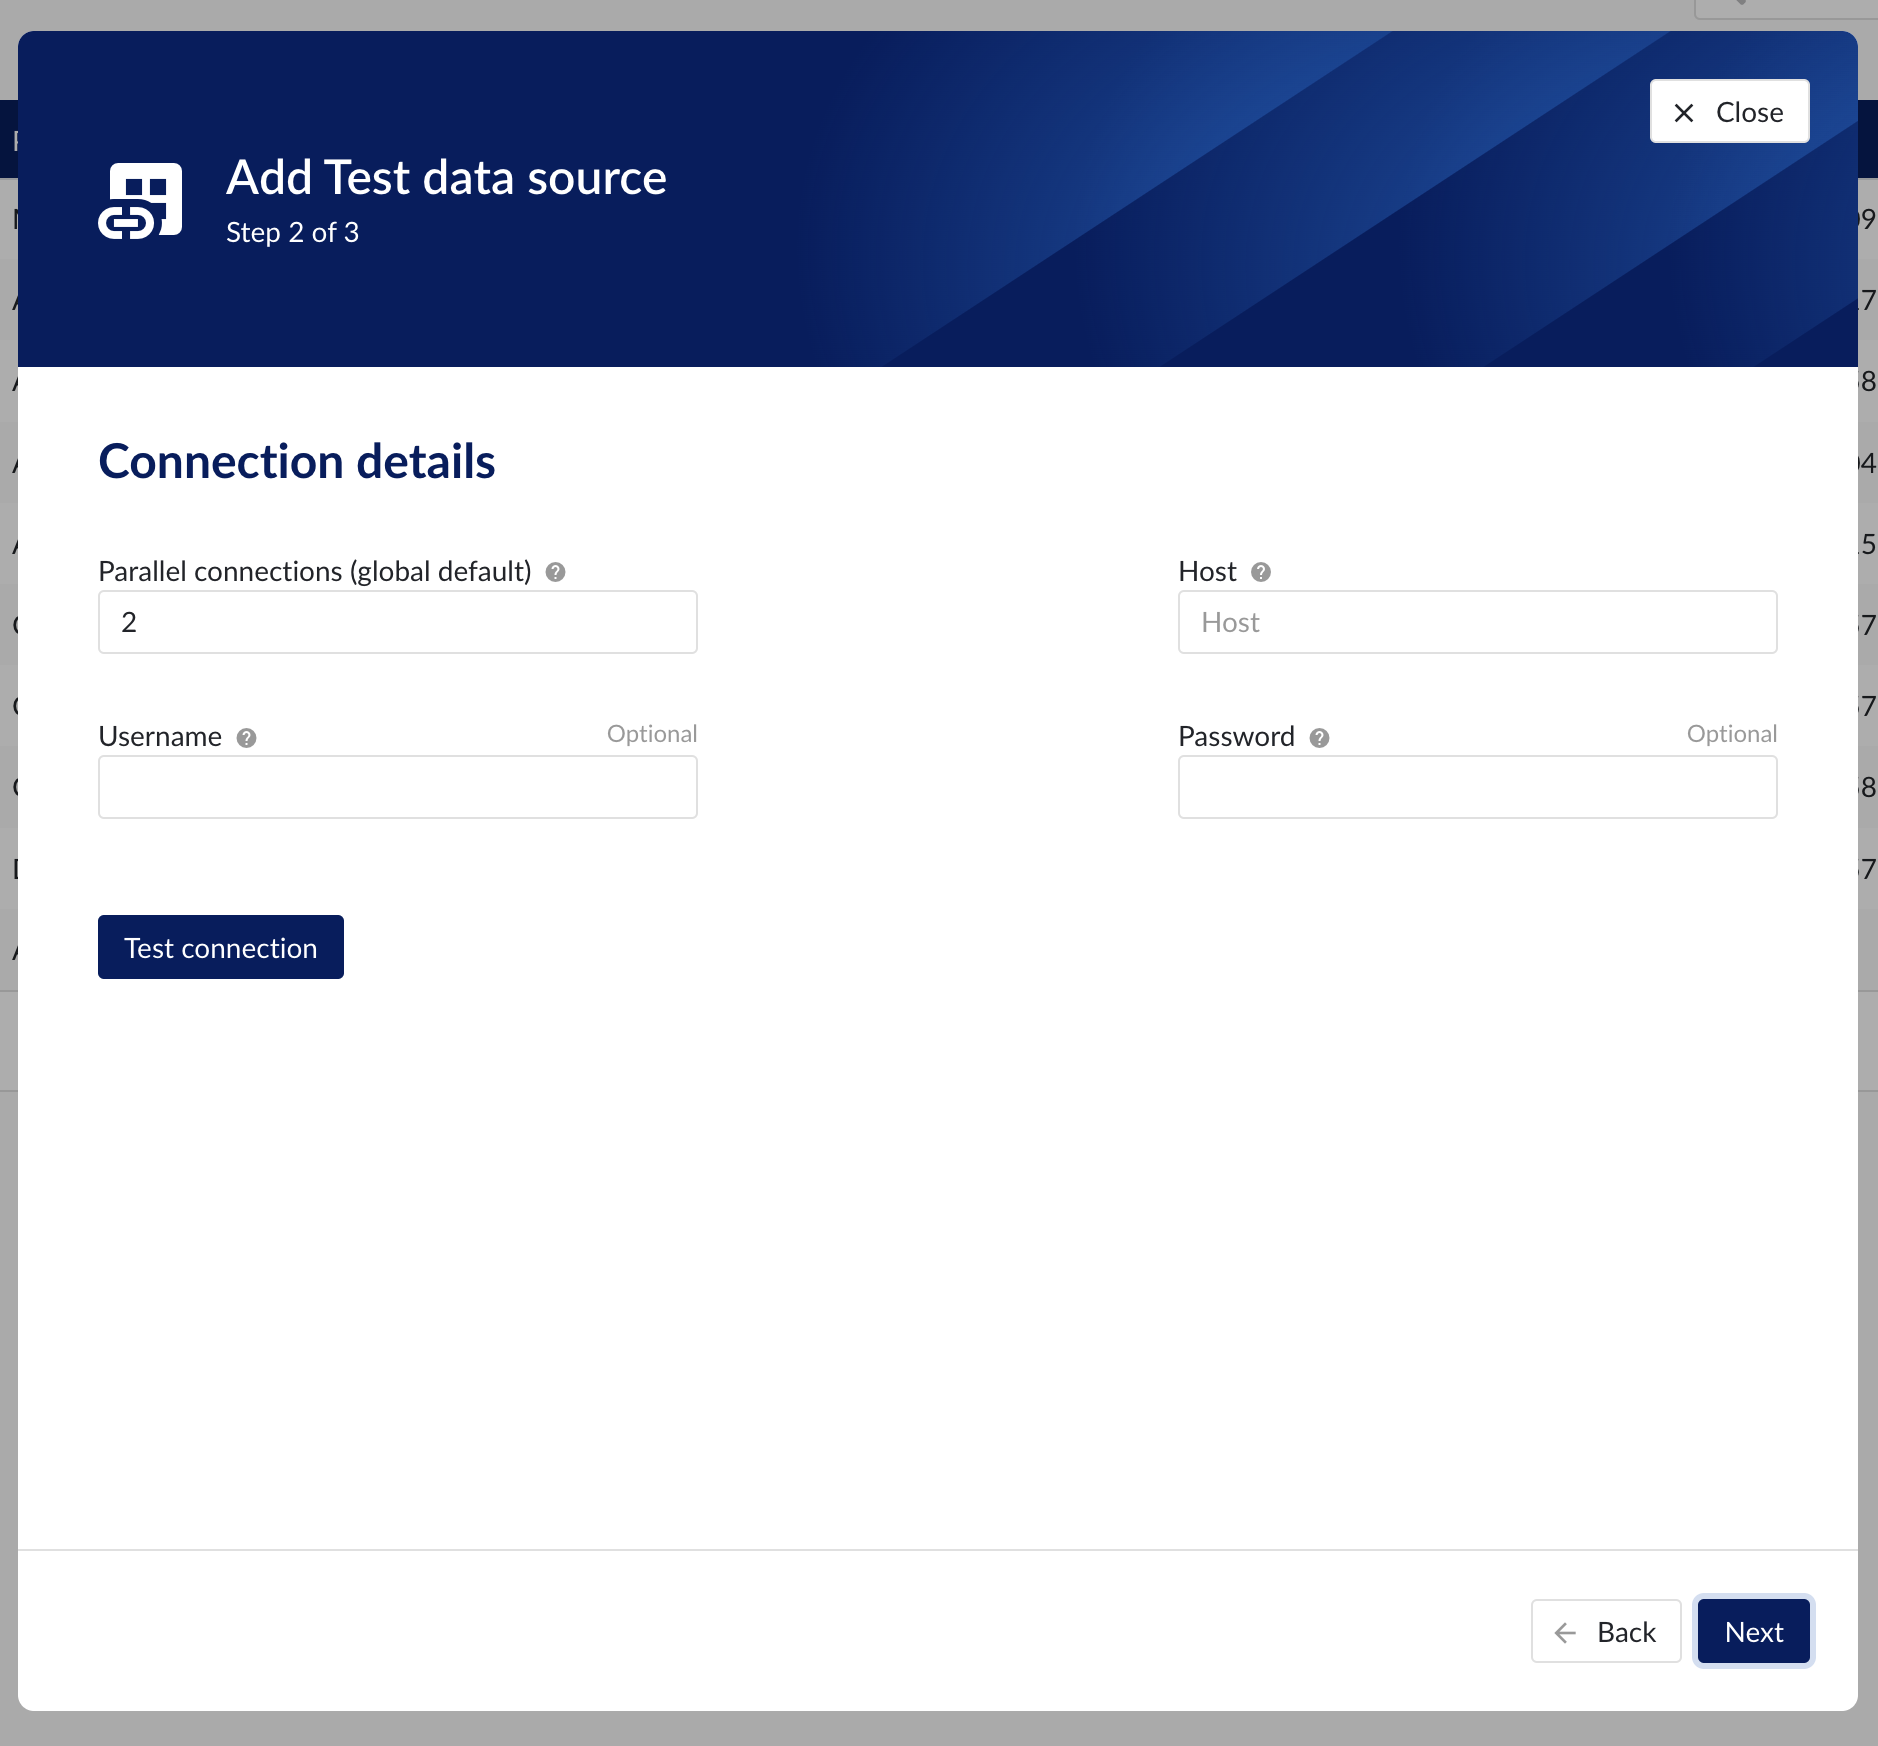
Connection details step in the datasource creation wizard
Time series details
Populate the fields on the Time series details step:
Prefix: you are free to choose prefixes. They are case insensitive but unique strings and have a maximum length of 5 characters. When synchronising a data source, all tag names of that data source will be prepended with the prefix to ensure tag name uniqueness in TrendMiner. Prefixes are optional but we highly recommend the provision of a prefix when connecting a data source to avoid duplicate tag names.
Tag filter: regular expression to be entered. Only tags with names that match this regular expression will be retained when creating tags (using the tag list query).
Examples:
Tag filter
Result
LINE.[1]+
Will make tags with 'LINE.1' in the name available but will exclude tags with 'LINE.3' in the tag name.
^(?:(?!BA:TEMP).).*$
Only excludes tag STARTING with BA:TEMP (so still keep test_BA:TEMP.1)
^\[pref\]PI.*$
Only syncs tags from a data source with prefix 'pref' and which start with 'PI'
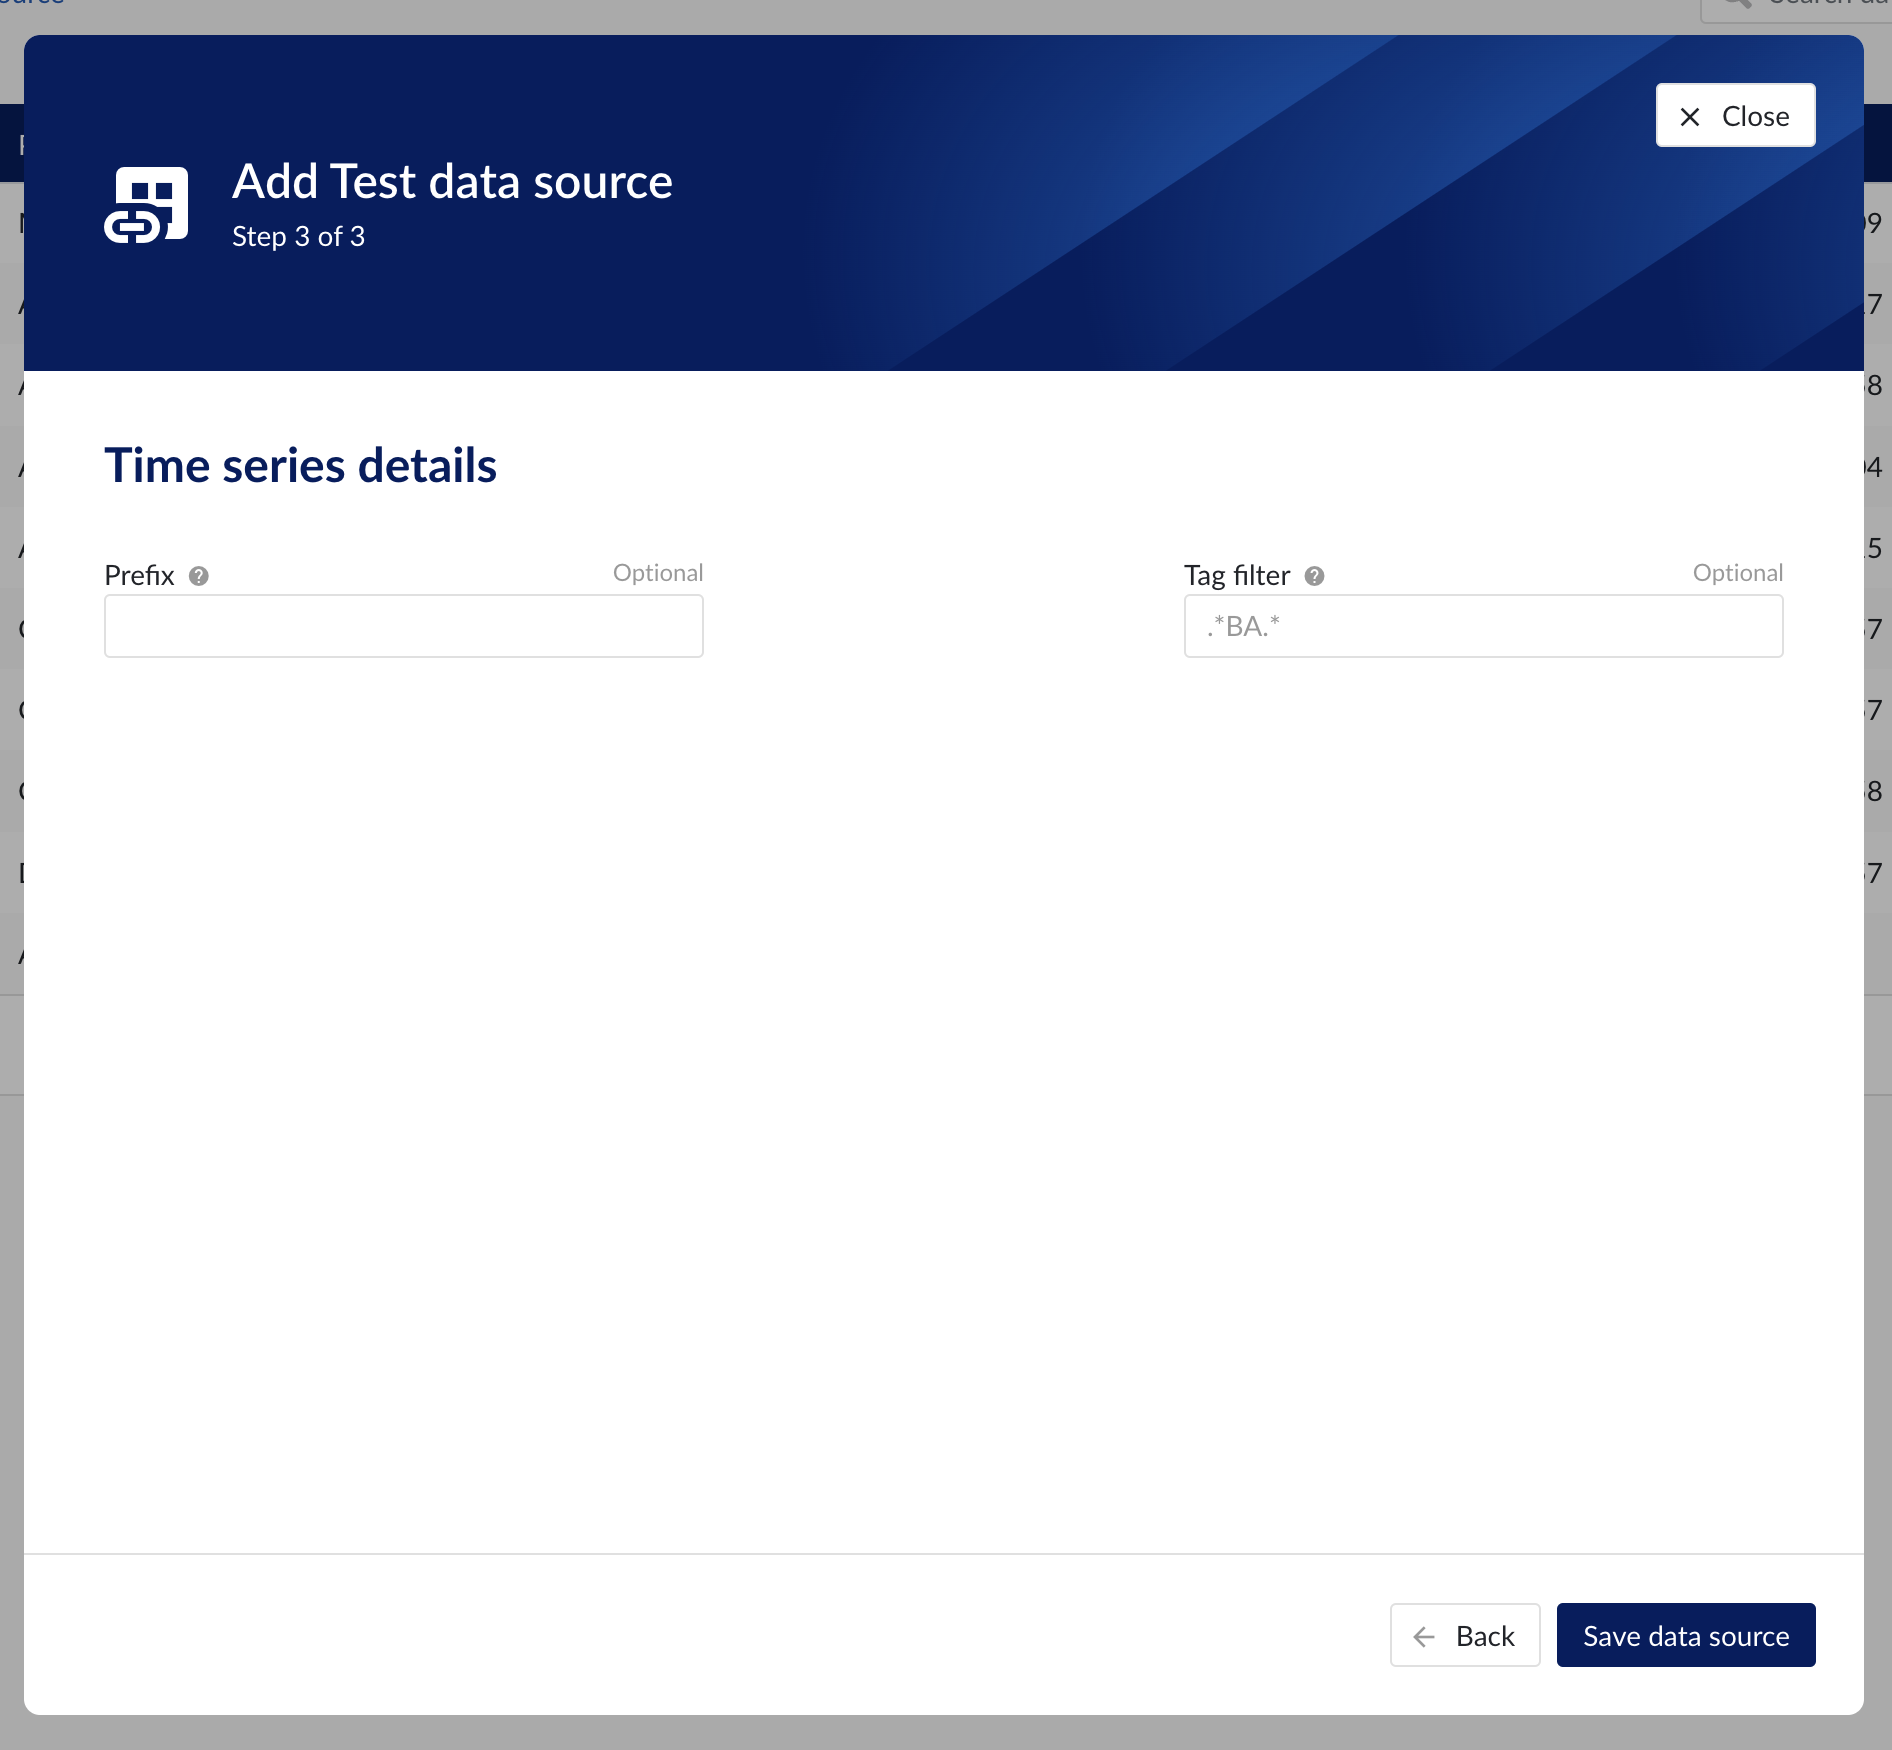
Time series details step in the datasource creation wizard
Asset details
The process of creating asset data source, is somewhat similar to the creation of time series data source, but fewer fields are required to fill in.
Database: name of the database to connect to.
Important
It is not permitted to add the same connection multiple times with asset capabilities enabled on both instances!
Asset tree permissions need to be managed in the asset permission section (ContextHub).
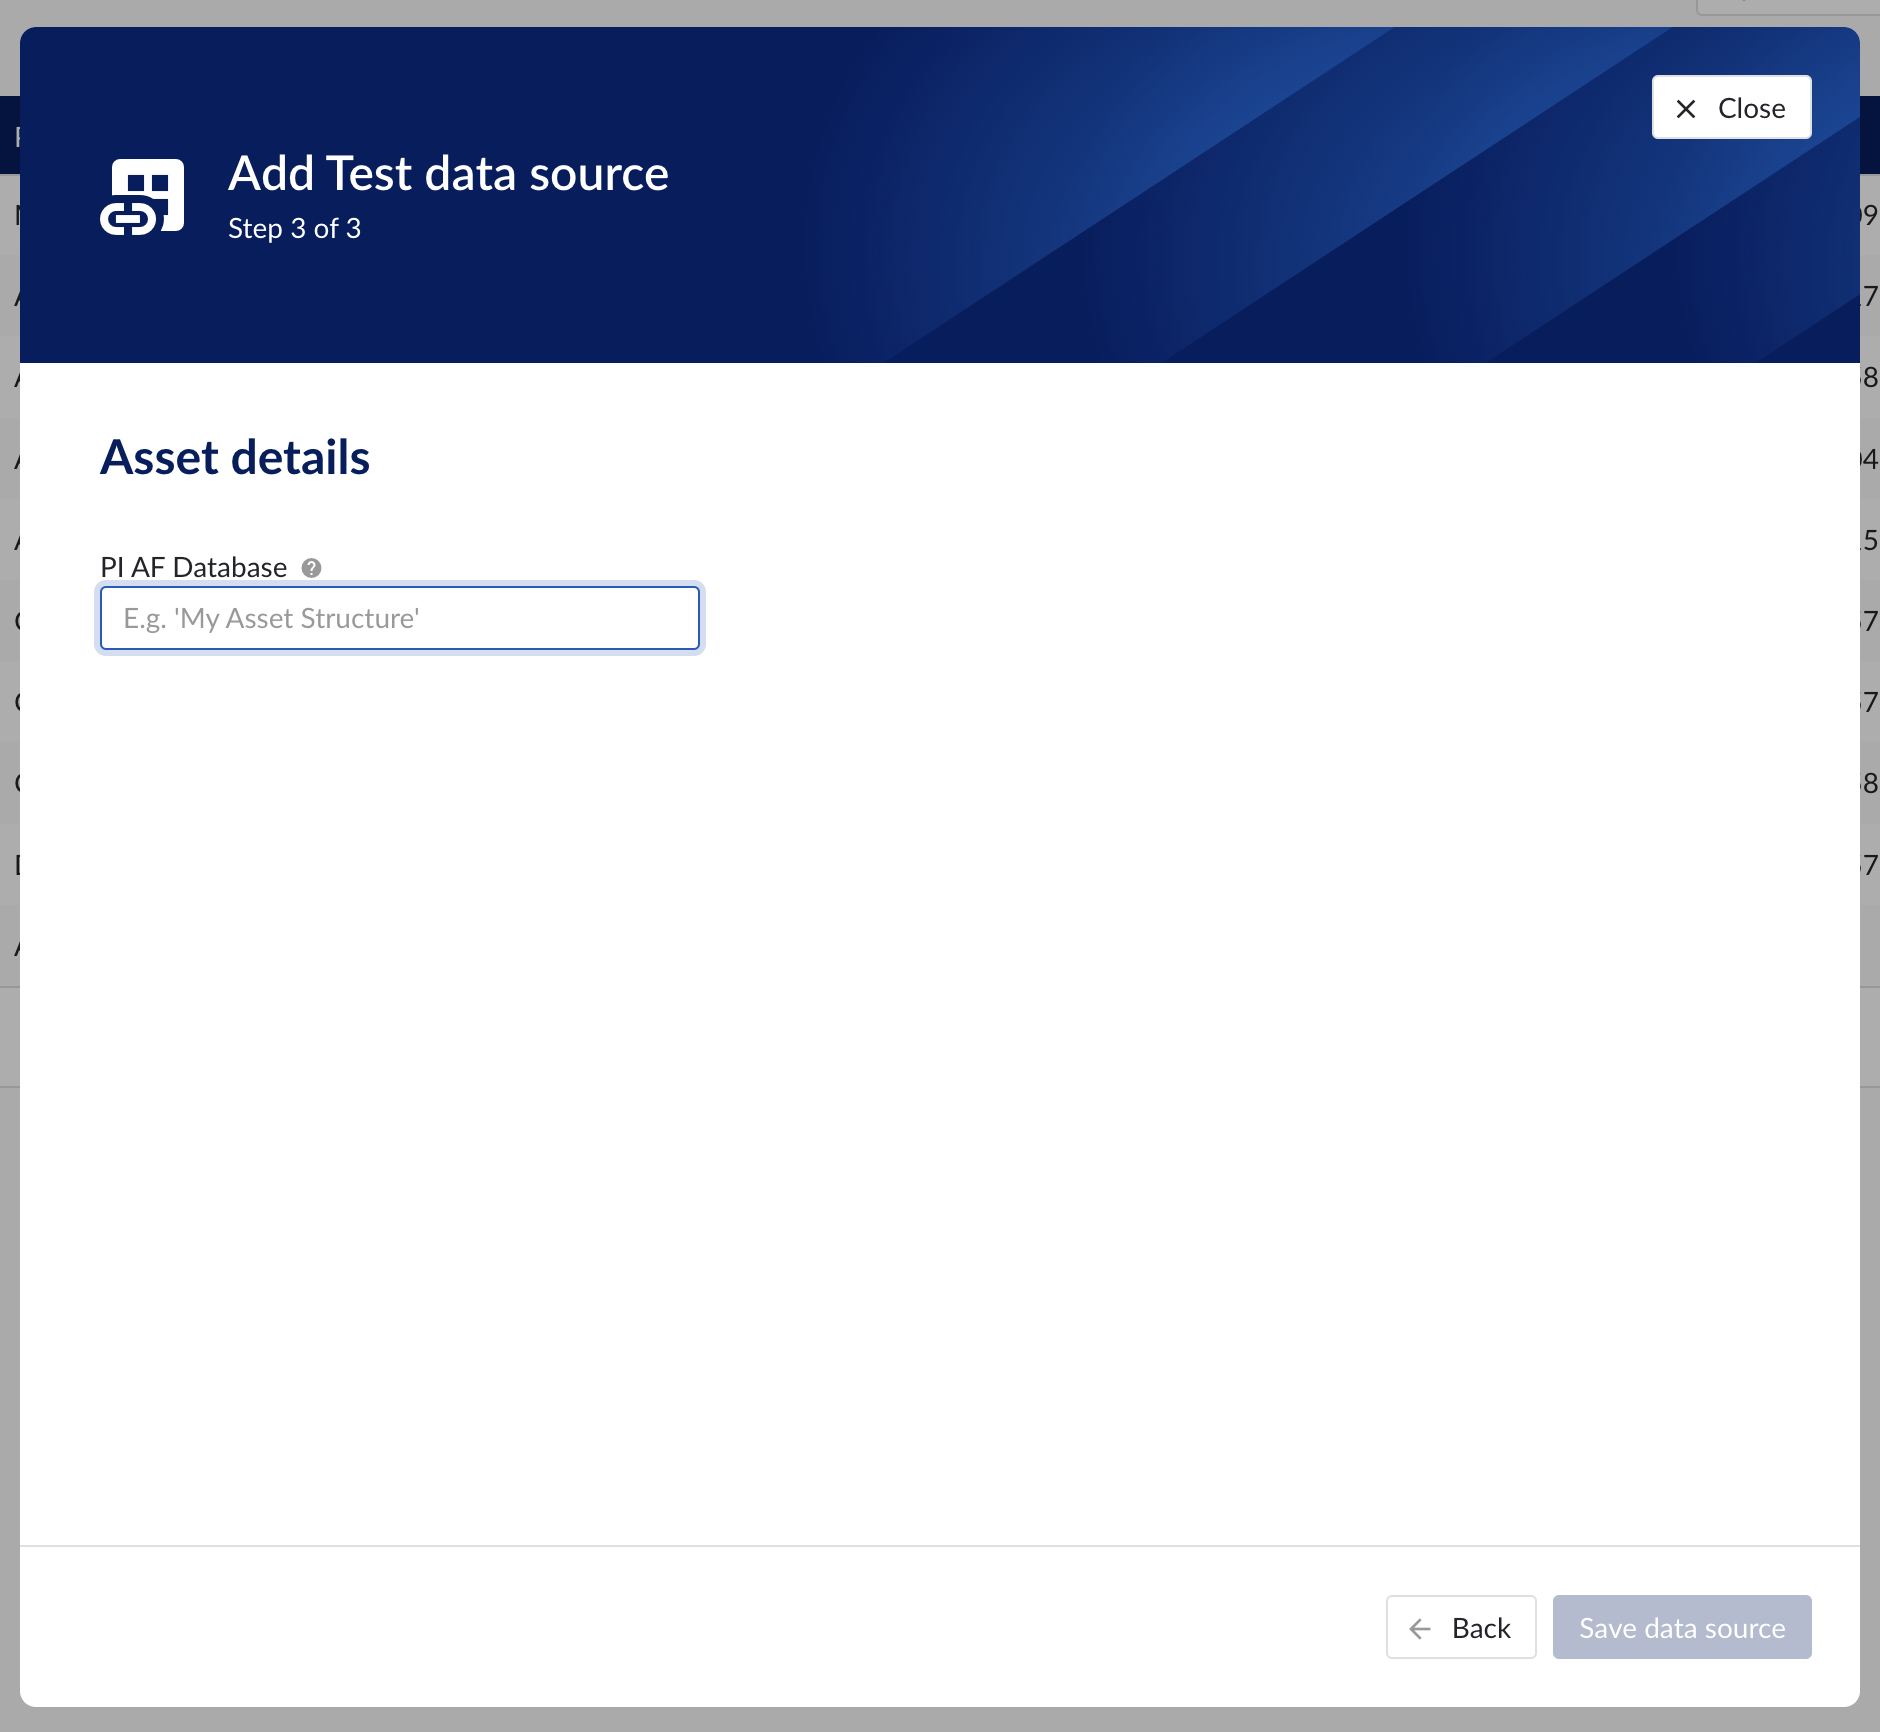
Asset details step in the datasource creation wizard
Context data
Context data sources are managed the same way as asset data sources. When a data source is context capable, the context capability checkbox can be checked, after which the correct database for context data needs to be specified.
Notice
Note
Context data synchronised from a data source in OSISoft PI will be related to asset data in TrendMiner based on the "referenced elements" on the PI event frames. The system will always attempt to relate the context item to the asset corresponding to the primary referenced element in PI (if it exists). Otherwise it will default to the first referenced element for which a corresponding asset is known in TrendMiner.
Important
It is not permitted to add the same connection multiple times with context capabilities enabled on both instances! This will result in the creation of duplicate context items.
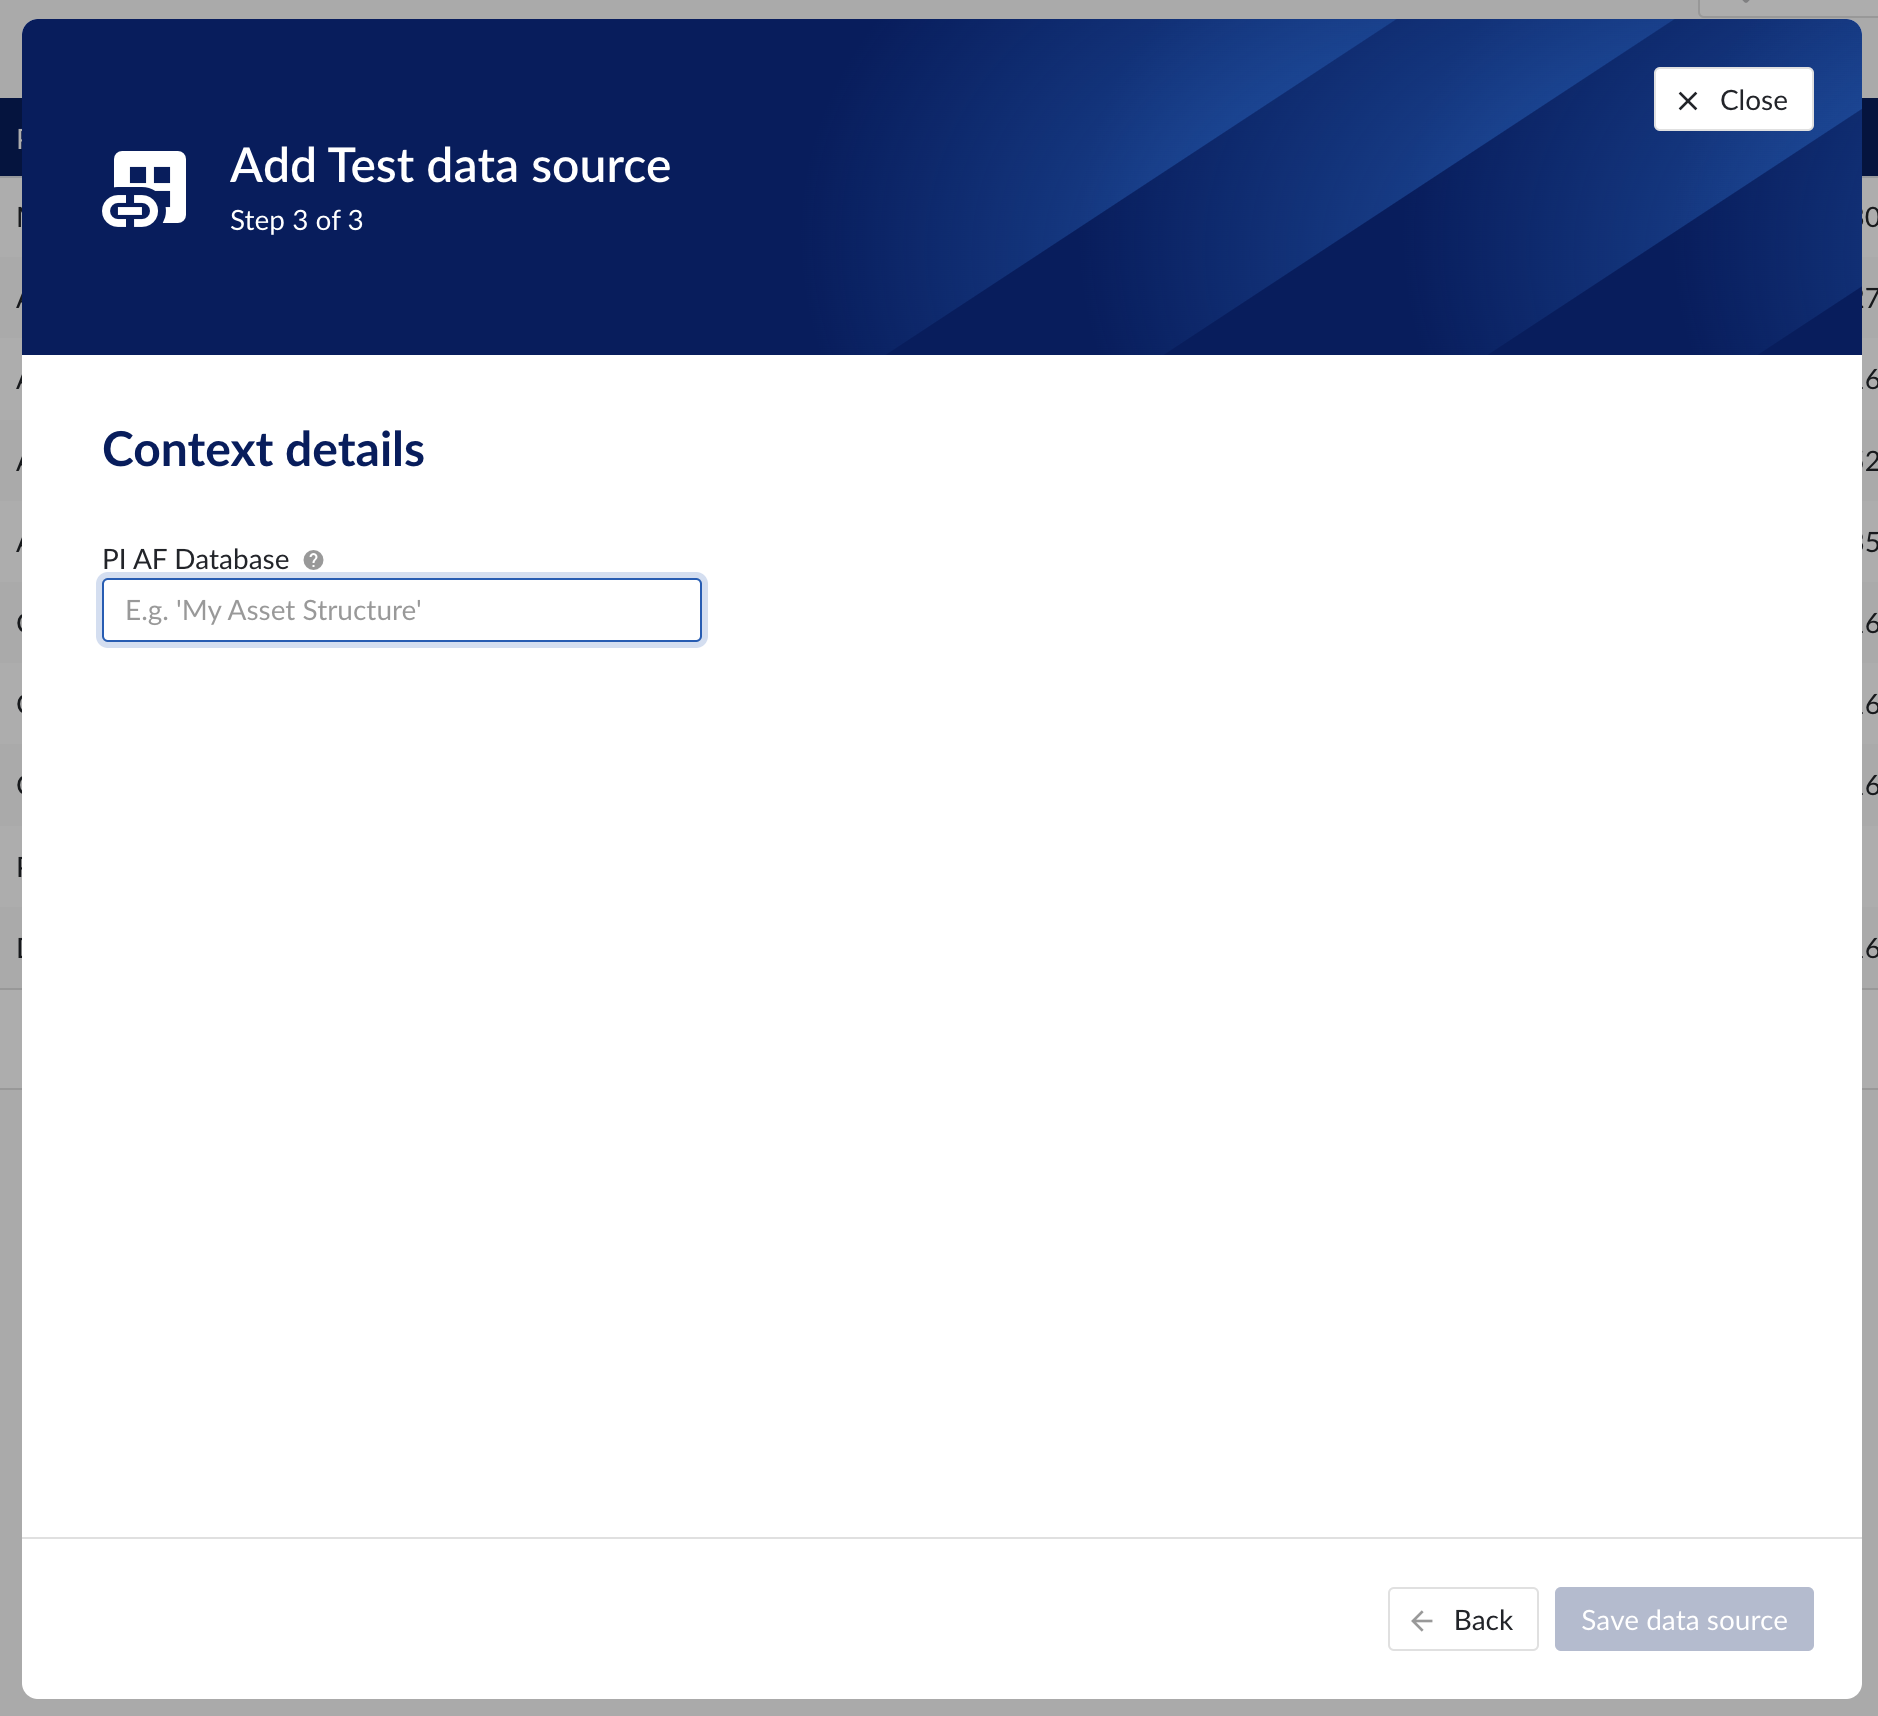
Context details step in the datasource creation wizard
Data source menu
As soon as a new data source (with time series capability) is successfully added, it will start syncing all the tags from the data source, and can be found in the Data source overview.
To manually synchronize the data source, simply:
Click on the data source of your choice within the data source overview table. Datasource details will open below the datasources overview table.
Click on Time series tab.
Click on "Refresh tag cache" button.

If a data source cannot be synced, the error feedback will be shown under 'Last synced' field.
For data sources which are successfully connected the 'Last synced' field in the data source details will show the last synced date and time and status 'Successful'. The last sync date and time will be updated when a manual sync is triggered or when TrendMiner synchronizes the tag cache for that data source, which happens automatically every 24 hours since the last refresh or service restart.
To edit the details of a data source, click on its name to open the datasource details tile below the overview table and then click on 'Edit' button. Datasource edit modal will appear.
It is prohibited to edit the prefix of an existing data source because it would break existing views, formulas, etc. All other fields can be updated after which the data source is synced again.
Other options available are:
Test connection (on Connection tab): this option will test the connection to the data source without triggering a sync and update the health status of the data source.
Delete: this option will remove the data source and all tags from this data source until it is connected again via a correctly configured connector.
When a data source is deleted, all tags from that data source will become unavailable immediately, as well as breaking views and calculations which depend on these tags. It is possible to restore these tags and dependent views and formulas by adding the data source again, using the exact same name and prefix via the same or alternate connector.
For more detailed information on how to add or configure a specific data source, open the detailed instructions which are linked on the connectivity overview pages.
How to connect to time series data sources?
Install a connector. If your connector is already connected, this step can be skipped.
In ConfigHub select the tab "Connectors".
Click "+ Add connector" and fill in the details of the connector.
In ConfigHub select the tab "Data sources".
Click "+ Add data source". Datasource creation modal will appear.

Fill out 'Data source details' step:
Name the data source.
Select the provider you would like to use. If the provider of your choice is not listed, this implies none of the connected connectors supports this data source type and you have to add a connector which does, or check your implementation in case you implemented your own custom connector.
A list of providers which TrendMiner supports out of the box can be found here.
Select the connector you want to use for connecting the data source via 'Connect via' dropdown (if the provider of your choice requires a connector). If the connector of your choice is not listed, this implies this connector does not support this provider and you have to select a different connector or check your implementation in case you implemented your own custom connector.
Make sure to select the "Time series" capability checkbox. If this checkbox is not visible, it means this provider does not support time series data. You can check which connectivity options TrendMiner supports out of the box here.

Each data source with time series capability has some basic configuration options like "Host", "Username", "Password", "Parallel connections" etc. More information about these parameters can be found in our user documentation.
Besides the basic configuration each data source can have some historian specific configuration and installation requirements which can be found via the links on the connectivity overview pages.