Security
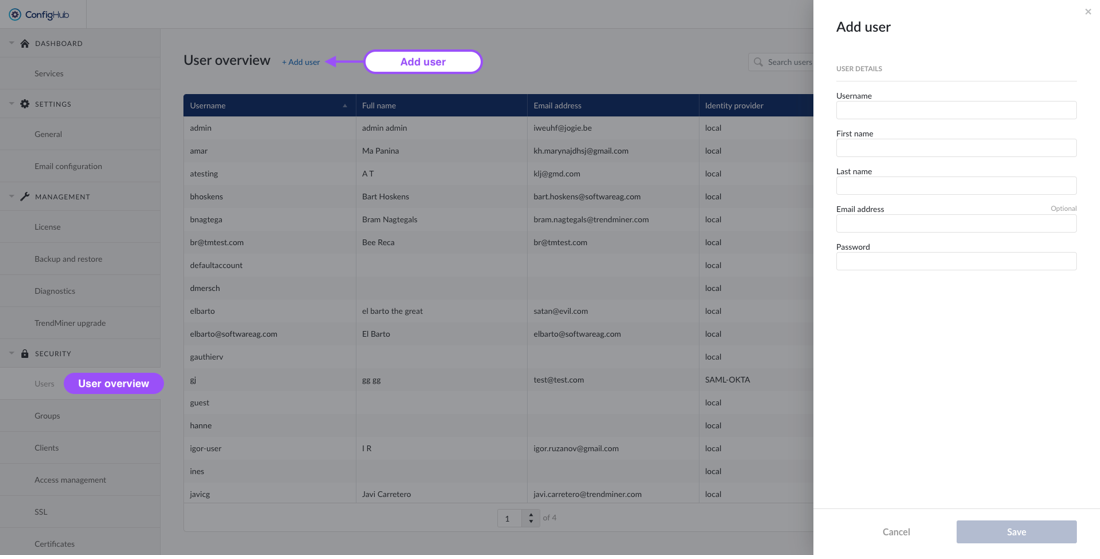
TrendMiner users can either exist locally or via an external Identity Provider. An overview of all users can be found under the "Security" section in ConfigHub.
The user overview shows the username, full name, email address and the identity provider. Specific users can be searched through via the top right search bar above the table.
Creating users
Only local users can be created via ConfigHub. In the case of an external Identity Provider (IdP), the users are synced instead and should be managed via the IdP.
To create users you will need to go to the user-menu under the "security" section. From there users can be added via the "+add user"-button.
Note
Usernames need to be unique and cannot be changed afterwards.
Password policy
When creating users locally, the password needs to adhere to the following rules:
Have a minimum length of 8 characters
Contain at least one uppercase character
Contain at least one lowercase character
Contain at least one digit
Contain at least one special character
Not have been recently used in the previous three passwords
Configuring User details
From the user overview an user can be clicked to see more detail in the side-panel. Here more options can be performed such as:
Editing user details (local users only)
Change passwords (local users only)
Change roles (e.g. give users admin rights)
Unlock the user after the user consecutively failed to enter his password correctly.
Delete the user from TrendMiner (local users only).
Configuring Roles for in User Details
2 roles are now available
System Administrator (full access to the platform)
Application Administrator (limit access to parts of the application)
Sins version 2024.R1 there is a new role added called “System Administrator”. The previous role called “Administrator” is renamed to “Application Administrator”.
The users having the role Administrator before will be automatically having the role “Application Administrator” to be able to keep working on the TrendHub screens, that require this specific access.
In case this user has the ‘admin’ username, the user will also receive the System Administrator Role
Warning
The “admin” username is the principle main admin user of the TrendMiner Platform. This user can't be deleted, and cannot be linked to any IDP provider. This user is kept local, in case recovery to ConfigHub is needed.
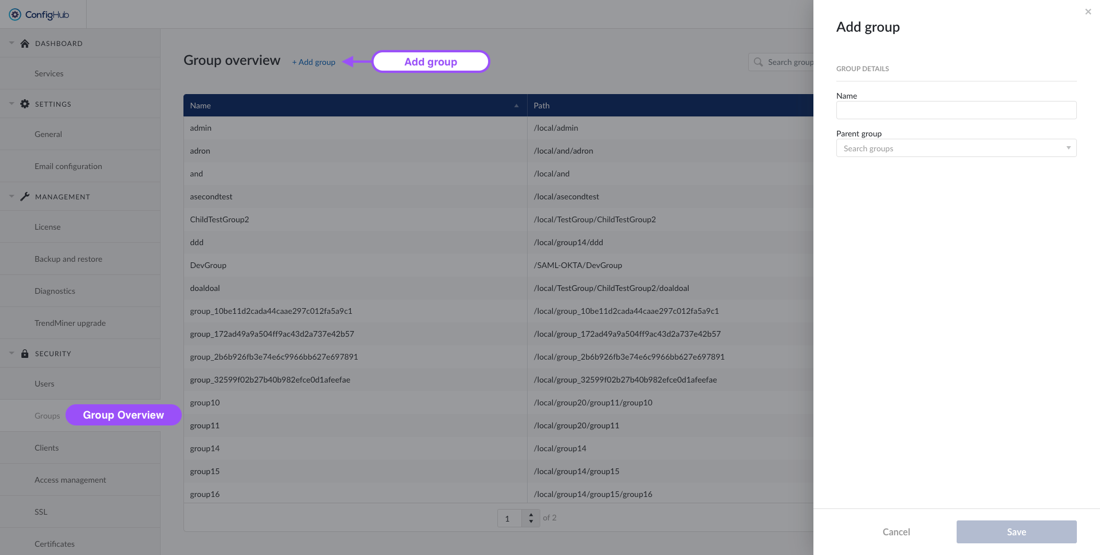
Group management allows the creation of a collection of users and other groups (i.e. nested groups). An overview of all existing groups can be found under the "Security"-section in ConfigHub.
The group overview shows the groupname and path of the groups so that it can be linked to its corresponding identity provider.
Specific groups can be searched through via the top right search bar above the table.
Creating Groups
Creating Groups is only allowed on a local level. In case of an external provider the groups are managed and synced into TrendMiner from the IdP itself.
It is possible to create local groups and assign users coming from LDAP or SAML or locally, to local groups and use access management to configure datasource access at group level.
To create a new group you will need to go to the groups-menu under the "security" section. From there groups can be added via the "+add group"-button.
Note
A group can have only one parent group.
Configuring Group details
From the group overview a group can be clicked to see more detail in the side-panel. Here more options can be performed such as:
Edit the name of a group
Delete the group
Add existing users/groups as member to that group
Note
These actions can only be done for Local Groups. Groups synced from an external IdP are non-editable and should be managed from the IdP itself.
Warning
Deleting a group will also delete all subgroups. A modal will be shown when this is the case. In case you want to keep the subgroups you will need to remove them first from the member list.
Creating Clients
TrendMiner allows the creation of a client and secret in order to generate a token to be used in external API calls.
To create a new client you will need to go to the clients-menu under the "security" section. From there clients can be created via the "+add client"-button.
You will be asked to enter a name (client ID) for your client which will be used for external references. Once the client is created you can click on it to:
Edit the client ID
Show the secret of the client
Generate a new secret
Delete the client
Note
Regenerating a secret will invalidate your old secret and tokens. This action cannot be undone.
Clients need to be added to a domain/entity in the Access management menu just as users/groups to allow access to the data.
Fetch Token
A token can be fetched via curl or any other means. An example is shown below.
Note
A new token needs to be fetched when the token expires after 5 minutes.
Template:
curl --request POST \
  --url 'https://YOUR_DOMAIN/oauth/token' \
  --header 'content-type: application/x-www-form-urlencoded' \
  --data grant_type=client_credentials \
  --data client_id=YOUR_CLIENT_ID \
  --data client_secret=YOUR_CLIENT_SECRET
Example:
curl --request POST \
     --url 'https://trendminer.example.net/auth/realms/trendminer/protocol/openid-connect/token' \
     --header 'content-type: application/x-www-form-urlencoded' \
     --data grant_type=client_credentials \
     --data client_id=external-client \
     --data client_secret=35c07824-5e11-40f5-88f0-0b578b940b43
Response token:
{
 "access_token":
"eyJhbGciOiJSUzI1NiIsInR5cCIgOiAiSldUIiwia2lkIiA6ICJwcXZ1UXBpQkpiOGpRMVZQcU9PMDdFNDFCb25IRGxNZ01YY0NockZJbkhFIn0.eyJleHAiOjE2MzYwMjkzNDYsImlhdCI6MTYzNjAyOTA0NiwianRpIjoiMWQzNWUyNGQtMGQ4Zi00MWI1LThkYzgtZTYzZmIxZDk3MTEzIiwiaXNzIjoiaHR0cHM6Ly90bS1waXBlbGluZS1wbGVhc3VyZTMxLnRyZW5kbWluZXIubmV0L2F1dGgvcmVhbG1zL3RyZW5kbWluZXIiLCJhdWQiOiJhY2NvdW50Iiwic3ViIjoiMTRlODRmODUtZjc5YS00YjIyLTg4MzktYWM5OWRkOWQzY2U1IiwidHlwIjoiQmVhcmVyIiwiYXpwIjoiZXh0ZXJuYWwtY2xpZW50IiwiYWNyIjoiMSIsInJlYWxtX2FjY2VzcyI6eyJyb2xlcyI6WyJkZWZhdWx0LXJvbGVzLXRyZW5kbWluZXIiLCJvZmZsaW5lX2FjY2VzcyIsInVtYV9hdXRob3JpemF0aW9uIiwidXNlciJdfSwicmVzb3VyY2VfYWNjZXNzIjp7ImV4dGVybmFsLWNsaWVudCI6eyJyb2xlcyI6WyJ1bWFfcHJvdGVjdGlvbiJdfSwiYWNjb3VudCI6eyJyb2xlcyI6WyJtYW5hZ2UtYWNjb3VudCIsIm1hbmFnZS1hY2NvdW50LWxpbmtzIiwidmlldy1wcm9maWxlIl19fSwic2NvcGUiOiJlbWFpbCBwcm9maWxlIiwiY2xpZW50SWQiOiJleHRlcm5hbC1jbGllbnQiLCJjbGllbnRIb3N0IjoiMTAuMzIuMTM1LjE1IiwiZW1haWxfdmVyaWZpZWQiOmZhbHNlLCJjcmVhdGVkRGF0ZSI6MTYzNjAyODY2NTMxMCwicm9sZXMiOlsiZGVmYXVsdC1yb2xlcy10cmVuZG1pbmVyIiwib2ZmbGluZV9hY2Nlc3MiLCJ1bWFfYXV0aG9yaXphdGlvbiIsInVzZXIiXSwicHJlZmVycmVkX3VzZXJuYW1lIjoic2VydmljZS1hY2NvdW50LWV4dGVybmFsLWNsaWVudCIsImNsaWVudEFkZHJlc3MiOiIxMC4zMi4xMzUuMTUifQ.GtGGgH7wqeqbEJuLfuGamps2nTqxHLDtz5plQ5IewZN6RTKnPTxh3oWlBshr_3lBVYaQHkjw0aXZc7K8dxfttXwQGQnxn6ijt_j2NFdqPVqlwODFWhwqGTtvTQXYESlghqz_8-k NHky9uFgd5lvZxdy6FGnOJcG6PmeeRa9lwZc_6hpwNGCEeH_9TKPM2WaiIs0f9sFoMlOSqOGZrqPrbxjzsCr0leVxptvLwSIw6RMOlDZ9IonBglpoL6mhpzTPtvZSGXQ-BL0Lcef2G_xY3A__etLM5U5bH44Ey-vwMGCYJ0ZWo7GsSPCOQYdwcGJOUoZ0Yvy0l2kNuazI1WC2g",
 "expires_in": 300,
 "refresh_expires_in": 0,
 "token_type": "Bearer",
 "not-before-policy": 1571391000,
"scope": "email profile" 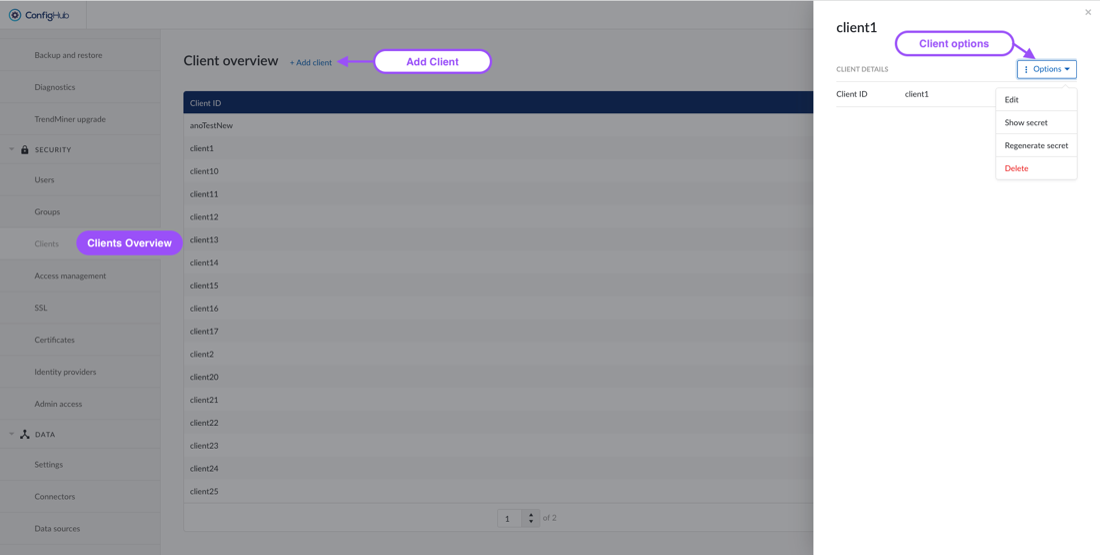
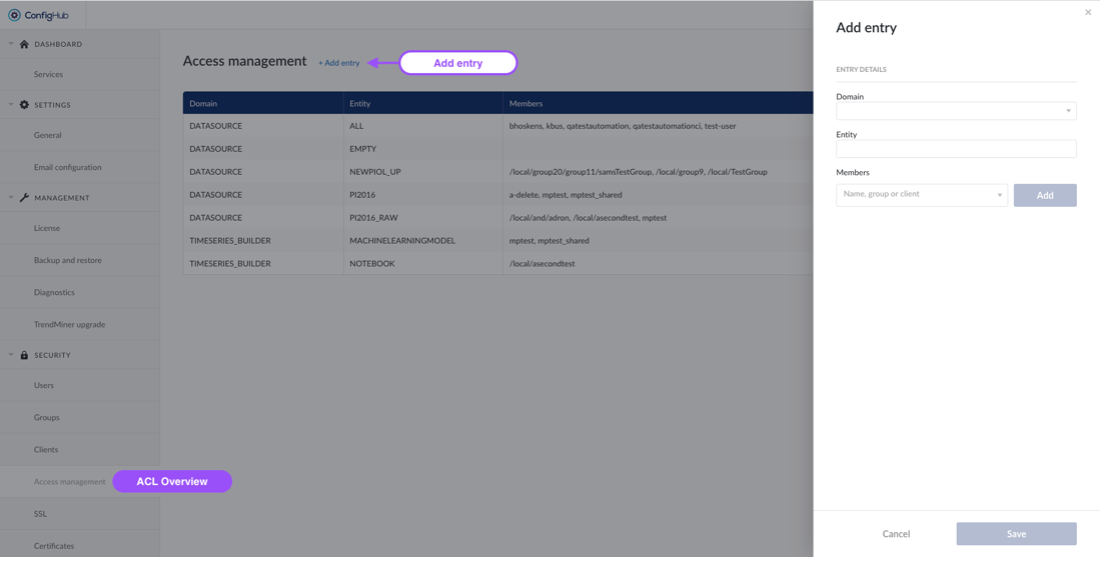
The Access Management menu allows you to manage access permissions centrally per domain. Opening the menu returns an overview of all set access permissions.
To create a new access permission, click the “Add entry” button situated at the top of the page and fill in the necessary details in the pop-up:
Domain: DATASOURCE or TIMESERIES_BUILDER
Entity:
Using the DATASOURCE domain: Enter the name of the Historian Connection, as configured in TrendMiner or use "ALL" to indicate the collection of all Historian Connections).
Using TIMESERIES_BUILDER domain: add the "MACHINELEARNINGMODEL" and/or "NOTEBOOK" Entity.
Members: Users, groups or clients you want to grant access permission for the domain.
To edit an existing access permission, click on the entry you want to edit and click “Edit” in the options menu.
To remove an existing access permission, click on the entry you want to delete and click “Delete” in the options menu.
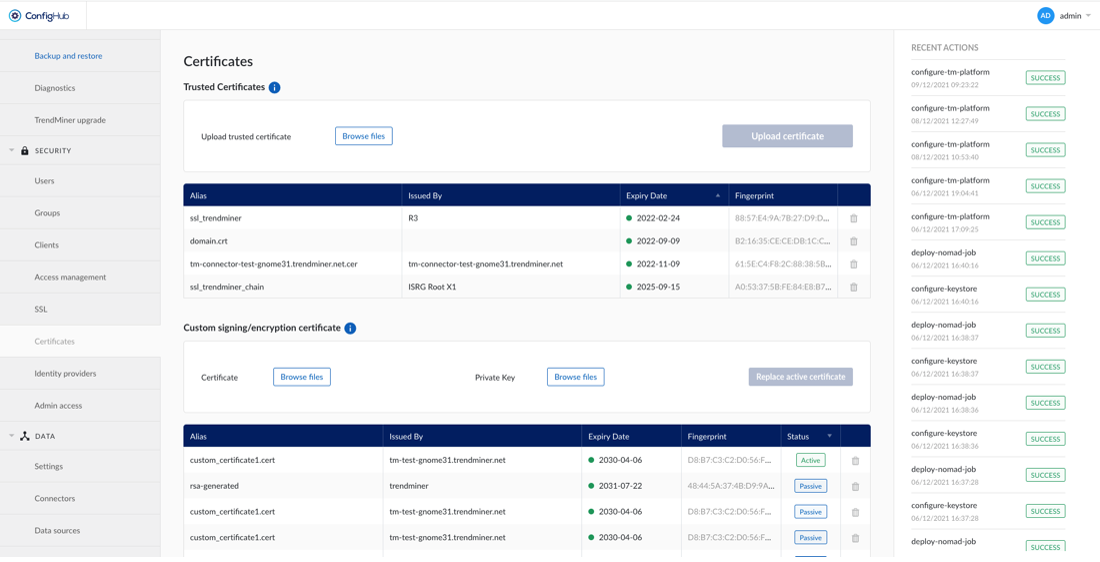
If TrendMiner needs to communicate with SSL enabled services (Plant Integrations, LDAP, ...) that are using self signed certificates or certificates issued by an internal CA, it's not possible to verify the trust chain of these certificates.
To be able to verify the trust chain please upload the root CA and optionally one or multiple intermediate CA certificates. The same is needed when using SAML with certificates issued by an internal CA.
Detailed information on identity providers can be found here.