Troubleshooting
General troubleshooting information
To troubleshoot the TrendMiner PI Vision plugin, it is often required to look into the browser's developer tools, such as the console or the network tab. If one of the solutions in the troubleshooting list refers to 'open the console' or 'open the network tab', these steps can be followed to do so. The shortcut for a lot of browsers is normally the key 'F12'.
For Firefox and Chrome on Windows and Linux 'Ctrl + Shift + i' should also work.
For Firefox and Chrome on MacOS Command + Option + i' should also work.
Manual steps for some popular browsers are linked below.
Chrome
Firefox
Internet Explorer 11
Left-click on the cogwheel in the top right of the browser window and click on 'F12 Developer Tools'.
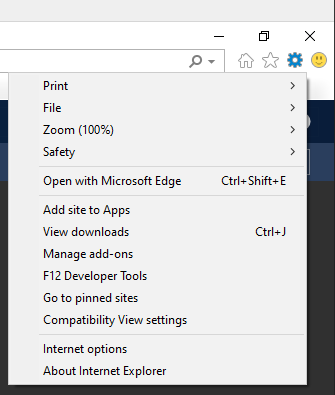
This will open the developer tools:

Plugin is not visible
If the plugin is not visible, meaning the TrendMiner icon does not appear as a new symbol after following the installation steps, please confirm PI Vision is not currently running in debug mode. Navigate to the PI Vision web.config file and look for the following line:
<compilation debug="true" targetFramework="x.x">
Change this line to the following (do not change the value for targetFramework, only change the debug attribute to false):
<compilation debug="false" targetFramework="x.x">
When this is done, open a new PI Vision view to confirm the plugin is visible. Typically, no restart of the IIS server is required.
Blocked by CORS policy
Quick solution
If PIVision is visited over 'http://', try to visit it over 'https://'.
Problem
When clicking on a correctly configured 'Open in TrendHub' button, nothing happens. When looking at the console it shows an error.
The error shown looks different for each browser:
Chrome

Firefox
Internet Explorer 11
Solution
Make sure that the URL exists in the configuration of PI Web API.
To see which URL or 'origin' is allowed, the following link can be visited:
https://PI_SERVER/piwebapi/system/configuration
PI_SERVER should be replaced by the server on which PI is installed. This is the part before '/PIVision' of the URL on which PI Vision can be viewed.
E.g. If http://my-company.something-else.com/PIVision is used to visit PI Vision, the URL for the PI Web API would be https://my-company.something-else.com/PIWebAPI.
Anmerkung
Depending on how the server is configured, this might show a screen that says 'Insecure connection'.
When visiting this URL, a response will be shown including the 'CorsOrigins' (see following figure).
The 'CorsOrigins' list should contain the 'origin' on which PI Vision is visited.
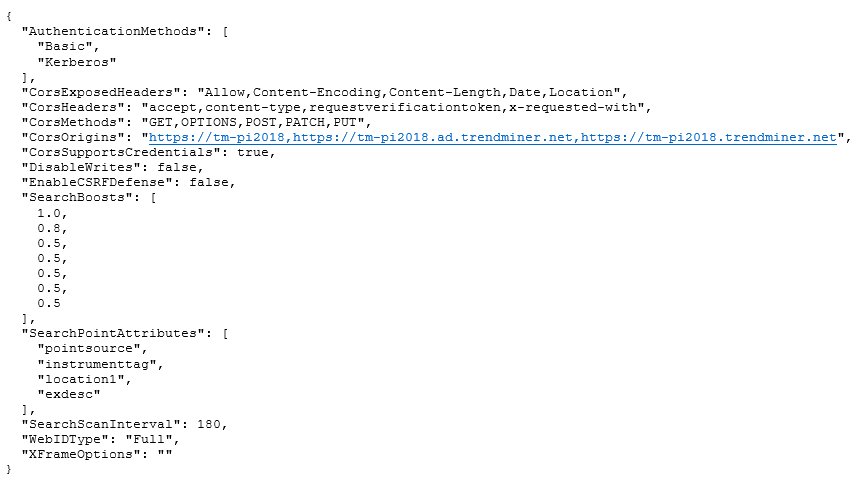
E.g. http://tm-pi2018.ad.trendminer.net/PIVision is used, the 'origin' in this case is 'http://tm-pi2018.ad.trendminer.net', which is not in the list of 'CorsOrigins'. However 'https://tm-pi2018.ad.trendminer.net' is in the list of 'CorsOrigins'.
Content Security Policy (CSP)
Starting with the 2020 release of PI Vision, stricter CSP policies were introduced. The TrendMiner plugin relies on 2 local libraries to be loaded (part of the installation files) to ensure browser compatibility.
To safely permit these 2 libraries to be loaded, add the following key entry to your PI Vision web.config file:
<add key="ScriptSrcPolicy" value="'sha256-gek/Vuej/Jl9F6njjNGk4Dn9tmM0DlWFmeuT+7qXYTw=' 'sha256-1mqegnFGx8//91ISAydSFyNS3J7Kge/j/0E+ueAI9zo='" />
Debug mode
Debug mode should be disabled, otherwise, the piwebapi script isn’t loaded and our plugin does not work.
Steps to disable debug:
Use the file explorer to go to the PI Vision installation folder. In the navigation bar type in %pihome64%, this will open up the PI Vision directory. e.g. C:\Program Files\PIPC
From there navigate to the folder PIVision
Edit the web.config file to change the compilation tag, under the system.web section: <compilation debug=“false” targetFramework=“4.8”/>
Save the file and refresh PI Vision in the browser